crwdns2933423:0crwdne2933423:0

Desmontaje de Jura Capresso IMPRESSA J5

crwdns2931529:0crwdnd2931529:0crwdnd2931529:0crwdnd2931529:02crwdnd2931529:0crwdne2931529:0

crwdns2936315:0crwdne2936315:0
crwdns2936331:0crwdne2936331:0
crwdns2931653:010crwdne2931653:0
Jura Capresso IMPRESSA J5 Teardown: crwdns2935265:00crwdnd2935265:01crwdnd2935265:03crwdne2935265:0 Jura Capresso IMPRESSA J5 Teardown: crwdns2935265:00crwdnd2935265:02crwdnd2935265:03crwdne2935265:0 Jura Capresso IMPRESSA J5 Teardown: crwdns2935265:00crwdnd2935265:03crwdnd2935265:03crwdne2935265:0
  • You can do this step before or after you remove the top.

  • Careful, it is easily broken! (I re-attached mine tastefully with tape, having broken the attachment points. ;o) )

  • Take a piece of tape, preferably painters tape, and make a small tape T-handle on the rear Jura badge. A small piece of rubber might work or you might be able to get it off with just clean fingers and skin friction.

  • Carefully push in and twist it to the left ~1/10 of a turn. Then, when you feel that it has come loose, pull it gently out to remove it. It is held in place by little lugs and pressure tangs.

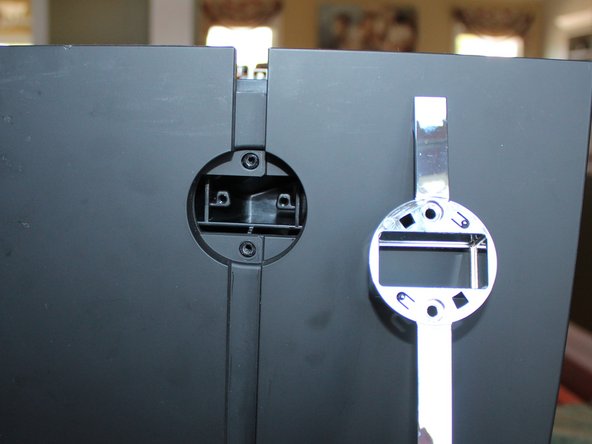
  • After the rear Jura badge has been removed, behind it you will find two T15 Torx screws marked with red circles in the second picture. They must be removed.

  • You can then gently wiggle free the vertical plastic chrome piece that is on the rear - pull out and set that aside.

Puedes hacer este paso antes o después de quitar la parte superior.

¡Cuidado, se rompe fácilmente! (Yo volví a colocar la mía con cinta adhesiva, después de haber roto los puntos de sujeción. ;o) )

Toma un trozo de cinta, preferiblemente cinta de pintor, y haz una pequeña manija en forma de T en la insignia trasera de Jura. Un pequeño trozo de goma podría funcionar o podrías sacarla con solo los dedos limpios y la fricción de la piel.

Empújala con cuidado y gírala hacia la izquierda aproximadamente 1/10 de vuelta. Luego, cuando sientas que se ha soltado, sácala con cuidado para quitarla. Se mantiene en su lugar mediante pequeñas lengüetas y lengüetas de presión.

Una vez que hayas quitado la insignia trasera de Jura, detrás de ella encontrarás dos tornillos Torx T15 marcados con círculos rojos en la segunda imagen. Debes quitarlos.

Luego puedes soltar suavemente la pieza de plástico cromada vertical que está en la parte trasera, sácala y déjala a un lado.

crwdns2944171:0crwdnd2944171:0crwdnd2944171:0crwdnd2944171:0crwdne2944171:0