crwdns2933423:0crwdne2933423:0

Smontaggio iPhone 12 e iPhone 12 Pro

crwdns2936315:0crwdne2936315:0
crwdns2936321:0crwdne2936321:0
crwdns2931653:019crwdne2931653:0
iPhone 12 and 12 Pro Teardown: crwdns2935265:00crwdnd2935265:01crwdnd2935265:03crwdne2935265:0 iPhone 12 and 12 Pro Teardown: crwdns2935265:00crwdnd2935265:02crwdnd2935265:03crwdne2935265:0 iPhone 12 and 12 Pro Teardown: crwdns2935265:00crwdnd2935265:03crwdnd2935265:03crwdne2935265:0
  • The only seam to be found is where the rubber meets the metal, making that the obvious entry point.

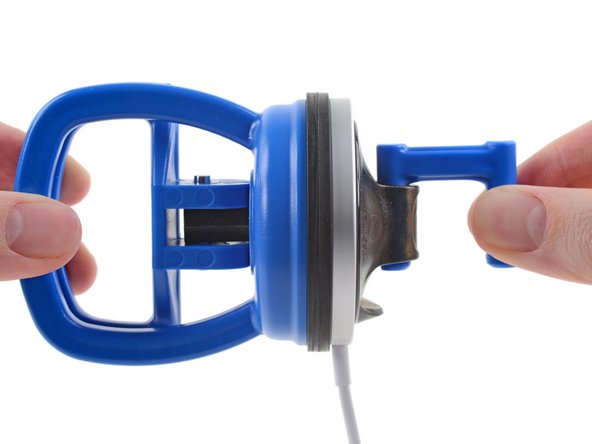
  • Optimistically, we blast it with some heat in order to soften the adhesive which, presumably, holds this thing together. Then we attach two perfectly-fitting suction cups, one to either side, and start tug-of-warring.

  • The white cover material on the charging surface starts to stretch slightly, but the actual gap doesn’t budge. (Sometimes we're too optimistic.)

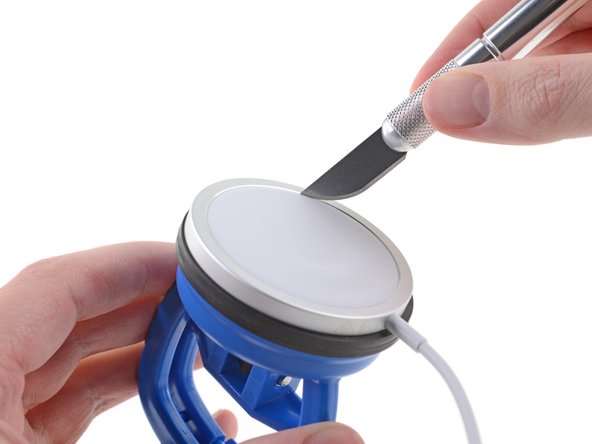
  • So, under the knife it goes! Some persuasion from our razor knife gets us past the white cover, between the plastic and metal underneath, where we can start prying.

L'unico punto di giunzione che si può trovare è quello dove la gomma incontra il metallo, e quindi ovviamente il punto di accesso è qui.

Con un certo ottimismo, applichiamo del calore per poter ammorbidire l'adesivo che, presumibilmente, tiene insieme questo aggeggio. Quindi attacchiamo due ventose perfettamente aderenti, una su ciascun lato, e iniziamo il braccio di ferro.

Il materiale bianco di copertura della superficie di ricarica inizia a deformarsi lievemente, ma non appare alcuna fessura (alcune volte, siamo troppo ottimisti).

E quindi, vai con il coltello! Un po' di persuasione da parte della nostra lama affilata ci fa superare la cover bianca e arrivare tra la plastica e il metallo sottostante dove iniziamo a far leva.

crwdns2944171:0crwdnd2944171:0crwdnd2944171:0crwdnd2944171:0crwdne2944171:0