crwdns2933423:0crwdne2933423:0

Sustitución de las Tiras Adhesivas del iMac Intel 27" 2012-2019

crwdns2931529:0crwdnd2931529:0crwdnd2931529:0crwdnd2931529:04crwdnd2931529:0crwdne2931529:0

crwdns2936315:0crwdne2936315:0
crwdns2936331:0crwdne2936331:0
crwdns2931653:017crwdne2931653:0
iMac Intel 27" 2012-2019 Adhesive Strips Replacement: crwdns2935265:00crwdnd2935265:01crwdnd2935265:03crwdne2935265:0 iMac Intel 27" 2012-2019 Adhesive Strips Replacement: crwdns2935265:00crwdnd2935265:02crwdnd2935265:03crwdne2935265:0 iMac Intel 27" 2012-2019 Adhesive Strips Replacement: crwdns2935265:00crwdnd2935265:03crwdnd2935265:03crwdne2935265:0
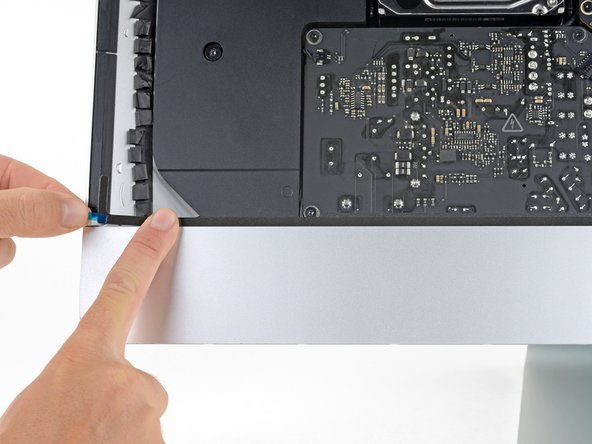
  • Repeat the previous steps for the bottom left adhesive strip (strip 26), aligning and placing it along the bottom left edge of the iMac.

  • The strip should be positioned such that the L-bend sits next to the left vertical adhesive. The L-bend should not overlap the left vertical adhesive.

  • Once you've applied all the adhesive strips, the iMac should look as shown in the second photo.

Repite los pasos anteriores para la tira adhesiva inferior izquierda (tira 26), alineándola y colocándola a lo largo del borde inferior izquierdo del iMac.

La tira debe colocarse de manera que la curva en L quede junto al adhesivo vertical izquierdo. La curva en L no debe superponerse al adhesivo vertical izquierdo

Una vez que hayas aplicado todas las tiras adhesivas, el iMac debería verse como se muestra en la segunda foto.

crwdns2944171:0crwdnd2944171:0crwdnd2944171:0crwdnd2944171:0crwdne2944171:0