crwdns2933423:0crwdne2933423:0

Google Pixel 4 XL バックパネルの交換

crwdns2931529:0crwdnd2931529:0crwdnd2931529:0crwdnd2931529:012crwdnd2931529:0crwdne2931529:0

crwdns2936315:0crwdne2936315:0
crwdns2936323:0crwdne2936323:0
crwdns2931653:015crwdne2931653:0
Google Pixel 4 XL Back Panel Replacement: crwdns2935265:00crwdnd2935265:01crwdnd2935265:02crwdne2935265:0 Google Pixel 4 XL Back Panel Replacement: crwdns2935265:00crwdnd2935265:02crwdnd2935265:02crwdne2935265:0
  • Whenever you use the spudger near the battery, be very careful not to puncture the battery.

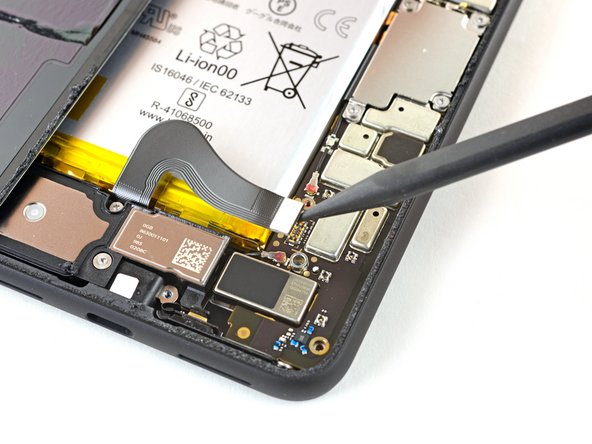
  • Using the pointed end of a spudger, pry the battery connector straight up from the motherboard to disconnect the battery.

  • To re-attach press connectors like this one, carefully align and press down on one side until it clicks into place, then repeat on the other side. Do not press down on the middle. If the connector is misaligned, the pins can bend, causing permanent damage.

バッテリー周辺でスパッジャーを使用するときは、バッテリーに穴を開けないようにご注意ください。

スパッジャーの先端を使用して、バッテリーコネクタをマザーボードからまっすぐ上にこじ開けてバッテリーを外します。

このようなプレスコネクタを再装着するには、片側を慎重に位置合わせして、カチッと所定の位置に収まるまで押し下げてから、もう一方の側でも同じ作業を繰り返します。 中央部分を押し下げないでください。 コネクタの位置がずれていると、ピンが曲がって永久的な損傷を引き起こす可能性があります。

crwdns2944171:0crwdnd2944171:0crwdnd2944171:0crwdnd2944171:0crwdne2944171:0