crwdns2933423:0crwdne2933423:0

MacBook Air (13 Zoll, Retina Display, 2019) Mikrofoneinheit tauschen

crwdns2931529:0crwdnd2931529:0crwdnd2931529:0crwdnd2931529:03crwdnd2931529:0crwdne2931529:0

crwdns2935425:01crwdne2935425:0

crwdns2936315:0crwdne2936315:0
crwdns2936319:0crwdne2936319:0
crwdns2931653:01crwdne2931653:0
MacBook Air 13" Retina Display 2019 Microphone Assembly Replacement, Remove the microphone assembly: crwdns2935265:00crwdnd2935265:01crwdnd2935265:02crwdne2935265:0 MacBook Air 13" Retina Display 2019 Microphone Assembly Replacement, Remove the microphone assembly: crwdns2935265:00crwdnd2935265:02crwdnd2935265:02crwdne2935265:0
Remove the microphone assembly
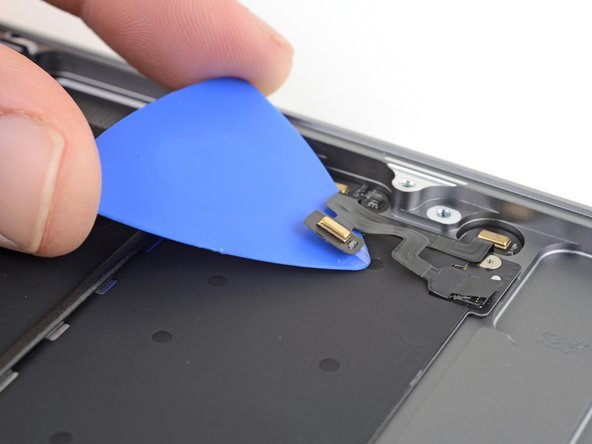
  • Slide an opening pick under the microphone farthest away from the edge of the case to slice through the adhesive securing it to the upper case.

  • The microphone assembly is still connected to the case. Do not try to remove the microphone assembly or lift the cable.

  • If the adhesive is stubborn, do not force the pick. Heat the microphone assembly using an iOpener or a hair dryer to soften the adhesive.

Schiebe an der Stelle ein Plektrum unter das Mikrofon, wo es am weitesten von der Gehäusekante entfernt ist. Schneide dann durch die Klebeverbindung, mit der es am oberen Gehäuse befestigt ist.

Die Mikrofoneinheit ist immer noch mit dem Gehäuse verbunden. Versuche noch nicht, die Mikrofoneinheit zu entfernen oder das Kabel anzuheben.

Wenn der Kleber nicht nachgibt, dann drücke nicht zu stark mit dem Plektrum. Erwärme die Mikrofoneinheit mit einem iOpener oder einem Haartrockner, um den Kleber darunter aufzuweichen.

crwdns2944171:0crwdnd2944171:0crwdnd2944171:0crwdnd2944171:0crwdne2944171:0