crwdns2933423:0crwdne2933423:0

Procedura di apertura

crwdns2931527:0crwdnd2931527:0crwdnd2931527:0crwdnd2931527:0crwdne2931527:0

crwdns2936315:0crwdne2936315:0
crwdns2936321:0crwdne2936321:0
crwdns2931653:06crwdne2931653:0
Opening Procedure: crwdns2935265:00crwdnd2935265:01crwdnd2935265:03crwdne2935265:0 Opening Procedure: crwdns2935265:00crwdnd2935265:02crwdnd2935265:03crwdne2935265:0 Opening Procedure: crwdns2935265:00crwdnd2935265:03crwdnd2935265:03crwdne2935265:0
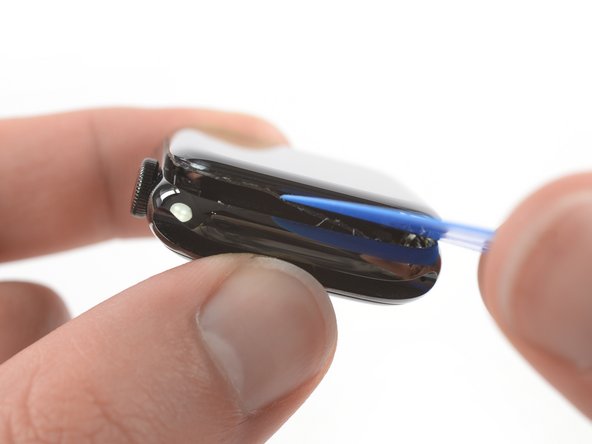
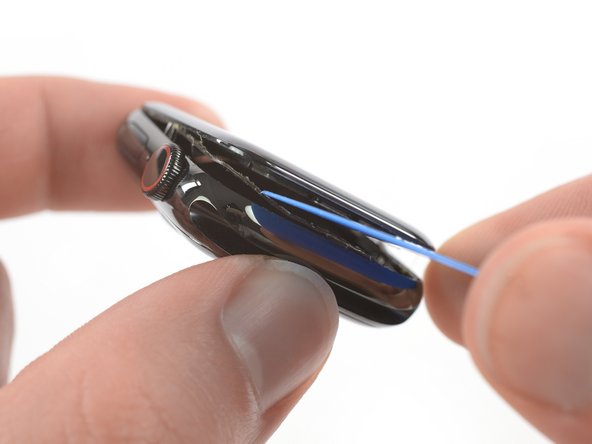
  • It's likely that the force touch sensor will stick to the display frame instead to the watch's body. In this case, insert an opening pick under the display and carefully separate the Force Touch gasket from the display.

  • To preserve the Force Touch gasket, pry carefully under the edge of the display. If the Force Touch gasket splits when lifting the display, or if you separate the gasket layers, you'll also need to replace the Force Touch gasket itself.

  • Slide the pick around the display to separate the adhesive between the Force Touch gasket and the display.

  • Don't insert the opening pick deeper than 1/16th of an inch (~2 mm) to avoid damaging other components.

È facile che il sensore Force Touch si attacchi al telaio dello schermo invece che alla scocca dell'orologio. In questo caso, inserisci un plettro di apertura sotto il display e separa con delicatezza dal display la guarnizione del Force Touch.

Per preservare la guarnizione del Force Touch, fai leva con delicatezza sotto il bordo dello schermo. Se la guarnizione del Force Touch si divide mentre sollevi il display o se ne separi gli strati, dovrai anche sostituire la guarnizione del Force Touch.

Fai scorrere il plettro lungo il display per separare l'adesivo tra la guarnizione del Force Touch e lo schermo.

Infila il plettro di apertura per massimo 2 mm circa per evitare di danneggiare altri componenti.

crwdns2944171:0crwdnd2944171:0crwdnd2944171:0crwdnd2944171:0crwdne2944171:0