crwdns2933423:0crwdne2933423:0

Karcher Pressure Washers 15209900 2018 Opening Procedure

crwdns2931529:0crwdnd2931529:0crwdnd2931529:0crwdnd2931529:05crwdnd2931529:0crwdne2931529:0

crwdns2935425:013crwdne2935425:0

crwdns2936315:0crwdne2936315:0
crwdns2936321:0crwdne2936321:0
crwdns2931653:013crwdne2931653:0
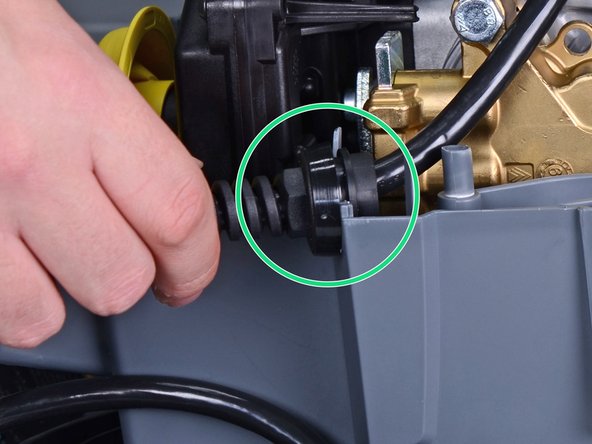
Karcher Pressure Washers 15209900 2018 Opening Procedure, Reassembly tip: crwdns2935265:00crwdnd2935265:01crwdnd2935265:03crwdne2935265:0 Karcher Pressure Washers 15209900 2018 Opening Procedure, Reassembly tip: crwdns2935265:00crwdnd2935265:02crwdnd2935265:03crwdne2935265:0 Karcher Pressure Washers 15209900 2018 Opening Procedure, Reassembly tip: crwdns2935265:00crwdnd2935265:03crwdnd2935265:03crwdne2935265:0
Reassembly tip
  • Reassembly tip: Use these images to help reassemble the housing back around the motor.

  • Make sure that all five bushings are in place.

  • In order for the housing to fit properly, the bushings must fit in their respective mounts.

  • Make sure that the yellow tube is properly notched onto the housing.

  • Make sure that the power cord strain relief sits correctly in the housing notch.

crwdns2935429:0crwdne2935429:0

crwdns2935429:0crwdne2935429:0

crwdns2935429:0crwdne2935429:0

crwdns2935429:0crwdne2935429:0

crwdns2935429:0crwdne2935429:0

crwdns2944171:0crwdnd2944171:0crwdnd2944171:0crwdnd2944171:0crwdne2944171:0