crwdns2935425:05crwdne2935425:0
crwdns2931653:05crwdne2931653:0

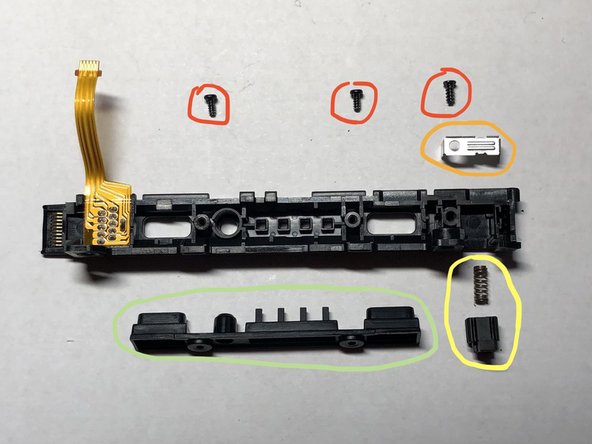


Disassemble Rail
-
Remove the three PH00 screws.
-
Pry out the metal cover over the buckle lock. Be gentle so as not to bend the metal.
-
The spring loaded buckle lock can then be removed. NOTE: Do not lose the spring when disassembling. Reassembly can be tricky because the spring needs to be compressed to get back in place.
-
The plastic cover over the holes in the middle of the rail can be removed. This is where the SL, SR, and connect buttons would be on a normal Joy Con controller and also the lights indicating which controller number it is.
| [title] Disassemble Rail | |
| [* red] Remove the three PH00 screws. | |
| [* orange] Pry out the metal cover over the buckle lock. Be gentle so as not to bend the metal. | |
| - | [* yellow] The spring loaded buckle lock can then be removed. NOTE: Do not |
| + | [* yellow] The spring loaded buckle lock can then be removed. NOTE: Do not lose the spring when disassembling. Reassembly can be tricky because the spring needs to be compressed to get back in place. |
| [* green] The plastic cover over the holes in the middle of the rail can be removed. This is where the SL, SR, and connect buttons would be on a normal Joy Con controller and also the lights indicating which controller number it is. |
crwdns2944171:0crwdnd2944171:0crwdnd2944171:0crwdnd2944171:0crwdne2944171:0