crwdns2933423:0crwdne2933423:0

Intel NUC8i7BEH Demontage

crwdns2931527:0crwdnd2931527:0crwdnd2931527:0crwdnd2931527:0crwdne2931527:0

crwdns2936315:0crwdne2936315:0
crwdns2936319:0crwdne2936319:0
crwdns2931653:03crwdne2931653:0
Intel NUC8i7BEH Disassembly, Lid and HDD Bracket: crwdns2935265:00crwdnd2935265:01crwdnd2935265:03crwdne2935265:0 Intel NUC8i7BEH Disassembly, Lid and HDD Bracket: crwdns2935265:00crwdnd2935265:02crwdnd2935265:03crwdne2935265:0 Intel NUC8i7BEH Disassembly, Lid and HDD Bracket: crwdns2935265:00crwdnd2935265:03crwdnd2935265:03crwdne2935265:0
Lid and HDD Bracket
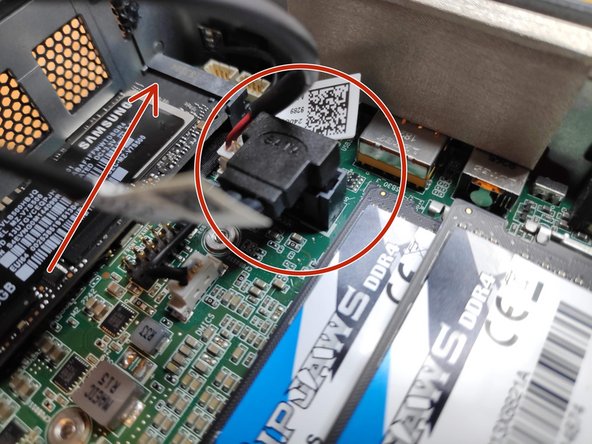
  • Lift the door, and keep an eye on the cables that connect to the NUC's motherboard. These cables are the power and data cables for the 2.5" hard drive bay.

  • Carefully unplug the cables from the motherboard, and set the bracket aside.

  • In the last photo, the slot for a blade SSD is marked with a red arrow. This is where you would install the blade SSD, and use a screw to hold it in place.

Hebe die Abdeckung leicht an und behalte die Kabel vom Motherboard im Auge. Diese Kabel sind für die Stromzufuhr und Dateiübertragung des 2,5" HDD Slots.

Trenne die Kabel vorsichtig vom Motherboard ab und lege die HDD-Halterung beiseite.

Auf dem letzten Bild ist der Steckplatz für eine SSD mit einem roten Pfeil markiert. Hier würdest du eine Blade-SSD einbauen und sie mit einer Schraube befestigen.

crwdns2944171:0crwdnd2944171:0crwdnd2944171:0crwdnd2944171:0crwdne2944171:0