crwdns2933423:0crwdne2933423:0

Moto G6 Plus バッテリーの交換

crwdns2931527:0crwdnd2931527:0crwdnd2931527:0crwdnd2931527:0crwdne2931527:0

crwdns2935425:07crwdne2935425:0

crwdns2936315:0crwdne2936315:0
crwdns2936323:0crwdne2936323:0
crwdns2931653:07crwdne2931653:0
Moto G6 Plus Battery Replacement: crwdns2935265:00crwdnd2935265:01crwdnd2935265:02crwdne2935265:0 Moto G6 Plus Battery Replacement: crwdns2935265:00crwdnd2935265:02crwdnd2935265:02crwdne2935265:0
  • Lift the battery out of the phone case.

  • Do not reuse the battery after it has been removed, as doing so is a potential safety hazard. Replace it with a new battery.

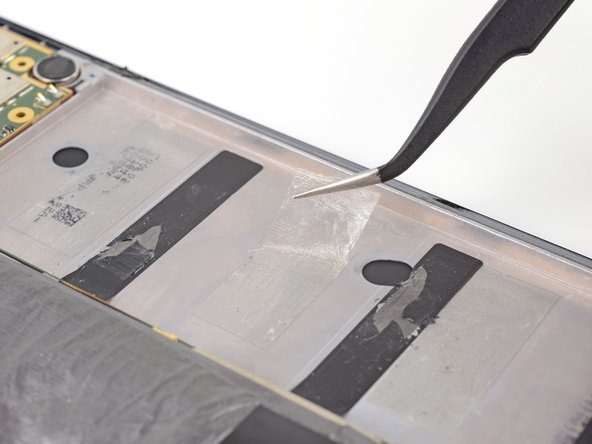
  • Before installing your new battery, peel up all the old adhesive and remove it from the phone.

  • For best results, clean the area underneath the battery with isopropyl alcohol and a lint-free cloth or coffee filter. This helps prep the surface so the new battery can adhere more strongly. Replace old adhesive with stretch release adhesive strips, double-sided tape, or pre-cut adhesive strips.

  • If you're also replacing the screen assembly, which includes the midframe, the new midframe may have battery adhesive pre-installed. In that case, don't apply any more adhesive—just peel the backing off the preinstalled adhesive and install the battery.

デバイスケースからバッテリーを持ち上げます。

安全性を損なう可能性があるため、取り外したバッテリーは再利用しないでください。 必ず新しい電池と交換してください。

新しいバッテリーを取り付ける前に、古い接着剤をすべて除去します。

最良の修理結果を得るには、イソプロピルアルコールと糸くずの出ない布またはコーヒーフィルターで、バッテリー下のエリアをきれいにクリーニングします。これは、新しい交換用バッテリーがより強力に接着できるよう、表面を整えるのに役立ちます。古い接着剤をストレッチリリースタイプの接着ストリップ両面テープ、両面テープ、またはプレカットされた接着ストリップに交換します。

ミッドフレームを含むスクリーンアセンブリも交換する場合、新しいミッドフレームにはバッテリー用の接着剤が既に付いている場合があります。 その場合、接着剤を塗布する必要はありません。接着剤からシールを剥がして、バッテリーを取り付けてください。

crwdns2944171:0crwdnd2944171:0crwdnd2944171:0crwdnd2944171:0crwdne2944171:0