crwdns2931527:0crwdnd2931527:0crwdnd2931527:0crwdnd2931527:0crwdne2931527:0
crwdns2935425:03crwdne2935425:0


-
Next, remove the battery housing/protective cover using a Phillips #00 screwdriver.
-
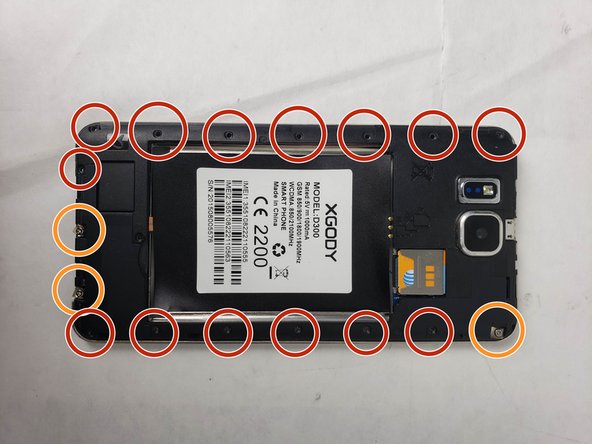
Use the Phillips #00 screwdriver to remove the screws securing the protective housing to the smartphone. There should be fourteen screws measuring 3 mm in length and one screw measuring 6 mm.
-
Three of the screws will remain attached to the protective housing and can be identified by a metal plate underneath them. In total, there are 18 screws.
-
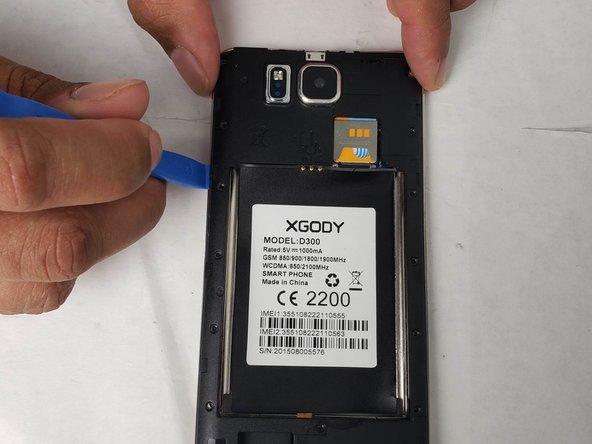
After loosening and removing all the screws, use the pry tool and tweezers to lift the housing along the edges. A sticky pad will hold the housing to the smartphone, do not hesitate to give it a firm tug until the housing separates from the sticky pad.
| - | [* black] Next the battery housing/protective cover |
|---|---|
| - | [* red] |
| - | [* orange] Three of the screws will |
| - | [* black] After loosening and removing all the screws lift the housing along the edges |
| + | [* black] Next, remove the battery housing/protective cover using a Phillips #00 screwdriver. |
| + | [* red] Use the Phillips #00 screwdriver to remove the screws securing the protective housing to the smartphone. There should be fourteen screws measuring 3 mm in length and one screw measuring 6 mm. |
| + | [* orange] Three of the screws will remain attached to the protective housing and can be identified by a metal plate underneath them. In total, there are 18 screws. |
| + | [* black] After loosening and removing all the screws, use the pry tool and [product|IF145-020|tweezers] to lift the housing along the edges. A sticky pad will hold the housing to the smartphone, do not hesitate to give it a firm tug until the housing separates from the sticky pad. |
crwdns2944171:0crwdnd2944171:0crwdnd2944171:0crwdnd2944171:0crwdne2944171:0