crwdns2933423:0crwdne2933423:0

Kano Computer Kit Touch Démontage

crwdns2931527:0crwdnd2931527:0crwdnd2931527:0crwdnd2931527:0crwdne2931527:0

crwdns2936315:0crwdne2936315:0
crwdns2936317:0crwdne2936317:0
crwdns2931653:04crwdne2931653:0
Kano Computer Kit Touch Disassembly, Removing the Cables: crwdns2935265:00crwdnd2935265:01crwdnd2935265:03crwdne2935265:0 Kano Computer Kit Touch Disassembly, Removing the Cables: crwdns2935265:00crwdnd2935265:02crwdnd2935265:03crwdne2935265:0 Kano Computer Kit Touch Disassembly, Removing the Cables: crwdns2935265:00crwdnd2935265:03crwdnd2935265:03crwdne2935265:0
Removing the Cables
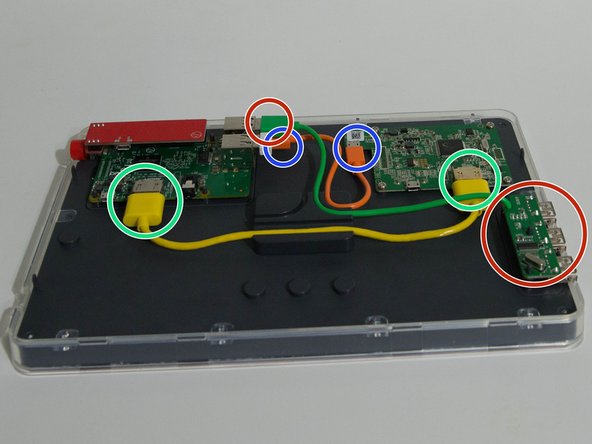
  • Remember the power cable we removed from the battery? Let's go ahead and get that out of the way. It's plugged in to the power control board we used earlier, and the video driver board on the right of the image.

  • Next we will get this speaker out of the way. The speaker circled on the far left has a 3.5mm plug circled in the middle that carries the audio signal, and a USB connector circled towards the right that powers the speaker.

  • The yellow cable here is our HDMI cable that carries the video signal to the screen. We will remove it by unplugging it.

  • This little orange cable is a USB cable that allows the touch screen to operate. All we need to do to remove it is unplug it.

  • This green cable is a 3 port USB hub that lets us plug more than 4 USB devices in. We will remove it by unplugging it and then lifting the hub circled on the right up.

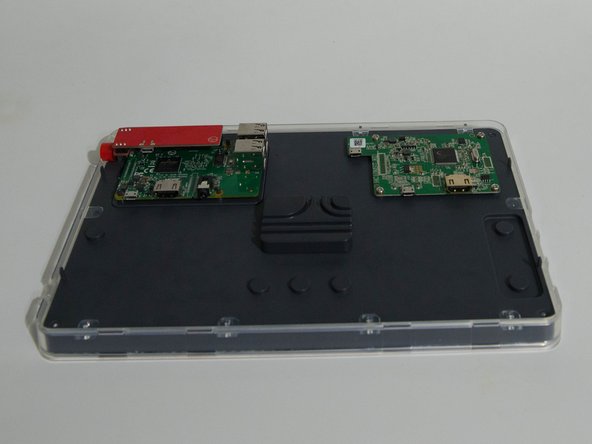
  • The last picture is with all of the cables removed.

Vous souvenez-vous du câble d'alimentation que nous avons retiré de la batterie ? Allons-y et éliminons cela. Il est branché sur la carte de contrôle de l'alimentation que nous avons utilisée précédemment et sur la carte du pilote vidéo à droite de l'image.

Ensuite, nous allons éliminer ce haut-parleur. Le haut-parleur entouré à l'extrême gauche a une prise de 3,5 mm entourée au milieu qui transporte le signal audio, et un connecteur USB entouré vers la droite qui alimente le haut-parleur.

Le câble jaune ici est notre câble HDMI qui transporte le signal vidéo à l'écran. Nous allons l'enlever en le débranchant.

Ce petit câble orange est un câble USB qui permet à l'écran tactile de fonctionner. Tout ce que nous devons faire pour l'enlever est de le débrancher.

Ce câble vert est un concentrateur USB à 3 ports qui nous permet de brancher plus de 4 périphériques USB. Nous le retirerons en le débranchant puis en soulevant le concentrateur entouré à droite.

La dernière photo est avec tous les câbles retirés.

crwdns2944171:0crwdnd2944171:0crwdnd2944171:0crwdnd2944171:0crwdne2944171:0