crwdns2933423:0crwdne2933423:0

Dell XPS 13 9380のバックパネル交換

crwdns2931529:0crwdnd2931529:0crwdnd2931529:0crwdnd2931529:08crwdnd2931529:0crwdne2931529:0

crwdns2935425:01crwdne2935425:0

crwdns2936317:0crwdne2936317:0
crwdns2936323:0crwdne2936323:0
crwdns2931653:01crwdne2931653:0
Remplacement du panneau arrière sur Dell XPS 13 9380, Retirer le panneau arrière: crwdns2935265:00crwdnd2935265:01crwdnd2935265:03crwdne2935265:0 Remplacement du panneau arrière sur Dell XPS 13 9380, Retirer le panneau arrière: crwdns2935265:00crwdnd2935265:02crwdnd2935265:03crwdne2935265:0 Remplacement du panneau arrière sur Dell XPS 13 9380, Retirer le panneau arrière: crwdns2935265:00crwdnd2935265:03crwdnd2935265:03crwdne2935265:0
Retirer le panneau arrière
  • Dévisser les huit vis (Torx M2x3) qui fixent le panneau arrière.

  • Retournez l’ordinateur, puis ouvrez-le en l’inclinant.

  • À l'aide d'un Spudger, faites levier sur le panneau arrière.

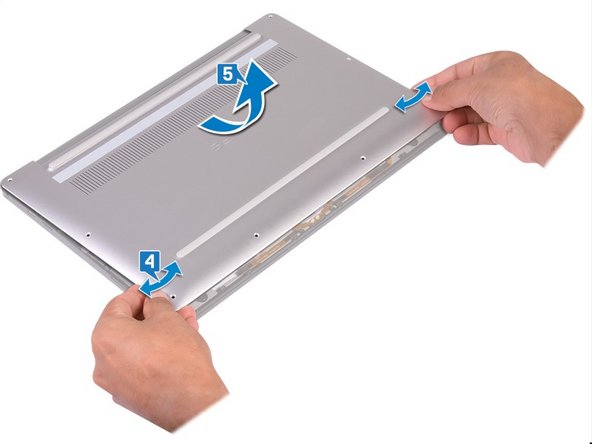
  • En faisant glisser le panneau arrière de gauche à droite, libérez les clips qui le fixent. Vous pouvez ainsi le retirer.

始める前に、必ずノートパソコンの電源を切り、コンセントからプラグを抜いてください。

トルクスT5ドライバーを使用して、バックパネルを固定している8本のネジを外してください。

スパッジャーでバックパネルをこじあけ、緩めます。

バックパネルをヒンジのない端から少し持ち上げてください。

バックパネルをヒンジ部分から引き離し、前後にくねらせてクリップを緩めます。

バックパネルのクリップが外れたら、バックパネルを取り出します。

crwdns2944171:0crwdnd2944171:0crwdnd2944171:0crwdnd2944171:0crwdne2944171:0