crwdns2933423:0crwdne2933423:0

Replacement of the back panel on Dell XPS 13 9380

crwdns2931529:0crwdnd2931529:0crwdnd2931529:0crwdnd2931529:08crwdnd2931529:0crwdne2931529:0

crwdns2935425:01crwdne2935425:0

crwdns2936317:0crwdne2936317:0
crwdns2936315:0crwdne2936315:0
crwdns2931653:01crwdne2931653:0
Remplacement du panneau arrière sur Dell XPS 13 9380, Retirer le panneau arrière: crwdns2935265:00crwdnd2935265:01crwdnd2935265:03crwdne2935265:0 Remplacement du panneau arrière sur Dell XPS 13 9380, Retirer le panneau arrière: crwdns2935265:00crwdnd2935265:02crwdnd2935265:03crwdne2935265:0 Remplacement du panneau arrière sur Dell XPS 13 9380, Retirer le panneau arrière: crwdns2935265:00crwdnd2935265:03crwdnd2935265:03crwdne2935265:0
Retirer le panneau arrière
  • Dévisser les huit vis (Torx M2x3) qui fixent le panneau arrière.

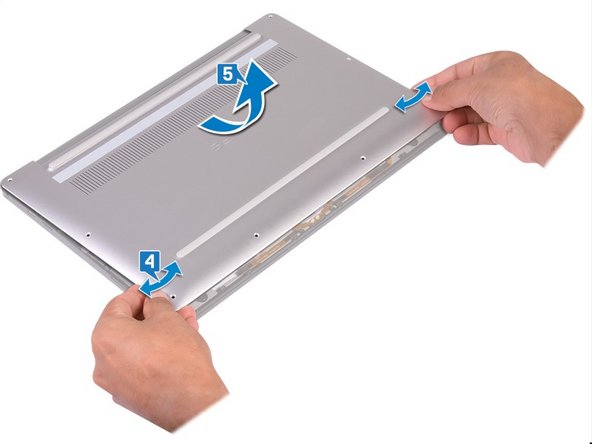
  • Retournez l’ordinateur, puis ouvrez-le en l’inclinant.

  • À l'aide d'un Spudger, faites levier sur le panneau arrière.

  • En faisant glisser le panneau arrière de gauche à droite, libérez les clips qui le fixent. Vous pouvez ainsi le retirer.

Before you begin, be sure to turn off your laptop and unplug it from the outlet.

Use a Torx T5 driver to unscrew the eight screws securing the back panel.

Use a spudger to pry up and loosen the back panel.

Lift the back panel up slightly from the non-hinged edge.

Pull the back panel away from the hinged edge, wiggling it back and forth to loosen the clips.

When the back panel clips are free, remove the back panel.

crwdns2944171:0crwdnd2944171:0crwdnd2944171:0crwdnd2944171:0crwdne2944171:0