crwdns2933423:0crwdne2933423:0

Google Pixel 3 マザーボードの交換

crwdns2931529:0crwdnd2931529:0crwdnd2931529:0crwdnd2931529:03crwdnd2931529:0crwdne2931529:0

crwdns2936315:0crwdne2936315:0
crwdns2936323:0crwdne2936323:0
crwdns2931653:02crwdne2931653:0
Google Pixel 3 Motherboard Replacement, Peel the black tape away from the battery: crwdns2935265:00crwdnd2935265:01crwdnd2935265:03crwdne2935265:0 Google Pixel 3 Motherboard Replacement, Peel the black tape away from the battery: crwdns2935265:00crwdnd2935265:02crwdnd2935265:03crwdne2935265:0 Google Pixel 3 Motherboard Replacement, Peel the black tape away from the battery: crwdns2935265:00crwdnd2935265:03crwdnd2935265:03crwdne2935265:0
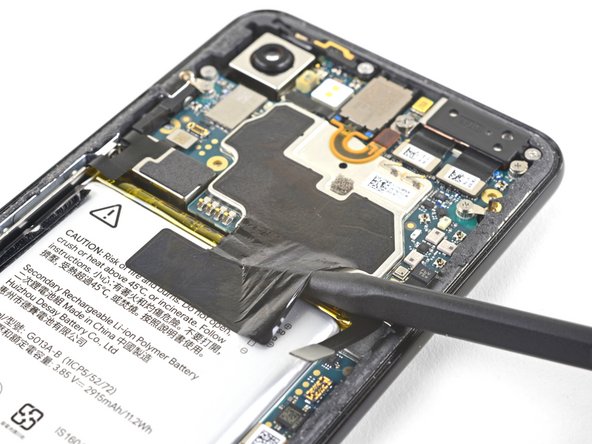
Peel the black tape away from the battery
  • Whenever you use the spudger near the battery, be very careful not to puncture the battery.

  • Slide the point of a spudger in the crevice underneath the black tape bridging across the battery and the motherboard.

  • Slide the spudger along the crevice to pry up the tape from the battery side.

  • Carefully peel the tape from the battery and fold it out of the way.

バッテリー付近での作業をする際は、スパッジャーでバッテリーに穴を開けてしまわないよう、特にご注意ください。

スパッジャーの先端をバッテリーとマザーボードを繋ぐ黒いテープの下に差し込みます。

スパッジャーを割れ目に沿ってスライドし、バッテリー側からテープを剥がします。

バッテリー側からテープを慎重に剥がしたら、剥がしたテープを作業の邪魔にならないように折りたたみます。

crwdns2944171:0crwdnd2944171:0crwdnd2944171:0crwdnd2944171:0crwdne2944171:0