crwdns2933423:0crwdne2933423:0

Remplacement de la batterie de l'iPad Pro 10,5"

crwdns2936315:0crwdne2936315:0
crwdns2936317:0crwdne2936317:0
crwdns2931653:011crwdne2931653:0
iPad Pro 10.5" Battery Replacement: crwdns2935265:00crwdnd2935265:01crwdnd2935265:03crwdne2935265:0 iPad Pro 10.5" Battery Replacement: crwdns2935265:00crwdnd2935265:02crwdnd2935265:03crwdne2935265:0 iPad Pro 10.5" Battery Replacement: crwdns2935265:00crwdnd2935265:03crwdnd2935265:03crwdne2935265:0
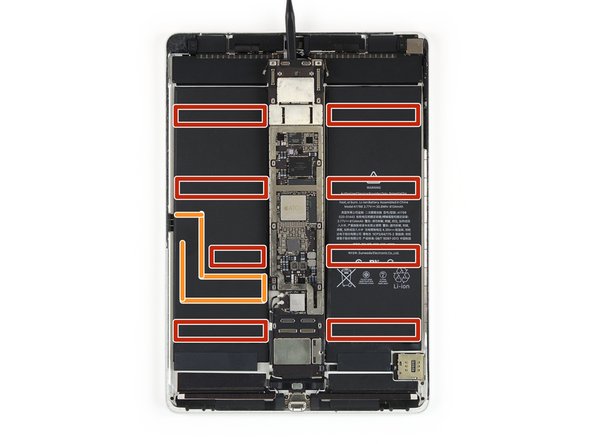
  • Set the logic board back down, leaving the spudger underneath to prevent the adhesive from re-sealing.

  • In the following steps, you'll use a liquid solvent (such as iFixit Adhesive Remover or high-concentration isopropyl alcohol) to weaken the adhesive under the battery. The location of the adhered areas and the Smart Connector flex cable underneath the battery are shown in the last two images:

  • Adhesive

  • Smart Connector cable

Remettez la carte mère en place en laissant la spatule en dessous pour empêcher l'adhésif de recoller.

Dans les étapes suivantes, vous utiliserez un solvant liquide (tel que le dissolvant d'adhésif iFixit ou de l'alcool isopropylique à haute concentration) pour ramollir l'adhésif sous la batterie. L'emplacement des zones collées et la nappe du Smart Connector sous la batterie sont indiqués dans les deux dernières images :

Adhésif

Nappe du Smart Connector

crwdns2944171:0crwdnd2944171:0crwdnd2944171:0crwdnd2944171:0crwdne2944171:0