crwdns2933423:0crwdne2933423:0

iPad Pro 10.5" Battery Replacement

crwdns2936315:0crwdne2936315:0
crwdns2936325:0crwdne2936325:0
crwdns2931653:09crwdne2931653:0
iPad Pro 10.5" Battery Replacement: crwdns2935265:00crwdnd2935265:01crwdnd2935265:03crwdne2935265:0 iPad Pro 10.5" Battery Replacement: crwdns2935265:00crwdnd2935265:02crwdnd2935265:03crwdne2935265:0 iPad Pro 10.5" Battery Replacement: crwdns2935265:00crwdnd2935265:03crwdnd2935265:03crwdne2935265:0
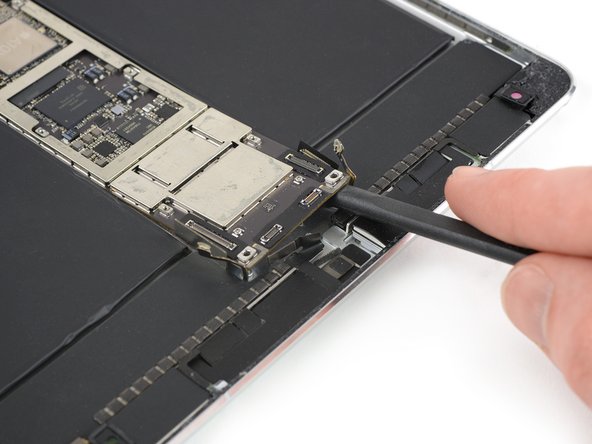
  • In the following steps you'll be very carefully prying up the logic board. The place to lift it is very tight. Avoid damage to the left and right interconnect and antenna cables, by making sure they don't get caught by the logic board when prying it up.

  • Insert the flat end of a spudger between the logic board and the rear case of the iPad.

  • Use the spudger to slowly pry up the right side of the logic board.

  • If the adhesive is too strong to pry up the logic board, apply some additional solvent and give it time to penetrate.

  • Pry up the left side of the logic board until you can get a good grip.

  • Don't try to remove the logic board all the way! It is still connected to the bottom area of the iPad.

다음 단계에서는 로직 보드를 아주 조심스럽게 들어 올려야 합니다. 들어 올릴 위치가 매우 좁습니다. 들어 올릴 때 왼쪽 및 오른쪽 인터커넥트 및 안테나 케이블이 로직 보드에 걸리지 않도록 주의하여 손상되지 않도록 하세요.

스퍼저의 납작한 끝을 로직 보드와 iPad 후면 케이스 사이에 끼우세요.

스퍼저를 사용하여 로직 보드의 오른쪽을 천천히 들어 올리세요.

접착제가 너무 강해서 로직 보드를 들어 올릴 수 없는 경우 용매를 추가로 바르고 접착제가 스며들 때까지 시간을 주세요.

로직 보드의 왼쪽을 잘 잡을 수 있을 때까지 들어 올리세요.

로직 보드를 끝까지 분리하려 하지 마세요! 여전히 iPad의 하단 영역에 연결되어 있습니다.

crwdns2944171:0crwdnd2944171:0crwdnd2944171:0crwdnd2944171:0crwdne2944171:0