crwdns2933423:0crwdne2933423:0

Reemplazo de batería de iPad Pro 10.5"

crwdns2936315:0crwdne2936315:0
crwdns2936331:0crwdne2936331:0
crwdns2931653:09crwdne2931653:0
iPad Pro 10.5" Battery Replacement: crwdns2935265:00crwdnd2935265:01crwdnd2935265:03crwdne2935265:0 iPad Pro 10.5" Battery Replacement: crwdns2935265:00crwdnd2935265:02crwdnd2935265:03crwdne2935265:0 iPad Pro 10.5" Battery Replacement: crwdns2935265:00crwdnd2935265:03crwdnd2935265:03crwdne2935265:0
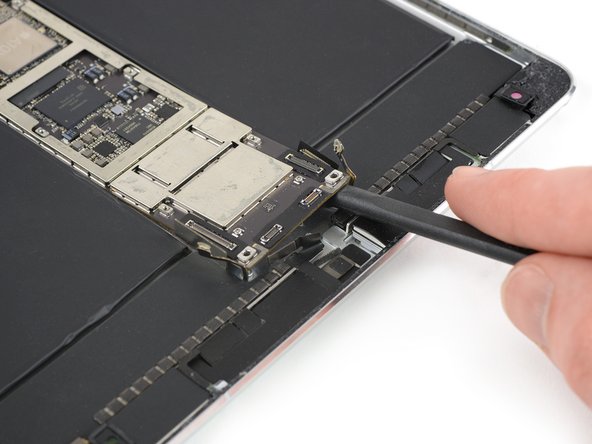
  • In the following steps you'll be very carefully prying up the logic board. The place to lift it is very tight. Avoid damage to the left and right interconnect and antenna cables, by making sure they don't get caught by the logic board when prying it up.

  • Insert the flat end of a spudger between the logic board and the rear case of the iPad.

  • Use the spudger to slowly pry up the right side of the logic board.

  • If the adhesive is too strong to pry up the logic board, apply some additional solvent and give it time to penetrate.

  • Pry up the left side of the logic board until you can get a good grip.

  • Don't try to remove the logic board all the way! It is still connected to the bottom area of the iPad.

En los siguientes pasos, levantarás con mucho cuidado la placa lógica. El lugar para levantarla es muy estrecho. Evita dañar los cables de antena e interconexión izquierdo y derecho asegurándote de que la placa lógica no los atrape al levantarlos.

Inserta el extremo plano de un spudger entre la placa lógica y la carcasa trasera del iPad.

Usa el spudger para levantar lentamente el lado derecho de la placa lógica.

Si el adhesivo es demasiado fuerte para levantar la placa lógica, aplica un poco de solvente adicional y dale tiempo para que penetre.

Levanta el lado izquierdo de la placa lógica hasta que puedas agarrarla bien.

¡No intentes quitar la placa lógica por completo! Todavía está conectado al área inferior del iPad.

crwdns2944171:0crwdnd2944171:0crwdnd2944171:0crwdnd2944171:0crwdne2944171:0