crwdns2933423:0crwdne2933423:0

Google Pixel 2 XLディスプレイ粘着剤の交換

crwdns2936315:0crwdne2936315:0
crwdns2936323:0crwdne2936323:0
crwdns2931653:03crwdne2931653:0
Google Pixel 2 XL Display Adhesive Replacement: crwdns2935265:00crwdnd2935265:01crwdnd2935265:02crwdne2935265:0 Google Pixel 2 XL Display Adhesive Replacement: crwdns2935265:00crwdnd2935265:02crwdnd2935265:02crwdne2935265:0
  • There are perforations along the inner and outer edges of the adhesive strip.

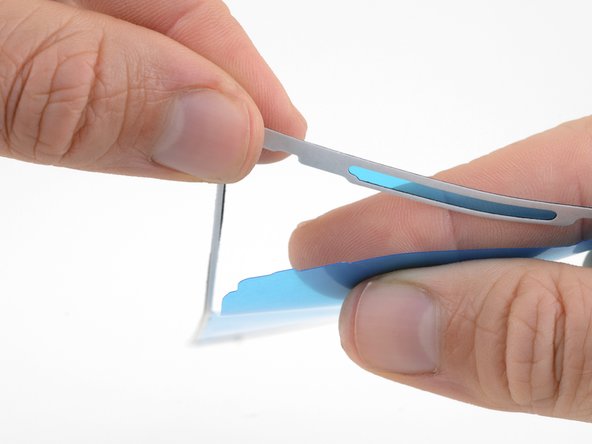
  • Carefully tear along the perforations to separate the outer portion of the adhesive backing from the adhesive strip.

  • Carefully tear along the inner perforations to separate the inner portion of the blue backing from the adhesive strip.

  • Be very careful not to tear the adhesive, the white backing, or the blue backing underneath the adhesive. Only remove the blue plastic surrounding the adhesive strip.

  • When you're done, you should have just have a phone-shaped ring of adhesive with blue backing on one side and white backing on the other.

粘着テープの内端と外端に沿って切り取り線がついています。

切り取り線に沿って、粘着剤の剥離シートの外端部を、粘着テープから慎重に分離します。

内側の切り取り線に沿って、粘着剤の青い剥離シートの内端部を、粘着テープから慎重に分離します。

粘着剤、白い剥離シート、または粘着剤の下の青い剥離シートを傷つけないように、よく注意してください。粘着テープ周囲の青いビニールシートのみを切り離します。

完了すると、スマートフォンの形状をした粘着剤のリング(片面に青い剥離シート、もう片面に白い剥離シートがついています)が出来上がったはずです。

crwdns2944171:0crwdnd2944171:0crwdnd2944171:0crwdnd2944171:0crwdne2944171:0