crwdns2933423:0crwdne2933423:0

Google Pixel 2 XLの開口手順

crwdns2931529:0crwdnd2931529:0crwdnd2931529:0crwdnd2931529:013crwdnd2931529:0crwdne2931529:0

crwdns2936315:0crwdne2936315:0
crwdns2936323:0crwdne2936323:0
crwdns2931653:09crwdne2931653:0
Google Pixel 2 XL Opening Procedure: crwdns2935265:00crwdnd2935265:01crwdnd2935265:02crwdne2935265:0 Google Pixel 2 XL Opening Procedure: crwdns2935265:00crwdnd2935265:02crwdnd2935265:02crwdne2935265:0
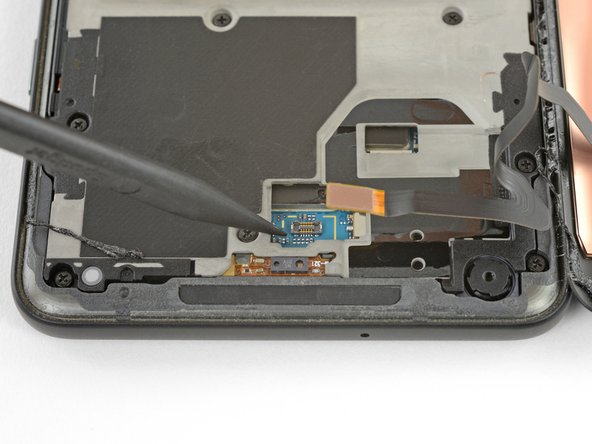
  • Use the point of a spudger to lift the digitizer cable connector up and out of its socket on the motherboard.

  • To re-attach press connectors like this one, carefully align and press down on one side until it clicks into place, then repeat on the other side. Do not press down on the middle. If the connector is misaligned, the pins can bend, causing permanent damage.

  • If any part of your screen doesn't respond to touch after your repair, re-seat this connector, making sure it clicks fully into place and that there's no dust or other obstruction in the socket.

スパッジャーの先端でデジタイザケーブルを持ち上げ、マザーボードのソケットから外します。

プレスコネクタをこのように元の位置に取り付けるには、慎重に位置を合わせて、所定の位置にカチッとはまるまで一方の端を押し込みます。この際中央付近を押し込まないでください。コネクタの位置がずれていると、ピンが曲がって永久的な損傷が発生することがあります。

修理後に画面の一部がタッチに反応しない場合は、このコネクタを接続し直して、正しい位置にカチッとはまっており、ソケットに埃などの異物がないことを確認します。

crwdns2944171:0crwdnd2944171:0crwdnd2944171:0crwdnd2944171:0crwdne2944171:0