crwdns2933423:0crwdne2933423:0

Procedimiento de apertura Google Pixel 2 XL

crwdns2931529:0crwdnd2931529:0crwdnd2931529:0crwdnd2931529:013crwdnd2931529:0crwdne2931529:0

crwdns2936315:0crwdne2936315:0
crwdns2936331:0crwdne2936331:0
crwdns2931653:09crwdne2931653:0
Google Pixel 2 XL Opening Procedure: crwdns2935265:00crwdnd2935265:01crwdnd2935265:02crwdne2935265:0 Google Pixel 2 XL Opening Procedure: crwdns2935265:00crwdnd2935265:02crwdnd2935265:02crwdne2935265:0
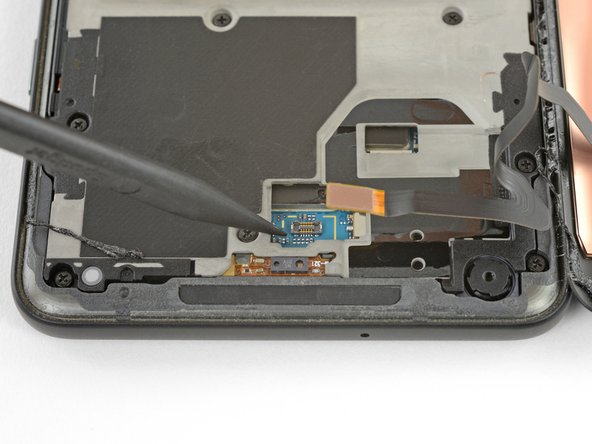
  • Use the point of a spudger to lift the digitizer cable connector up and out of its socket on the motherboard.

  • To re-attach press connectors like this one, carefully align and press down on one side until it clicks into place, then repeat on the other side. Do not press down on the middle. If the connector is misaligned, the pins can bend, causing permanent damage.

  • If any part of your screen doesn't respond to touch after your repair, re-seat this connector, making sure it clicks fully into place and that there's no dust or other obstruction in the socket.

Usa la punta de un spudger para levantar el conector del cable digitalizador y sacarlo de su zócalo en la placa madre.

Para volver a conectar los conectores a presión como este, con cuidado alinea y presiona en un lado hasta que encaje en su lugar. No presiones en el medio. si es conector está mal alineado, las clavijas se pueden doblar y causar daño permanente.

Si alguna parte de tu pantalla no responde al tacto luego de la reparación, vuelve a asentar el conector, asegurándote de que se encaje completamente en su lugar y de que no haya polvo u otra obstrucción en el zócalo.

crwdns2944171:0crwdnd2944171:0crwdnd2944171:0crwdnd2944171:0crwdne2944171:0