crwdns2933423:0crwdne2933423:0

Disassembly of Sony Dream Machine ICF-C717PJ

crwdns2936319:0crwdne2936319:0
crwdns2936315:0crwdne2936315:0
crwdns2931653:04crwdne2931653:0
Demontage Sony Dream Machine ICF-C717PJ, Herauslösen des Projektors: crwdns2935265:00crwdnd2935265:01crwdnd2935265:03crwdne2935265:0 Demontage Sony Dream Machine ICF-C717PJ, Herauslösen des Projektors: crwdns2935265:00crwdnd2935265:02crwdnd2935265:03crwdne2935265:0 Demontage Sony Dream Machine ICF-C717PJ, Herauslösen des Projektors: crwdns2935265:00crwdnd2935265:03crwdnd2935265:03crwdne2935265:0
Herauslösen des Projektors
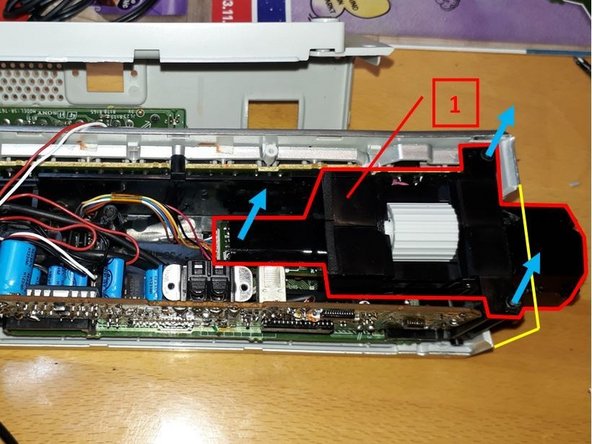
  • Zunächst die Kabelsteckverbindung [1] durch Herausziehen lösen. Unterhalb des Flachbandkabels [2] kommt man übrigens auch an die Projektor-LED, welche man z.B. über den Diodentest einen Multimeters testen kann. Danach wird das Herauslösen der Projektoreinheit kompliziert.

  • Ich habe keine andere Lösung gefunden, als eine Seite des Gehäuses herauszutrennen. Da man die Abdeckung der Lupeneinheit außerhalb des Gehäuses nicht abziehen kann, bleibt einem nichts anderes übrig, als das Gehäuse am Durchgang der drehbaren Lupeneinheit so einzuschneiden, dass man anschließend den kompletten Projektor nach oben ziehen kann.

  • In der letzten Abbildung dieses Schrittes sieht man das ausgeschnittene Seitenteil sowie die Abdeckkappe für die Lupeneinheit. Die Kappe ist nach der Demontage des Projektors nur so zu entfernen, in dem man sie auf der gegenüberliegenden Seite von der Lupe einschneided. Die Kappe muss aber zum Ausbau des Projektors gar nicht entfernt werden!

First disconnect the cable connector [1] by pulling it out. Below the ribbon cable [2] you can also reach the projector LED, which can be tested e.g. with the diode test of a multimeter. After that, removing the projector unit becomes complicated.

I found no other solution than to cut out one side of the case. Since you can't pull off the cover of the magnifier unit outside the housing, you have no choice but to cut the housing at the passage of the rotating magnifier unit so that you can pull the complete projector up afterwards.

In the last picture of this step you can see the cut out side part as well as the cover cap for the magnifier unit. The cap can only be removed after disassembling the projector by cutting it on the opposite side from the magnifier. However, the cap does not have to be removed at all to disassemble the projector!

crwdns2944171:0crwdnd2944171:0crwdnd2944171:0crwdnd2944171:0crwdne2944171:0