crwdns2933423:0crwdne2933423:0

MacBook Pro 15" Touch Bar Late 2016 배터리 교체

crwdns2931529:0crwdnd2931529:0crwdnd2931529:0crwdnd2931529:03crwdnd2931529:0crwdne2931529:0

crwdns2936315:0crwdne2936315:0
crwdns2936325:0crwdne2936325:0
crwdns2931653:08crwdne2931653:0
MacBook Pro 15" Touch Bar Late 2016 Battery Replacement: crwdns2935265:00crwdnd2935265:01crwdnd2935265:03crwdne2935265:0 MacBook Pro 15" Touch Bar Late 2016 Battery Replacement: crwdns2935265:00crwdnd2935265:02crwdnd2935265:03crwdne2935265:0 MacBook Pro 15" Touch Bar Late 2016 Battery Replacement: crwdns2935265:00crwdnd2935265:03crwdnd2935265:03crwdne2935265:0
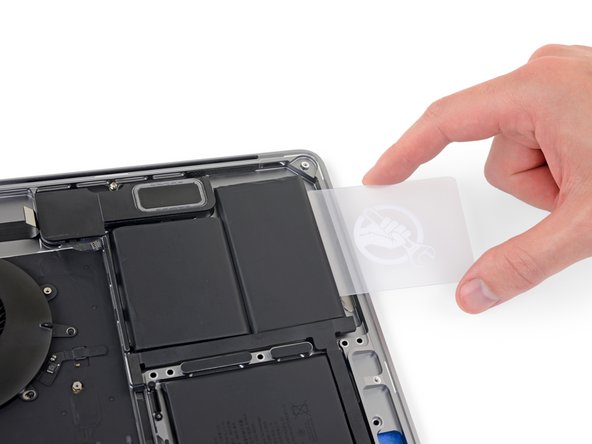
  • After a couple minutes, insert one corner of a plastic card underneath the battery, starting from the lower edge of the bottom, right-most cell.

  • This shouldn't require much force. If you have trouble, apply more adhesive remover and give it 2-3 additional minutes to penetrate.

  • Try not to deform the battery. A damaged or punctured battery can leak dangerous chemicals and/or catch fire.

  • Wiggle the card from side to side and slide it all the way underneath both battery cells.

  • Lift the cells to fully separate the adhesive, but don't try to remove them from your MacBook yet.

  • Leave the plastic card temporarily underneath the cells to prevent the adhesive from re-bonding as you proceed to the next step.

몇 분 후 플라스틱 카드의 한쪽 모서리를 배터리 밑 가장 오른쪽 하단 셀의 하단 가장자리부터 끼우세요.

큰 힘이 들지 않아야 합니다. 문제가 있다면 접착제 제거제를 더 바르고 2~3분 정도 더 기다리세요.

배터리를 변형하지 않도록 주의하세요. 배터리가 손상되거나 구멍이 뚫리면 위험한 화학물질이 새어 나오거나 화재가 발생할 수 있습니다.

카드를 좌우로 흔들어서 양쪽 배터리 셀 밑으로 완전히 밀어 넣으세요.

셀을 들어 올려 접착제를 완전히 분리하되 아직 MacBook에서 제거하려고 하지 마세요.

다음 단계로 진행할 때 접착제가 다시 붙지 않도록 플라스틱 카드를 셀 아래에 일시적으로 놓아두세요.

crwdns2944171:0crwdnd2944171:0crwdnd2944171:0crwdnd2944171:0crwdne2944171:0