crwdns2933423:0crwdne2933423:0

Reemplazo del ensamblaje de digitalizador y pantalla LCD de Moto G4

crwdns2931527:0crwdnd2931527:0crwdnd2931527:0crwdnd2931527:0crwdne2931527:0

crwdns2936315:0crwdne2936315:0
crwdns2936331:0crwdne2936331:0
crwdns2931653:07crwdne2931653:0
Moto G4 LCD Screen and Digitizer Assembly Replacement: crwdns2935265:00crwdnd2935265:01crwdnd2935265:03crwdne2935265:0 Moto G4 LCD Screen and Digitizer Assembly Replacement: crwdns2935265:00crwdnd2935265:02crwdnd2935265:03crwdne2935265:0 Moto G4 LCD Screen and Digitizer Assembly Replacement: crwdns2935265:00crwdnd2935265:03crwdnd2935265:03crwdne2935265:0
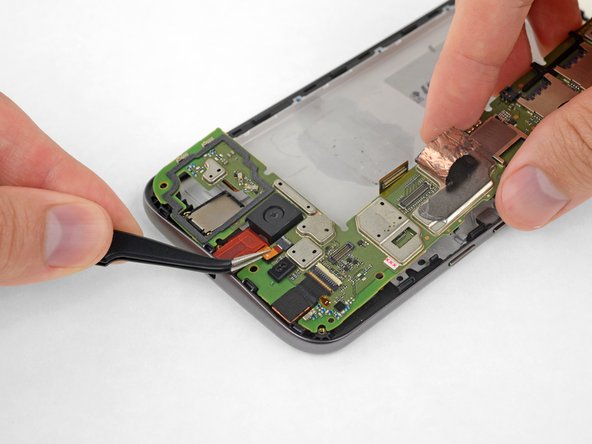
  • Grasping the motherboard by its edges, left the bottom end up at an angle, while keeping the top edge close to the phone.

  • Use your spudger to pry up the front-facing camera and make sure it separates safely from the frame. The camera can remain attached to the motherboard.

  • Using your tweezers, grasp the headphone jack flex cable and carefully pull it out of its socket as you remove the motherboard.

  • Remove the motherboard.

  • If you feel any resistance, stop. Make sure there are no components still holding the frame to the motherboard.

Tomando la placa madre de sus bordes, levanta el extremo inferior a un ángulo mientras mantienes el borde superior cerca del teléfono.

Usa tu spudger para levantar la cámara frontal y asegúrate de separarla de manera segura del marco. La cámara puede seguir conectada a la placa madre.

Usando tu pinzas, toma el cable flexible de la toma de auriculares y con cuidado sácalo de su zócalo mientras remueves la placa madre.

Remueve la placa madre.

Si sientes resistencia, para. Asegúrate de que aun no haya componentes que sujeten el marco a la placa madre.

crwdns2944171:0crwdnd2944171:0crwdnd2944171:0crwdnd2944171:0crwdne2944171:0