crwdns2933423:0crwdne2933423:0

Keurig 2.0-400 Circuit Board Replacement

crwdns2931529:0crwdnd2931529:0crwdnd2931529:0crwdnd2931529:02crwdnd2931529:0crwdne2931529:0

crwdns2936315:0crwdne2936315:0
crwdns2936311:0crwdne2936311:0
crwdns2931653:010crwdne2931653:0
Keurig 2.0-400 Circuit Board Replacement: crwdns2935265:00crwdnd2935265:01crwdnd2935265:03crwdne2935265:0 Keurig 2.0-400 Circuit Board Replacement: crwdns2935265:00crwdnd2935265:02crwdnd2935265:03crwdne2935265:0 Keurig 2.0-400 Circuit Board Replacement: crwdns2935265:00crwdnd2935265:03crwdnd2935265:03crwdne2935265:0
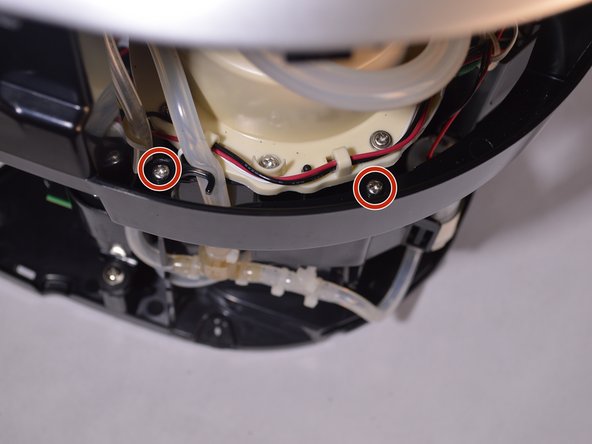
  • Reorient the brewer as shown in the picture.

  • Locate the four 140mm screws holding the top frame of the Keurig in place. Remove these screws using the Phillips #1 screwdriver.

  • Two of the screws are on the inside of the frame close to the water heater.

  • You may need to decrease the size of the screwdriver in order for it to fit inside the frame. Do this by taking out the bit extender.

  • The other two screws are located on the outside of the frame.

crwdns2935429:0crwdne2935429:0

crwdns2935429:0crwdne2935429:0

crwdns2935429:0crwdne2935429:0

crwdns2935429:0crwdne2935429:0

crwdns2935429:0crwdne2935429:0

crwdns2944171:0crwdnd2944171:0crwdnd2944171:0crwdnd2944171:0crwdne2944171:0