crwdns2933423:0crwdne2933423:0

Google Pixel 2 XLマザーボード交換

crwdns2931529:0crwdnd2931529:0crwdnd2931529:0crwdnd2931529:07crwdnd2931529:0crwdne2931529:0

crwdns2935425:07crwdne2935425:0

crwdns2936315:0crwdne2936315:0
crwdns2936323:0crwdne2936323:0
crwdns2931653:07crwdne2931653:0
Google Pixel 2 XL Motherboard Replacement: crwdns2935265:00crwdnd2935265:01crwdnd2935265:03crwdne2935265:0 Google Pixel 2 XL Motherboard Replacement: crwdns2935265:00crwdnd2935265:02crwdnd2935265:03crwdne2935265:0 Google Pixel 2 XL Motherboard Replacement: crwdns2935265:00crwdnd2935265:03crwdnd2935265:03crwdne2935265:0
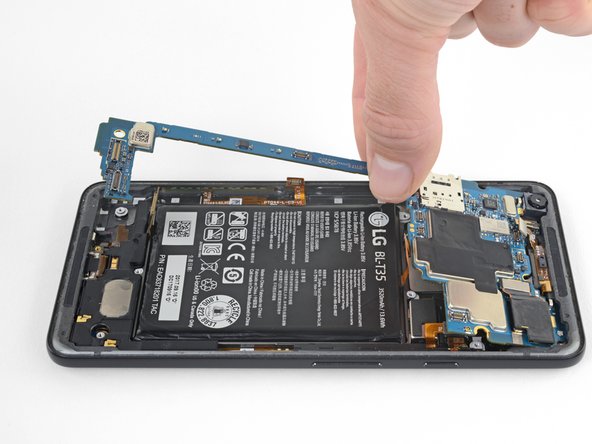
  • Make sure all the cables and connectors are clear of the board, and use the flat edge of a spudger to gently lift the bottom of the motherboard.

  • The narrow part of the motherboard is very fragile. If it starts to bend when you lift, stop and make sure there isn't anything holding the board down. The board should lift up without any resistance.

  • Holding the wide part of the motherboard near the SIM card slot, carefully slide the board toward the bottom of the phone while lifting it out of the phone.

  • Remove the motherboard.

  • Try to keep the phone flat with the battery facing up after you remove the motherboard, as the front-facing camera can fall out of the phone case very easily.

  • When reinstalling the motherboard, move all the cables and connectors out of the way of the board and make sure all connectors are aligned with their respective sockets.

全てのケーブルとコネクタが基板から解放されていることを確認してください。そして、スパッジャーの平面側先端を使って、マザーボード底部を慎重に持ち上げます。

マザーボードの狭小部は、非常に壊れやすいです。持ち上げるときに曲がりそうな場合は、作業を中断し、基盤を固定しているものがないことを確認してください。基板は、何の抵抗もなく持ち上がります。

SIMカードスロット付近のマザーボードの広い部分を掴み、スマートフォンから持ち上げながら、スマートフォン底部に向けて基板を注意深くスライドします。

マザーボードを取り外します。

正面カメラは、スマートフォンケースから非常に容易に落下するので、マザーボードを取り外した後は、バッテリーが上向きになるようにしてスマートフォンを平面上に置いてください。

マザーボードを再度取り付ける際は、全てのケーブルとコネクタが基板への作業の邪魔にならないよう固定し、全てのコネクタが各ソケットと同一直線状にあることを確認してください。

crwdns2944171:0crwdnd2944171:0crwdnd2944171:0crwdnd2944171:0crwdne2944171:0