crwdns2933423:0crwdne2933423:0

Samsung Galaxy S7 Edge ディスプレイアセンブリの交換

crwdns2936315:0crwdne2936315:0
crwdns2936323:0crwdne2936323:0
crwdns2931653:011crwdne2931653:0
Samsung Galaxy S7 Edge Display Assembly Replacement: crwdns2935265:00crwdnd2935265:01crwdnd2935265:03crwdne2935265:0 Samsung Galaxy S7 Edge Display Assembly Replacement: crwdns2935265:00crwdnd2935265:02crwdnd2935265:03crwdne2935265:0 Samsung Galaxy S7 Edge Display Assembly Replacement: crwdns2935265:00crwdnd2935265:03crwdnd2935265:03crwdne2935265:0
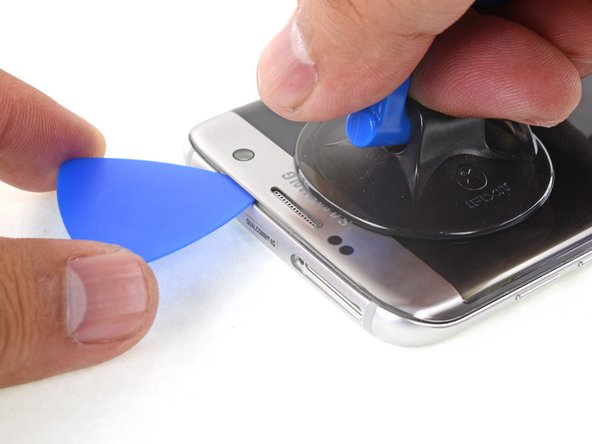
  • Once the edge is warm, apply a suction cup as close to the top edge as possible without overlapping the speaker grill.

  • If your display is badly cracked, lay down a layer of tape on the display and try lifting the display with strong tape.

  • Lift on the suction cup to create a small gap underneath the top edge of the display.

  • This may require a significant amount of force, but you only need to open a very slight gap with the suction cup to insert your tool.

  • Insert an opening pick into the gap. Take care not to insert it more than 0.25 inches in.

  • Due to the strong adhesive, this may require several attempts. Follow the iOpener heating instructions and repeat the heat-suction-lift procedure until you can get a pick in place.

エッジが温まったら、スピーカーグリルの上に重ならない、出来るだけ端に近い位置に吸盤カップを取り付けます。

ディスプレイ全体にひび割れが広がっている場合、ディスプレイ上にテープを貼ってから、強力なテープでディスプレイを引き上げます。

吸盤カップを持ち上げて、ディスプレイ上部端の下に小さな隙間を作ります。

この作業にはかなりの力が必要ですが、吸盤カップで、ツールを挿入できるだけのわずかな隙間を作るだけです。

隙間に開口ピックを挿入します。ピックの先端を0.5cm以上差し込まないようにご注意ください。

強力な接着力のため、iOpener のインストラクションに従って再度温めなおし、開口ピックを隙間に挿入できるまで、装着した吸盤カップを引き上げる作業を繰り返します。

crwdns2944171:0crwdnd2944171:0crwdnd2944171:0crwdnd2944171:0crwdne2944171:0