crwdns2933423:0crwdne2933423:0

Remplacement de l'écran complet et du capteur d'empreintes digitales du Motorola Moto Z2 Force

crwdns2931529:0crwdnd2931529:0crwdnd2931529:0crwdnd2931529:06crwdnd2931529:0crwdne2931529:0

crwdns2936315:0crwdne2936315:0
crwdns2936317:0crwdne2936317:0
crwdns2931653:02crwdne2931653:0
Motorola Moto Z2 Force Display and Fingerprint Sensor Replacement, Release the Screen Assembly: crwdns2935265:00crwdnd2935265:01crwdnd2935265:03crwdne2935265:0 Motorola Moto Z2 Force Display and Fingerprint Sensor Replacement, Release the Screen Assembly: crwdns2935265:00crwdnd2935265:02crwdnd2935265:03crwdne2935265:0 Motorola Moto Z2 Force Display and Fingerprint Sensor Replacement, Release the Screen Assembly: crwdns2935265:00crwdnd2935265:03crwdnd2935265:03crwdne2935265:0
Release the Screen Assembly
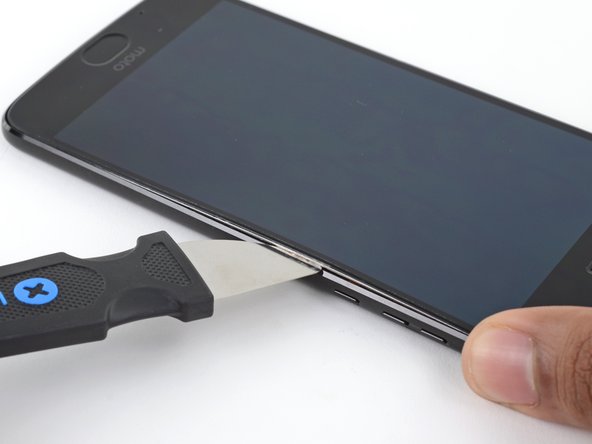
  • Insert a Jimmy or other metal tool between the right side of the plastic display and the metal frame, near the phone's side buttons.

  • This may require a considerable amount of force. Push the tool as far down into the gap as you can, taking care to not scratch the chassis of your device in the process.

  • Tilt the Jimmy downward while continuing to push it deeper into the gap to pry up the right side of the screen assembly.

  • Since the display on top of the screen assembly is flexible and only attached with a slight amount of adhesive, you may end up prying up only the display instead of lifting the entire assembly. If this occurs, remove the tool and try again, this time using more downward force to get underneath the entire assembly.

  • Ensure your tool is behind the entire screen assembly and not just the display. If done correctly, you should notice the thin silver metal midframe come up with the plastic display (as pictured).

Insérez un Jimmy ou un autre outil en métal entre le côté droit en plastique de l'écran et le bord métallique, près des boutons latéraux du téléphone.

Cela peut demander beaucoup de force. Poussez l'outil aussi profondément que possible dans l'interstice, en faisant attention à ne pas rayer le châssis de l'appareil.

Inclinez le Jimmy vers le bas en continuant à le pousser plus profondément dans l'ouverture, pour dégager le côté droit de l'écran.

Il se peut que vous ne souleviez que le LCD qui est souple et fixé par de l'adhésif, au lieu d'enlever l'écran complet. Si cela vous arrive, retirez l'outil et recommencez en vous assurant d'appuyer plus vers le bas pour passer sous l'écran complet.

Vérifiez que votre outil est sous l'écran complet et pas juste sous le LCD. Vous pouvez vous en assurer en vérifiant que le support fin en métal est soulevé avec la partie plastique de l'écran (voir photo)

crwdns2944171:0crwdnd2944171:0crwdnd2944171:0crwdnd2944171:0crwdne2944171:0