crwdns2933423:0crwdne2933423:0

Google Pixel 2 XLのスクリーンの交換

crwdns2931527:0crwdnd2931527:0crwdnd2931527:0crwdnd2931527:0crwdne2931527:0

crwdns2936315:0crwdne2936315:0
crwdns2936323:0crwdne2936323:0
crwdns2931653:04crwdne2931653:0
Google Pixel 2 XL Screen Replacement: crwdns2935265:00crwdnd2935265:01crwdnd2935265:03crwdne2935265:0 Google Pixel 2 XL Screen Replacement: crwdns2935265:00crwdnd2935265:02crwdnd2935265:03crwdne2935265:0 Google Pixel 2 XL Screen Replacement: crwdns2935265:00crwdnd2935265:03crwdnd2935265:03crwdne2935265:0
  • If you're reusing the camera gasket from your old screen, the old adhesive may have stuck to the gasket when you removed it. If this is the case, and the adhesive is still sticky, skip to the last step.

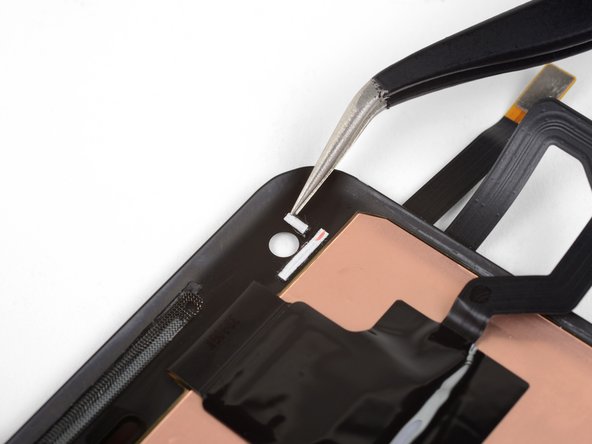
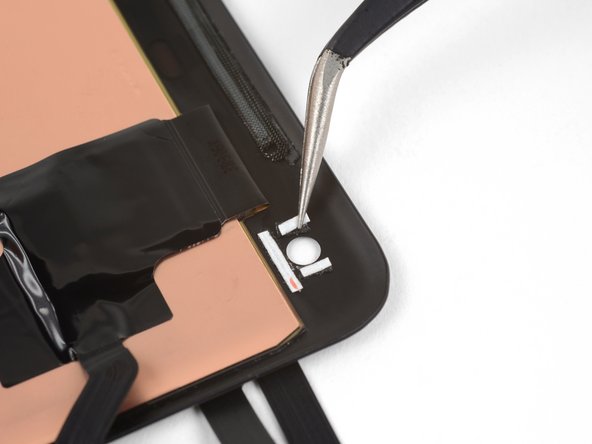
  • Cut one strip of 1 mm wide adhesive to be 6 mm (1/4") long.

  • Place the adhesive underneath the front-facing camera hole, parallel to the top edge of the display.

  • Cut two 3 mm (1/8") strips of 1 mm wide adhesive.

  • Place the adhesive strips to the left and right of the camera hole, perpendicular to the bottom adhesive strip.

  • Gently press the adhesive strips into place on the display with your finger or a spudger.

  • Make sure all three strips are as close as possible to the camera hole, without overlapping the hole.

古い画面に付いていたカメラのガスケットを再利用する場合は、取り外す際にガスケットに接着剤が付着していることがあります。このような場合は、接着剤に粘り気が残っているため、最後の手順までスキップしてください。

1 ㎜幅の両面テープを、長さ6 mmにカットします。

両面テープを、ディスプレイの上端と平行になるように、フロントカメラホールの下に貼ります。

1 ㎜幅の両面テープを、長さ3 ㎜に、2本カットします。

両面テープを、前の手順で貼った両面テープと直角になるように、カメラホールの左右に1つずつ貼ります。

指またはスパッジャーを使用して、両面テープをディスプレイの所定の位置にゆっくりと押し込みます。

3本すべての両面テープは、できるだけカメラホールの近くに貼ります。ただしホールに重ならないようにします。

crwdns2944171:0crwdnd2944171:0crwdnd2944171:0crwdnd2944171:0crwdne2944171:0