crwdns2933423:0crwdne2933423:0

Reemplazo de la pantalla Google Pixel 2 XL

crwdns2931527:0crwdnd2931527:0crwdnd2931527:0crwdnd2931527:0crwdne2931527:0

crwdns2935425:01crwdne2935425:0

crwdns2936315:0crwdne2936315:0
crwdns2936331:0crwdne2936331:0
crwdns2931653:01crwdne2931653:0
Google Pixel 2 XL Screen Replacement: crwdns2935265:00crwdnd2935265:01crwdnd2935265:03crwdne2935265:0 Google Pixel 2 XL Screen Replacement: crwdns2935265:00crwdnd2935265:02crwdnd2935265:03crwdne2935265:0 Google Pixel 2 XL Screen Replacement: crwdns2935265:00crwdnd2935265:03crwdnd2935265:03crwdne2935265:0
  • Your replacement display may not come with pre-installed speaker grilles or a front-facing camera gasket. If that is the case, use tweezers to carefully remove these parts from your old display and follow the rest of the guide to install them on a new display.

  • Clean any adhesive residue off of the parts before reinstalling them.

  • Make sure to install the grilles and gasket before applying display adhesive.

  • Cut a strip of 1 mm wide double-sided tape to be about 3 cm (1.25 inches) long.

  • Lay the adhesive strip along the upper edge of the earpiece speaker slot in your new display so that it's centered over the slot and touching the upper edge.

  • The adhesive strip needs to be as close as possible to the edge of the slot without overlapping. Otherwise, it can interfere with the display adhesive.

  • Gently press the adhesive strip into place on the display with your finger or a spudger.

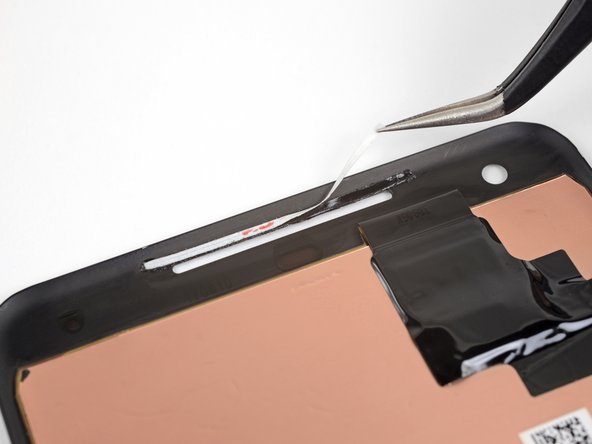
  • Peel the white backing away from the adhesive strip.

Tu pantalla de reemplazo podría no venir con las rejillas del altavoz preinstaladas o una junta de la cámara frontal. Si este es el caso, usa pinzas para remover con cuidado estas partes de tu pantalla vieja y sigue el resto de la guía para instalarlas en la pantalla nueva.

Limpia cualquier residuo de adhesivo de las partes antes de aplicar el adhesivo de la pantalla.

Asegúrate de instalar las rejillas y junta antes de aplicar adhesivo en la pantalla.

Corta una tira de 1 mm de ancho de cinta de doble cara que tenga alrededor de 3 cm de largo.

Coloca la tira adhesiva a lo largo del borde superior de la ranura del altavoz auricular en tu pantalla nueva para que esté centrada sobre la ranura y tocando el borde superior.

La tira adhesiva debe estar lo más cerca posible del borde de la ranura sin sobreponerse. De lo contrario, puede interferir con el adhesivo de la pantalla.

Con cuidado presiona la tira de adhesivo en su lugar en la pantalla con tu dedo o un spudger.

Despega el respaldo blanco de la tira adhesiva.

-[* black] Your replacement display may not come with pre-installed speaker grilles or a front-facing camera gasket. If that is the case, use tweezers to carefully remove these parts from your old display and follow the rest of the guide to install them on a new display.
+[* black] Your replacement display may not come with pre-installed speaker grilles or a front-facing camera gasket. If that is the case, use [product|IF145-020|tweezers] to carefully remove these parts from your old display and follow the rest of the guide to install them on a new display.
[* black] Clean any adhesive residue off of the parts before reinstalling them.
[* icon_note] Make sure to install the grilles and gasket before applying display adhesive.
[* black] Cut a strip of 1 mm wide double-sided tape to be about 3 cm (1.25 inches) long.
[* black] Lay the adhesive strip along the upper edge of the earpiece speaker slot in your new display so that it's centered over the slot and touching the upper edge.
[* icon_note] The adhesive strip needs to be as close as possible to the edge of the slot without overlapping. Otherwise, it can interfere with the display adhesive.
[* black] Gently press the adhesive strip into place on the display with your finger or a spudger.
[* black] Peel the white backing away from the adhesive strip.

crwdns2944171:0crwdnd2944171:0crwdnd2944171:0crwdnd2944171:0crwdne2944171:0