crwdns2915892:0crwdne2915892:0
Use this guide to replace the headphone jack on your iPod Touch.
crwdns2942213:0crwdne2942213:0
-
-
With the heat gun set on "low", begin heating the lower portion of the Touch near the home button.
-
-
-
Insert the edge of an iPod opening tool between the front glass panel and the plastic bezel near the home button.
-
Pry the bottom edge of the front panel upward, being careful not to bend the glass excessively.
-
-
-
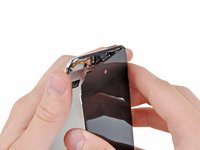
When there is enough room to grab the bottom edge of the front panel, lift it away from the body of the Touch to peel up the adhesive along its left and right edges.
-
-
-
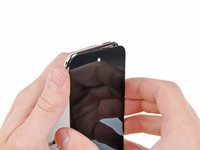
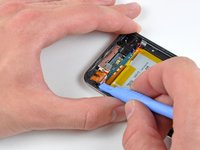
Carefully pull the top of the front panel assembly away from the adhesive holding it to the Touch, minding the short digitizer cable connecting the two components.
-
-
-
-
Remove the following eight Phillips #00 screws:
-
One 3.5 mm Phillips screw
-
Two 3.0 mm Phillips screws
-
One 2.3 mm Phillips screw
-
One 2.4 mm Phillips screw
-
Three 2.0 mm Phillips screws
-
-
-
Use the edge of an iPod opening tool to pry the thin steel cover up from the rear-facing camera.
-
Remove the steel cover from the iPod.
-
-
-
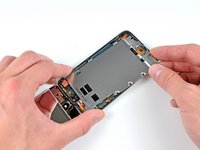
Insert the edge of an opening tool under the steel mid plate near the bottom left corner of the Touch.
-
Slowly pry upward to separate the plate from the adhesive securing it to the plastic inner case.
-
If the plate is still attached to the logic board, re-warm the area to loosen the adhesive, then slowly separate the plate from the logic board using the opening tool.
-
There is a thin, fragile ribbon cable underneath the plate. As you pry the plate up, be very careful not to rip the cable.
-
-
-
Slightly tilt the steel mid plane to dislodge it from the rear case.
-
Lift the steel mid plane up off the rear case and peel off the piece of copper tape stuck to the rear-facing camera.
-
-
-
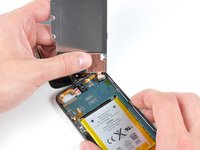
Use an iPod opening tool to pry the headphone jack connector up and out of its socket on the logic board.
-
-
-
Remove the single 2.6 mm Phillips screw securing the headphone jack assembly to the rear case.
-
-
-
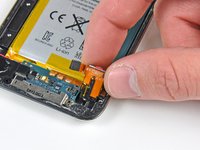
Use an iPod opening tool to gently lift the edge of the headphone jack nearest the battery out of its recess.
-
Remove the headphone jack from its housing within the rear case.
-


To reassemble your device, follow these instructions in reverse order.
To reassemble your device, follow these instructions in reverse order.
crwdns2935221:0crwdne2935221:0
crwdns2935229:062crwdne2935229:0

crwdns2947412:03crwdne2947412:0
BEFORE TO OPERATE, make sure that your headphone jack problem is not a clump of pocket dust stuck into it. It is hard to see so use a needle from which you curve the end a little bit. Make sure to empty it properly. Mine is like new.
You made my day
This Project was not hard if you are patient and sober. The guide is not so clear on reassembly. I RECOMMEND GETTING SOME SORT OF ADHESIVE FOR THE SCREEN when you replace anything on this Ipod. Most likely the previous adhesive will not be strong enough to hold it together, so rip it out and start over.