crwdns2915892:0crwdne2915892:0
Replace a broken display with this guide.
crwdns2942213:0crwdne2942213:0
-
-
The picture at left (front panel already removed) shows the locations of the metal clips (shown in red) that snap on to the plastic frame. In the next few steps, try to pry the front panel up from the gaps between these clips.
-
-
-
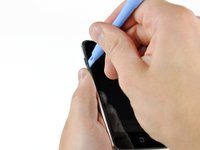
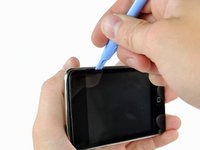
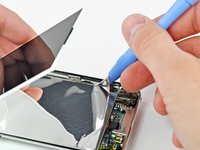
Gently insert a plastic opening tool, near the volume control buttons, between the plastic surround of the screen and the metal case.
-
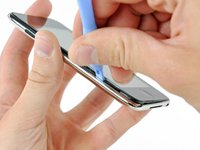
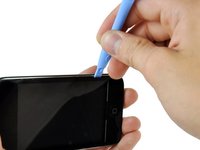
Rotate the tool away from the Touch to pry up on the glass panel.
-
-
-
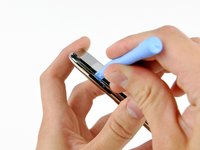
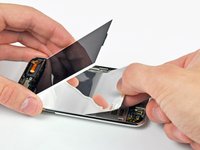
Insert the plastic opening tool between the front panel and its plastic surround and pry up at several points along the left edge of the Touch.
-
-
-
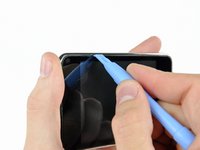
Continue prying up the left edge until the top and bottom edges start to lift out of the Touch.
-
Once the top and bottom edges have lifted slightly out of the Touch, use the opening tool to assure the plastic surround is detached from the clips along the inside of the Touch.
-
-
-
Continue the prying procedure, now focusing on detaching the plastic surround from the internal metal clips.
-
Pry along the top edge of the Touch to further separate the front panel from the rest of the device.
-
-
-
Pry up the front panel along the right edge using the method described in previous steps.
-
Eventually work around the entire perimeter of the front panel until it is lifted slightly from the rear panel.
-
-
-
-
Lift the front panel out of the rear case minding the cable still attaching it near the upper left corner of the Touch.
-
-
-
Use the flat end of a spudger (or an opening tool) to pry the touch screen cable connector up off the upper logic board.
-
-
-
Insert a small iPod opening tool with the edge angled up toward the underside of the display between the white plastic backlight and the metal shield beneath it.
-
Pry up along the lower edge of the display enough to grab it with your fingers.
-
-
-
Lift the display up from its lower edge and rotate it toward the top of the Touch.
-
-
-
While holding the display with one hand, run an iPod opening tool down the two long edges of the mylar reflector attached to the metal display tray.
-
When it is sufficiently free from the display tray, remove the mylar reflector from the Touch.
-
-
-
Remove the seven Phillips screws securing the metal display tray to the rear panel.
-
-
-
Lay the display back down into its tray.
-
Remove the final Phillips screw securing the metal tray to the rear panel.
-
-
-
Lift the display out of the metal tray and rotate it toward the top edge of the Touch.
-
Use an iPod opening tool to lift the metal display tray and rotate it up toward the top edge of the Touch.
-
-
-
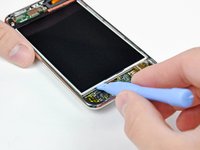
Use the edge of an iPod opening tool to peel the copper tape off the top edge of the display.
-
-
-
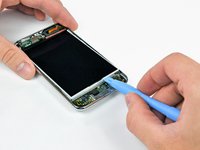
Use an iPod opening tool to pry the display cable connector up off its socket on the logic board.
-
-
-
Lift the metal display tray slightly (the battery is attached to its underside) and remove the display from the Touch, minding its delicate cable that may get caught.
-


To reassemble your device, follow these instructions in reverse order.
To reassemble your device, follow these instructions in reverse order.
crwdns2935221:0crwdne2935221:0
crwdns2935229:0169crwdne2935229:0

crwdns2947412:04crwdne2947412:0
I wore a pair of nitrile gloves (the blue ones) while putting in the new LCD and glass. That way no fingerprints got on the inside portions of the screens.
Thanks for the great instructions, I'm happy to keep using my same iPod and not have to buy a whole new unit.
Somehow it always get left out of these tutorals that the !@#$ thing has ALL parts glued together! There's a thin layer of what looks like silicon sealant/glue between the glass and the metal shell. Then the LCD is glued (also with silicon) to mylar backing and mylar backing is glued to the metal frame. The battery is also glued to that frame. The glue gives if you're persistent but it's very easy to crack the LCD while trying to pry it from the metal frame and I had to literally cut the battery off of the other side of that frame.
Ugh... Apple makes it almost impossible to open without breaking it.
Having successfully changed several iPhone batteries I decided to replace the cracked glass on my 2nd Gen Touch but it's practically impossible to do without damaging the rest of the iPod. With 2nd hand values as they are now in 2022 it's actually cheaper to buy a decent second hand 3rd. Gen one than it cost to buy the new screen, mid-frame & glue to repair the original.!! Not my ideal as I wanted to repair the old one, but at least I'm making use of another iPod that the previous owner no longer wanted. I have no doubt that these are repairable but a great deal of care & experience / practice is required & mine ended up being scrapped :-(