crwdns2933423:0crwdne2933423:0
crwdns2947577:0crwdnd2947577:0crwdne2947577:0

iPod Nano 7th Generation Volume Rocker Replacement

crwdns2942213:0crwdne2942213:0

    1. iPod Nano 7th Generation Volume Rocker Replacement, iOpener Heating: crwdns2935265:01crwdnd2935265:01crwdnd2935265:02crwdne2935265:0 iPod Nano 7th Generation Volume Rocker Replacement, iOpener Heating: crwdns2935265:01crwdnd2935265:02crwdnd2935265:02crwdne2935265:0
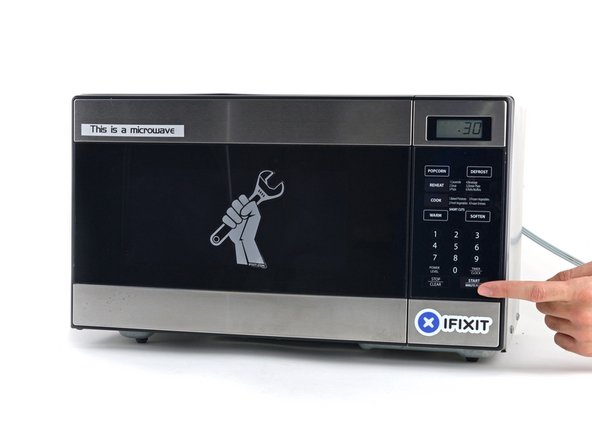
      • We recommend that you clean your microwave before proceeding, as any nasty gunk on the bottom may end up stuck to the iOpener.

      • Place the iOpener in the center of the microwave.

      • For carousel microwaves: Make sure the plate spins freely. If your iOpener gets stuck, it may overheat and burn.

      crwdns2952109:0crwdne2952109:0

      crwdns2917038:0crwdne2917038:0

    2. iPod Nano 7th Generation Volume Rocker Replacement: crwdns2935265:02crwdnd2935265:01crwdnd2935265:01crwdne2935265:0
      • Heat the iOpener for thirty seconds.

      • Depending on the wattage of your microwave, more or less time may be required. The iOpener is sufficiently heated when it's barely too hot to touch.

      • Throughout the repair procedure, as the iOpener cools, reheat it in the microwave for an additional thirty seconds at a time.

      • Be careful not to overheat the iOpener during the repair. Overheating may cause the iOpener to burst. Do not attempt to heat over 100˚C (212˚F).

      • Never touch the iOpener if it appears swollen.

      • If the iOpener is still too hot in the middle to touch, continue using it while waiting for it to cool down some more before reheating. A properly heated iOpener should stay warm for up to 10 minutes.

      crwdns2952109:0crwdne2952109:0

      crwdns2917038:0crwdne2917038:0

    3. iPod Nano 7th Generation Volume Rocker Replacement: crwdns2935265:03crwdnd2935265:01crwdnd2935265:01crwdne2935265:0
      • Remove the iOpener from the microwave, holding it by one of the two flat ends to avoid the hot center.

      • The iOpener will be very hot, so be careful when handling it. Use an oven mitt if necessary.

      crwdns2952109:0crwdne2952109:0

      crwdns2917038:0crwdne2917038:0

    4. iPod Nano 7th Generation Volume Rocker Replacement, Alternate iOpener heating method: crwdns2935265:04crwdnd2935265:01crwdnd2935265:02crwdne2935265:0 iPod Nano 7th Generation Volume Rocker Replacement, Alternate iOpener heating method: crwdns2935265:04crwdnd2935265:02crwdnd2935265:02crwdne2935265:0
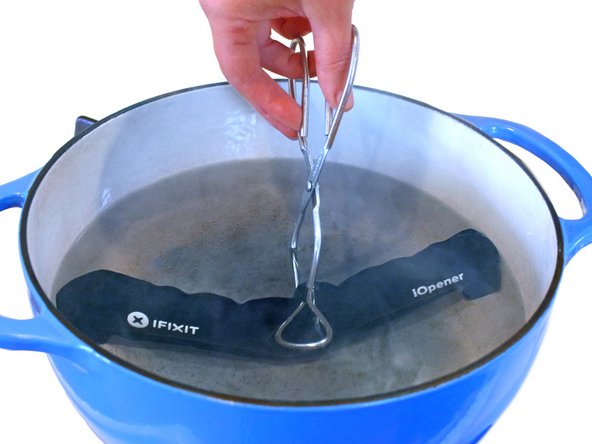
      • If you don't have a microwave, follow this step to heat your iOpener in boiling water.

      • Fill a pot or pan with enough water to fully submerge an iOpener.

      • Heat the water to a boil. Turn off the heat.

      • Place an iOpener into the hot water for 2-3 minutes. Make sure the iOpener is fully submerged in the water.

      • Use tongs to extract the heated iOpener from the hot water.

      • Thoroughly dry the iOpener with a towel.

      • The iOpener will be very hot, so be careful to hold it only by the end tabs.

      • Your iOpener is ready for use! If you need to reheat the iOpener, heat the water to a boil, turn off the heat, and place the iOpener in the water for 2-3 minutes.

      crwdns2952109:0crwdne2952109:0

      crwdns2917038:0crwdne2917038:0

    1. iPod Nano 7th Generation Volume Rocker Replacement, Front Panel Assembly: crwdns2935265:05crwdnd2935265:01crwdnd2935265:02crwdne2935265:0 iPod Nano 7th Generation Volume Rocker Replacement, Front Panel Assembly: crwdns2935265:05crwdnd2935265:02crwdnd2935265:02crwdne2935265:0
      • Lay the iOpener over the plastic tab to loosen the adhesive. Let the bag sit on the device for approximately 90 seconds before attempting to open the panel.

      crwdns2952109:0crwdne2952109:0

      crwdns2917038:0crwdne2917038:0

    2. iPod Nano 7th Generation Volume Rocker Replacement: crwdns2935265:06crwdnd2935265:01crwdnd2935265:03crwdne2935265:0 iPod Nano 7th Generation Volume Rocker Replacement: crwdns2935265:06crwdnd2935265:02crwdnd2935265:03crwdne2935265:0 iPod Nano 7th Generation Volume Rocker Replacement: crwdns2935265:06crwdnd2935265:03crwdnd2935265:03crwdne2935265:0
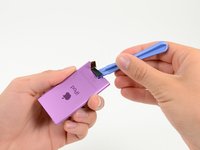
      • Use a plastic opening tool to pull the rear plastic cover away from the device until there is enough room to insert a spudger.

      • Insert a spudger under the cover, then pry it up and away from the device.

      • Remove the rear plastic cover from the iPod.

      • Be very careful in removing the plastic cover as the bluetooth antenna is adhered to it.

      crwdns2952109:0crwdne2952109:0

      crwdns2917038:0crwdne2917038:0

    3. iPod Nano 7th Generation Volume Rocker Replacement: crwdns2935265:07crwdnd2935265:01crwdnd2935265:01crwdne2935265:0
      • Gently bend the Bluetooth antenna to the right, out of the way of the screws in the bottom of the device.

      • Remove the single 1.4 mm Phillips #000 screw from the black plastic spacer.

      crwdns2952109:0crwdne2952109:0

      crwdns2917038:0crwdne2917038:0

    4. iPod Nano 7th Generation Volume Rocker Replacement: crwdns2935265:08crwdnd2935265:01crwdnd2935265:02crwdne2935265:0 iPod Nano 7th Generation Volume Rocker Replacement: crwdns2935265:08crwdnd2935265:02crwdnd2935265:02crwdne2935265:0
      • Use a plastic opening tool to remove the black plastic spacer from the Nano.

      crwdns2952109:0crwdne2952109:0

      crwdns2917038:0crwdne2917038:0

    5. iPod Nano 7th Generation Volume Rocker Replacement: crwdns2935265:09crwdnd2935265:01crwdnd2935265:01crwdne2935265:0
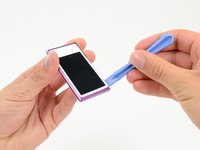
      • Remove the two 2 mm Phillips #000 screws from the bottom of the case.

      crwdns2952109:0crwdne2952109:0

      crwdns2917038:0crwdne2917038:0

    6. iPod Nano 7th Generation Volume Rocker Replacement: crwdns2935265:010crwdnd2935265:01crwdnd2935265:02crwdne2935265:0 iPod Nano 7th Generation Volume Rocker Replacement: crwdns2935265:010crwdnd2935265:02crwdnd2935265:02crwdne2935265:0
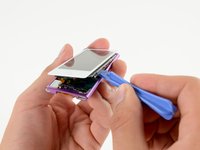
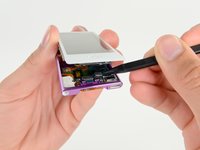
      • Insert a plastic opening tool into the seam between the white plastic front panel and the rear case.

      • Slide the opening tool along the edge of the front panel to free it from clips and adhesive.

      crwdns2952109:0crwdne2952109:0

      crwdns2917038:0crwdne2917038:0

    7. iPod Nano 7th Generation Volume Rocker Replacement: crwdns2935265:011crwdnd2935265:01crwdnd2935265:01crwdne2935265:0
      • Use a spudger to press the midframe screw tab up and out of the rear case.

      crwdns2952109:0crwdne2952109:0

      crwdns2917038:0crwdne2917038:0

    8. iPod Nano 7th Generation Volume Rocker Replacement: crwdns2935265:012crwdnd2935265:01crwdnd2935265:01crwdne2935265:0
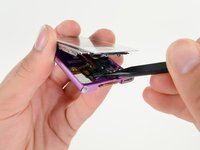
      • Use a metal spudger to carefully pry near the Lightning connector and under all parts of the front panel assembly: the front glass/digitizer, the LCD display and the metal midframe.

      • The adhesive under the metal midframe/display assembly is quite strong and the components are fragile, so go slowly and gently. Make sure you do not bend the LCD screen.

      crwdns2952109:0crwdne2952109:0

      crwdns2917038:0crwdne2917038:0

    9. iPod Nano 7th Generation Volume Rocker Replacement: crwdns2935265:013crwdnd2935265:01crwdnd2935265:02crwdne2935265:0 iPod Nano 7th Generation Volume Rocker Replacement: crwdns2935265:013crwdnd2935265:02crwdnd2935265:02crwdne2935265:0
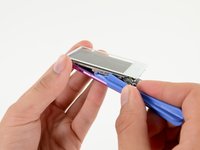
      • Continue prying along the edges under the front panel assembly, releasing the clips and adhesive along the sides of the device.

      crwdns2952109:0crwdne2952109:0

      crwdns2917038:0crwdne2917038:0

    10. iPod Nano 7th Generation Volume Rocker Replacement: crwdns2935265:014crwdnd2935265:01crwdnd2935265:02crwdne2935265:0 iPod Nano 7th Generation Volume Rocker Replacement: crwdns2935265:014crwdnd2935265:02crwdnd2935265:02crwdne2935265:0
      • Pull the front panel assembly slightly down and partially out of the device.

      • You only need to open the device enough to gain access to the display cable connectors near the sleep/power button.

      • Do not separate the two halves entirely, they are still connected by several cables.

      crwdns2952109:0crwdne2952109:0

      crwdns2917038:0crwdne2917038:0

    11. iPod Nano 7th Generation Volume Rocker Replacement: crwdns2935265:015crwdnd2935265:01crwdnd2935265:02crwdne2935265:0 iPod Nano 7th Generation Volume Rocker Replacement: crwdns2935265:015crwdnd2935265:02crwdnd2935265:02crwdne2935265:0
      • Use a spudger to release the digitizer cable and display data cable connectors.

      crwdns2952109:0crwdne2952109:0

      crwdns2917038:0crwdne2917038:0

    12. iPod Nano 7th Generation Volume Rocker Replacement: crwdns2935265:016crwdnd2935265:01crwdnd2935265:01crwdne2935265:0
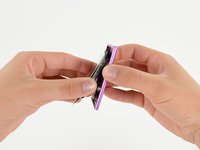
      • Gently unfold the two halves of the device to access the internal components.

      • Do not try to completely separate the two sections, yet, as they are still attached via a soldered cable.

      crwdns2952109:0crwdne2952109:0

      crwdns2917038:0crwdne2917038:0

    13. iPod Nano 7th Generation Volume Rocker Replacement: crwdns2935265:017crwdnd2935265:01crwdnd2935265:02crwdne2935265:0 iPod Nano 7th Generation Volume Rocker Replacement: crwdns2935265:017crwdnd2935265:02crwdnd2935265:02crwdne2935265:0
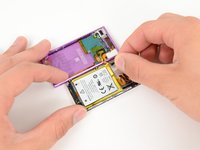
      • Pull up on the battery pull tab to free the battery from its adhesive.

      • Flip the battery over into the rear case for safekeeping.

      crwdns2952109:0crwdne2952109:0

      crwdns2917038:0crwdne2917038:0

    14. iPod Nano 7th Generation Volume Rocker Replacement: crwdns2935265:018crwdnd2935265:01crwdnd2935265:01crwdne2935265:0
      • Completely separate the front panel assembly from the rest of the device.

      crwdns2952109:0crwdne2952109:0

      crwdns2917038:0crwdne2917038:0

    1. iPod Nano 7th Generation Volume Rocker Replacement, Volume Rocker: crwdns2935265:019crwdnd2935265:01crwdnd2935265:01crwdne2935265:0
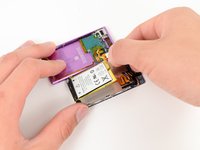
      • Flip the battery down over the logic board to gain access to the sleep/power button assembly.

      • Remove the two 1.4 mm Phillips #000 screws from the sleep/power button bracket.

      crwdns2952109:0crwdne2952109:0

      crwdns2917038:0crwdne2917038:0

    2. iPod Nano 7th Generation Volume Rocker Replacement: crwdns2935265:020crwdnd2935265:01crwdnd2935265:02crwdne2935265:0 iPod Nano 7th Generation Volume Rocker Replacement: crwdns2935265:020crwdnd2935265:02crwdnd2935265:02crwdne2935265:0
      crwdns2935267:0crwdne2935267:0
      Tweezers
      $4.99
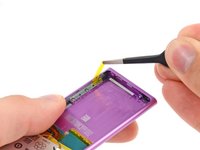
      • Remove the bracket with a pair of tweezers.

      crwdns2952109:0crwdne2952109:0

      crwdns2917038:0crwdne2917038:0

    3. iPod Nano 7th Generation Volume Rocker Replacement: crwdns2935265:021crwdnd2935265:01crwdnd2935265:02crwdne2935265:0 iPod Nano 7th Generation Volume Rocker Replacement: crwdns2935265:021crwdnd2935265:02crwdnd2935265:02crwdne2935265:0
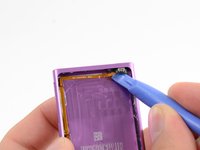
      • Insert a plastic opening tool under the sleep button, and gently pry upwards to free it from its adhesive.

      • Slide the plastic opening tool along the underside of the sleep button ribbon cable.

      • Continue freeing the ribbon cable until you can access the volume buttons on the left side of the rear case.

      crwdns2952109:0crwdne2952109:0

      crwdns2917038:0crwdne2917038:0

    4. iPod Nano 7th Generation Volume Rocker Replacement: crwdns2935265:022crwdnd2935265:01crwdnd2935265:02crwdne2935265:0 iPod Nano 7th Generation Volume Rocker Replacement: crwdns2935265:022crwdnd2935265:02crwdnd2935265:02crwdne2935265:0
      • Peel back and remove any tape covering the volume control button assembly.

      crwdns2952109:0crwdne2952109:0

      crwdns2917038:0crwdne2917038:0

    5. iPod Nano 7th Generation Volume Rocker Replacement: crwdns2935265:023crwdnd2935265:01crwdnd2935265:01crwdne2935265:0
      • Remove the three 1.4 mm Phillips #000 screws securing the volume control button assembly to the rear case.

      crwdns2952109:0crwdne2952109:0

      crwdns2917038:0crwdne2917038:0

    6. iPod Nano 7th Generation Volume Rocker Replacement: crwdns2935265:024crwdnd2935265:01crwdnd2935265:02crwdne2935265:0 iPod Nano 7th Generation Volume Rocker Replacement: crwdns2935265:024crwdnd2935265:02crwdnd2935265:02crwdne2935265:0
      • Use the pointed end of a spudger to pry the volume control button assembly away from the edge of the case.

      • Do not remove the volume control button assembly from the device entirely; it is still connected to the logic board assembly by a soldered cable.

      crwdns2952109:0crwdne2952109:0

      crwdns2917038:0crwdne2917038:0

    7. iPod Nano 7th Generation Volume Rocker Replacement: crwdns2935265:025crwdnd2935265:01crwdnd2935265:02crwdne2935265:0 iPod Nano 7th Generation Volume Rocker Replacement: crwdns2935265:025crwdnd2935265:02crwdnd2935265:02crwdne2935265:0
      • Using a spudger, gently push the volume rocker into the device from the outside.

      • The volume rocker is tucked into a thin rubber gasket. Try not to stretch the gasket too much as it may tear.

      crwdns2952109:0crwdne2952109:0

      crwdns2917038:0crwdne2917038:0

    8. iPod Nano 7th Generation Volume Rocker Replacement: crwdns2935265:026crwdnd2935265:01crwdnd2935265:02crwdne2935265:0 iPod Nano 7th Generation Volume Rocker Replacement: crwdns2935265:026crwdnd2935265:02crwdnd2935265:02crwdne2935265:0
      • Remove the volume rocker from the gasket and rear case.

      • During reassembly, use the pointed end of a spudger to fold the rubber gasket down away from the side of the case. Slip the volume rocker back into its recess and resettle the gasket.

      crwdns2952109:0crwdne2952109:0

      crwdns2917038:0crwdne2917038:0

crwdns2915888:0crwdne2915888:0

To reassemble your device, follow these instructions in reverse order.

crwdns2935221:0crwdne2935221:0

crwdns2935229:04crwdne2935229:0

Sam Goldheart

crwdns2935283:010/18/12crwdne2935283:0

478,260 crwdns2915208:0crwdne2915208:0

crwdns2935297:0538crwdne2935297:0

crwdns2935287:0crwdne2935287:0

iFixit crwdns2935289:0iFixitcrwdne2935289:0

Staff

crwdns2931471:0122crwdne2931471:0

crwdns2935297:086,241crwdne2935297:0

crwdns2947412:02crwdne2947412:0

where can i find this volume button rocker?

I can't find on the web

help

io - crwdns2934203:0crwdne2934203:0 crwdns2950251:0crwdne2950251:0

reassembly is not just the reverse of the disassembly. new adhesive is necessary as well as new instructions.

proj964 - crwdns2934203:0crwdne2934203:0 crwdns2950251:0crwdne2950251:0
crwdns2917038:0crwdne2917038:0

crwdns2936625:0crwdne2936625:0:

crwdns2936751:024crwdne2936751:0 2

crwdns2936753:07crwdne2936753:0 34

crwdns2936753:030crwdne2936753:0 96

crwdns2942667:0crwdne2942667:0 9,777