crwdns2915892:0crwdne2915892:0
Replace the curved glass screen to make your iPod Nano look like new again.
crwdns2942213:0crwdne2942213:0
-
-
Insert an iPod opening tool between the outer case and top bezel near the screen.
-
Lifting up on the iPod opening tool, gently pry the top panel off of the device.
-
-
-
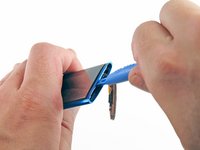
Use an iPod opening tool to pry the hold switch button off of the hold switch plate.
-
-
-
-
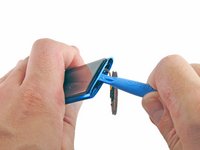
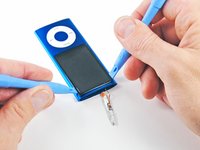
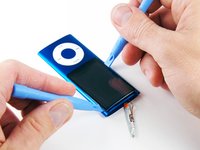
Insert an iPod opening tool between the outer case and the metal hold switch plate near the top of the screen .
-
While slightly lifting up on the iPod opening tool, pull the hold switch plate out of the iPod.
My ribbon broke.
I see that on the pictures further down, you removed the covering plate, which I would suggest to do, as it'll put less weight on the ribbon.
Luckily, we can find spare ones. In fact it doesn't sell alone, it's with the earphones jack.
could you elaborate more as to how did you remedy the broken ribbon?
is the broken ribbon fixable?
is the broken ribbon fixable?
I am new to this my ribbon broke when I was taking out the battery doesn't the new battery ribbon connect to the one connected to the end switch, by that I mean can I connect the new battery ribbon to the end switch ribbon?,where it broke?
I would say to just separate the hold switch from the top plate here. It would reduce the likely hood of a snapped ribbon cable. Less surface area for it to get caught on everything when sliding out.
-
-
-
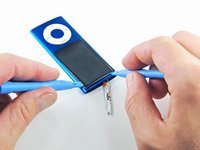
Insert an iPod opening tool between the display and the glass panel at the top of the device.
-
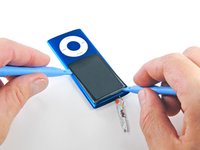
Rotate the iPod opening tool towards the rear of the device, slightly lifting the top of the glass out of the outer case.
I would recommend using a heat gun.
At this point, I find it helps to separate the lock switch from the top metal casting. You then have just the switch dangling on the fragile ribbon cable. Much less likely to snag or break the ribbon. Just loosen (Don't remove completely) the two Phillips screws. The heavy clunky casting bit can be removed.
You can remove this lens with virtually zero risk to the LCD underneath:
Get a couple guitar picks or spudgers ready, and another old spudger. Using a hot glue gun, glue the old spudger into the very middle of the lens. Let the glue cool completely.
Using a heat gun pointing up from the bottom, heat the 3 edges of the shell around the top and sides of the lens. Avoid getting heat on the lens or hot glue as it will soften.
Using the spudger as a handle, pull up on the lens to get the top edge started and get your guitar picks/spudgers under the sides at the top of the lens.
Complete removal as above.
Using a spudger/guitar pick, start to peel an edge of the hot glue loose to remove old spudger from lens; then clean any residue with alcohol.
“couple of” guitar picks
After destroying one iPod, I learned from my mistakes. Heating it with a hair dryer to loosen the adhesive helped a lot. You need to get the tool between the glass and the lcd display; be very careful not to put pressure on the display!
-
-
-
While lifting the screen up with one iPod opening tool, insert a second iPod opening tool in between the outer case and the top left edge of the glass panel.
-
Remove the first iPod opening tool from between the glass and LCD in the top of the device.
The iPod I repared had a cracked screen. Caution here because it doesn't pop out that easily. I had to apply some force on the plastic opening tool while using another tool to take out the shards (who are glued to the side).
Mujhe sirf LCD chahiye bhai
Bhai, ye admi angrezi hai. Os ko Urdu samaj nahi ata hai.
ian h -
90% guaranteed you will destroy the LCD in this step. You just dont know how much for to use and if you stress the LCD too much, even with a plastic tool it will be damaged.That’s why ifixit sells those too. My advice is to first completely follow this guide, and if successful, and only then , start ordering parts.
Since the display is probably 99 percent broken, I decided to use a different method. I heat the ipod on my 3-printer heating bed to around 70 degrees Celsius, then I take a suction cup and pull on the display glass. When the glue is warm enough, the glass rises and you can carefully detach the glass with an opening pick. the display remains completely intact greeting Andre
-
-
-
Prying up slightly on the iPod opening tool, insert a second iPod opening tool in between the front glass and the outer case, on the right side of the screen.
-
Slide the second iPod opening tool along the right edge of the panel to remove the adhesive.
-
-
-
With one iPod opening tool still between the glass and outer case, insert a second iPod opening tool in between the front glass and outer case, on the left side.
-
Slide the second iPod opening tool toward the bottom of the device to remove the adhesive.
-
-
-
Lifting the glass from the side nearest the top of the iPod, remove the glass panel from the Nano.
It might be a good idea to remove all the adhesive from the screen before trying to slide the internals out. I had a nightmare trying to get mine out, ended up cutting my thumb and finger from holding onto the edges of the screen too tight trying to wiggle it out. And then to top it off, I broke the hold switch ribbon cable too. I don’t know how much the screen glue vs the battery glue was responsible for making it difficult to remove. Also when sliding it out, be careful the lip on the lower edge of the button hole doesn’t snag on the thin steel frame around the screen.
Is it really needed to remove the glas? Can‘t you just slide out the logic board when glas remains?
-


To reassemble your device, follow these instructions in reverse order.
To reassemble your device, follow these instructions in reverse order.
crwdns2935221:0crwdne2935221:0
crwdns2935229:036crwdne2935229:0

crwdns2947412:06crwdne2947412:0
If the glass is cracked, you may not have to remove the end of the ipod to pry out the glass. In my case, I was able to carefully (with out putting pressure on the screen below) get the glass out in pieces.
This step by step guide is perfect for replacing the glass! There is no need to remove the click-wheel or the camera bezel - as seen in may other videos and guides. So stay away from the click wheel if you can - it's just glued in (there is no snap!) and it's really hard to put back in place again. And yes, ideally you can remove the glass without opening anything. It is just glued in and the new one will go in from the top. Good Luck!
I gave my homie my 8 gig when i bought my 16 gig. his girl dropped it and the glass screen cracked. took me no more then 5 minutes and i had it as good as new! Whoop Whoop, danke fo the instructions!
Dear Steven, To me exactly the same happened, although I was the person who got the Ipod and dropped it. So I do understand how to get the glass out, but how do I put a new one in? Just insert it and put everything back on? Should I use glue when I put the screen in? Or will it just stay there on its own? Thanks!
this was great and super easy! thanks so much
Worked well until the lock cable came off. Any way to fix the lock cable? Also the bezel took forever to get back into place.