crwdns2915892:0crwdne2915892:0
Use this guide to replace a broken display.
crwdns2942213:0crwdne2942213:0
-
-
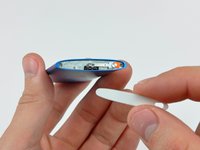
Insert the edge of an iPod opening tool into the gap between the outer case and the top bezel.
-
Pry the top bezel off the adhesive securing it to the display retainer.
-
-
-
Remove the hold switch slider from the top of the Nano.
-
-
-
Remove the two angled Phillips screws from the two corners of the display retainer.
-
-
-
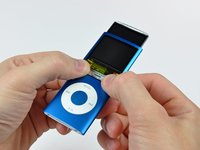
Insert an iPod opening tool between the outer case and the display retainer.
-
Use the tool to slide the display assembly out of the case slightly.
-
-
-
-
Slide the display out of the Nano. It will move about .5" until the display data cable limits its travel.
-
-
-
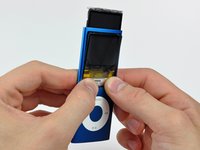
With the display pulled out of the case as much as possible, gently press on the lower edge of the glass panel until it pops in slightly (~1 mm).
-
Use your thumbs on the lower edge of the glass panel to slide the glass down and into the case until the top edge pops up out of the case.
-
-
-
Lift the glass panel out of the Nano.
-
-
-
Use the edge of an iPod opening tool to separate the hold switch from the adhesive securing it to the top edge of the display.
-
-
-
Peel back the Kapton tape covering the display data cable socket.
-
-
-
While holding the light colored socket down with one finger, use the tip of a spudger to flip the ZIF cable lock up toward the bottom of the Nano.
-
-
-
Use an iPod opening tool to peel the display data cable off the thin metal plate attached to the display.
-
-
-
Pull the display out of the Nano, minding the hold switch cable that may get caught.
-


To reassemble your device, follow these instructions in reverse order.
To reassemble your device, follow these instructions in reverse order.
crwdns2935221:0crwdne2935221:0
crwdns2935229:05crwdne2935229:0

crwdns2947410:01crwdne2947410:0
I followed all the directions carefully, using the correct tools, and viola...I now have a working iPod. Thanks iFixIt! :)