
iPod Classic Rear Panel Replacement

crwdns2944107:0crwdnd2944107:0iRobotcrwdnd2944107:0crwdnd2944107:0crwdnd2944107:02crwdnd2944107:0crwdne2944107:0
crwdns2944111:0Mha 21, 2024crwdne2944111:0
crwdns2915892:0crwdne2915892:0
crwdns2942287:0crwdne2942287:0The shiny rear half of your iPod case.
crwdns2942213:0crwdne2942213:0
crwdns2943213:0crwdne2943213:0


crwdns2943215:0crwdne2943215:0


crwdns2944105:0crwdne2944105:0

-
-
Insert a plastic opening tool into the seam between the front and back of the iPod.
-
-
-
Insert another plastic opening tool into the seam between the front and back of the iPod, leaving at least 1.5 inches of space between the two tools.
-
-
-
At an angle, carefully insert a putty knife about 1/8 inch into the seam between the two opening tools.
-
Once the putty knife has cleared the lip of the rear panel, pivot the putty knife so that it is vertical, and carefully (but firmly) wiggle it straight down into the gap between the opening tools.
-
-
-
Push with your fingers on the rear panel behind the putty knife to minimize bending. Slowly flex the putty knife, as shown in the picture, to ensure that most of the metal tabs on this side of the iPod are disengaged.
-
-
-
Remove the putty knife from the iPod and reinsert it closer to the corner of the iPod, using the same wiggle method as before.
-
-
-
Between the lock slider and headphone jack, insert a plastic opening tool into the seam between the front and back of the iPod.
-
-
-
Near the center of the display, carefully insert a metal spudger into the gap created by the plastic opening tool.
-
Using the metal spudger, disengage the single clip on the top of the iPod.
-
-
-
Near the other top corner, insert an opening tool into the seam between the front and back of the iPod
-
-
-
On the other side, insert an opening tool into the seam between the front and back of the iPod.
-
-
-
Remove the plastic opening tool from the top corner and insert it into the seam between the front and back of the iPod, leaving at least 1.5 inches of space between the two tools (as done on the other side).
-
-
-
At an angle, carefully insert a putty knife about 1/8 inch into the seam between the two opening tools.
-
Once the putty knife has cleared the lip of the rear panel, angle the putty knife so that it is vertical, and carefully (but firmly) wiggle it straight down into the iPod via the gap between the plastic opening tools.
-
Push with your fingers on the rear panel behind the putty knife to minimize bending. Ever so slightly flex the putty knife to ensure that most of the metal tabs on this side of the iPod are disengaged.
-
-
-
Carefully insert a metal spudger into the area near the stubborn metal clip.
-
-
-
Gently wiggle the metal spudger down so that it is all the way in the rear panel.
-
-
-
Gently begin to disengage the clip from the front panel.
-
-
-
Continue to push up on the front panel with the metal spudger until the metal clip releases.
-
-
-
Grasp the front panel assembly with one hand and the rear panel with the other.
-
Gently (GENTLY) disengage the remaining clips on the rear panel by pulling the tops of the front and rear panels away from each other (think of the bottom of the iPod as a hinge), taking great care not to damage the ribbon cables holding the two halves together.
-
-
crwdns2935267:0crwdne2935267:0Tweezers$3.99
-
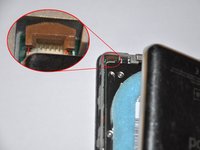
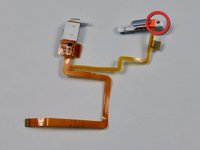
Use angled tweezers or an opening tool to lift the brown lock latch straight up by 1 mm. Make sure you pull from both sides of the latch.
-
Grasp the flex cable with your fingers or tweezers and pull it straight up to disconnect it.
-
-
-
Place the rear panel next to the iPod, being careful not to strain the orange headphone jack cable.
-
-
-
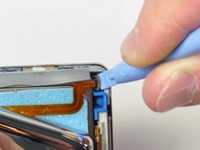
Lift the hard drive up with one hand so you can access the headphone jack ribbon beneath.
-
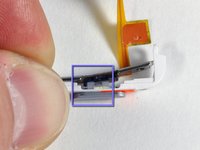
Use a spudger to flip up the plastic tab holding the headphone jack ribbon in place. The tab will rotate up 90 degrees, releasing the ribbon cable.
-
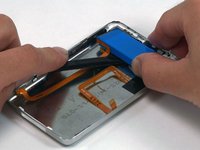
Slide the orange headphone jack ribbon out of its connector.
-
The rear panel is now free from the iPod.
-
-
-
Now to repair the damage caused by liberating the internal parts of the iPod Classic! It is highly likely that at least one of the metal clips in the rear panel has been bent upward. These clips must all be pointing downward in order to reinstall the rear panel.
-
-
-
Take the broad, flat side of the metal spudger and push the clip down, taking care not to tear the thin metal rail from the rear panel. Alternatively a pair of flat pin nosed pliers can be used to reduce risk of slipping and damaging the headphone jack.
-
-
-
On a clean, hard surface, lay the rear panel on its side. Carefully but firmly push down on it, rolling the entire lip side back into its proper spot.
-
-
-
Use a spudger to lift the battery and the attached orange cable out of the iPod. If you have a 160 GB iPod, the battery will be thicker than the one pictured.
Just wanted to say THANK YOU to whoever made this tutorial!! Kinda unclear in some areas, but I got it! Thanks so much!!!
I just want to say that with out this tutorial I could never have taken my iPod apart the biggest help was the addition of the putty knife. It took about 30min cause I took it slow. My iPod is charging and seems to be working thank you
dont do this, as u see, any one can edit it, it's like wikipedia, not reliable.
I do this and my ipod works now!
Thanks for this. It worked for me without any hitches. Your presentation, products and packaging are all first rate.
All very easy to do. Ive just "frankensteined" a 100Gb classic and working all fine. Very simple and clear instructions.
Been using iFixit for almost 10 years in my data recovery company and always been informative in getting Macs opened easily and with great results
Within the first minute, I pushed a plastic opener through the flesh of my opposite index finger. Within the second minute I peeled back about 3/16" of my index finger nail. Within the third minute I broke the tips off of first one and then the other of the supplied plastic openers. On the fourth minute, I threw the entire kit -- brand new replacement battery included -- in the trash. Thanks for absolutely nothing!! Ken Queale
Sounds like you're just clumsy...
Absolute waste of money. I have been working on it for an hour and half. Blue tools wore out the first 1/2hour
i am 14 years old and i did this fine.
My hold button ribbon was in the battery glue and tore when I pried the battery loose. I 'm going to try to replace that part with luck that will be all I have to do.
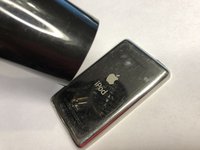
I just did the exact same thing. In retrospect, it strikes me that if I would’ve warmed the iPod’s back with a hair dryer to soften the glue holding the battery, this would’ve been a lot easier. Learn from my mistakes people. :-)
My Hold Button Ribbon was glued between the case and the battery too. Should have chanced more heat on the back of the case to totally free it from the battery before prying off the battery.
Ahtishoe -
There are several hard tasks in this process and this step was hard for me. Took me a while to detach the battery without damaging the cables. But with some patience I succeeded.
Great guide, by the way.
I have been trying unsuccessfully to get into my ipod to replace the duff battery for a long while. Now, armed with your instructions and the right tools I have done it! (not without considerable frustration with those pesky clips I might add). The plastic spudgers are useless by the way. It took a while to work out how to release the battery ribbon cable and larger picture of the clip action would help. I too found the battery glued to the ribbon cable beneath it. Perseverance, patience and a steady handed are a must for this one. Well done and thank you!
I did it all, plugged into the charger for 10 hours and it shows charging… I unplugged it and is dead.
Battery replaced. MB spooled up when I plugged the unit in. Now waiting for it to charge. This process was actually pretty easy with the help of this tutorial. A lot easier than an iPad repair with all the glue. No way could I have done it without the help. So far: every iFixit! repair I have done has been a success. Thanks!
When finish replace battery, need to restore?
No you do not
The instructions were great! I completed the repair with an hour. I can’t ay enough about the parts, tools, and repair guides from iFixIt. I recently replaced my hard drive with an SSD drive on my iMac and the repair guide for that was spot on as well. Thank you, iFixIt!
Any luck fixing the hold button ribbon Greg? Mine ripped too.
My experience? The first battery I ordered turned out to be a dud. (not from Ifixit). The ipod would not charge even though I disconnected and reconnected the battery twice. The second battery worked OK straight from the off. My tip? Don’t put the back of the device fully on before you try to charge up the battery. There is room to get a charging lead into place without the back being fully on. Saves a lot of trouble if your new battery turns out to be faulty.
im 14 and i did it fine
-
-
-
Use one hand to hold the orange ribbon cables in place, and peel up the black tape securing the cables to the rear panel with your other hand.
-
-
-
Remove the two black Phillips screws securing the headphone jack to the rear panel.
-
These are SMALL! Be sure you have a size 00 screwdriver on hand
-
-
-
Remove the following two screws:
-
One black Phillips screw securing the hold switch near the corner of the iPod.
-
One silver Phillips screw securing the other side of the hold switch.
-
-
-
Lift the hold switch free from its housing on the rear panel. Don't remove the hold switch completely at this time, because it is connected to the same cable as the headphone jack.
-
-
-
Slide the headphone jack out of its housing on the rear panel.
-
Lift the headphone jack and hold switch assembly out of the iPod.
-
-
-
If your replacement part does not include the plastic hold switch, follow the next steps to transfer the plastic hold switch to your new headphone jack.
-
Remove the single Phillips screw nearest to the hold switch.
-
Lift the plastic portion of the Hold switch away from the orange ribbon cable.
-
-
-
Use the small iPod opening tool to carefully peel the orange ribbon cable and attached black Hold switch up from the metal backing.
-


To reassemble your device, follow these instructions in reverse order.
crwdns2935221:0crwdne2935221:0
crwdns2935229:041crwdne2935229:0
crwdns2947821:0crwdne2947821:0
crwdns2947823:0crwdne2947823:0


crwdns2947412:05crwdne2947412:0
Thanks!
Can I swap rear panel fat to slim? I mean I have 6/7’th gen 120 Gb with slim SSD and what to close it with rear panel from 6’th gen 80 Gb - for 3 mm less width. So question: Is this 80Gb-iPod’s rear panel is compatible to my 120Gb-iPod?
Yes, you can. I upgraded the hard drive with a solid state and needed the extra space.
Just would like to have a confirmation that the rear panels of 5th Gen. (Video) and 6th Gen. (Classic) are identical. Some replacement panels are listed as “fits 5th, 6th & 7th” and some are specific…
What is the plastic for the charging port on the panel called?
I mean the plastic that was left in the panel