crwdns2915892:0crwdne2915892:0
Instructions on how to replace the iPod Video's display.
crwdns2942213:0crwdne2942213:0
-
-
Free the first retainer clip on the bottom of the iPod using the iPod opening tool. The tool's edge should point towards the metal back case to prevent scratching the plastic front.
-
-
-
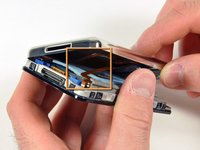
Use this photo of the OPENED iPod for the reference, in order to locate the areas where the retaining clips are - 4 per side, one on top and two at the bottom. It should save you a lot of frustration and help avoid scratching the plastic cover.
-
-
-
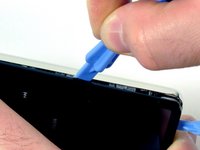
Insert the iPod opening tool into the left side of the iPod, with the edge of the tool pointing towards the metal back.
-
A small guitar pick can be extremely helpful in opening the iPod. Simply insert it and slide the pick around the case to free the clips to streamline the process.
-
Gently enlarge the existing crevice by wiggling the iPod opening tool and moving it to the left.
-
Continue doing so until the entire side of the iPod is loose.
-
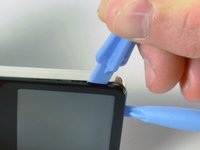
You can then insert an iPod opening tool to the right of the Hold button. Be very careful while inserting the tool, as the display is very fragile.
-
-
-
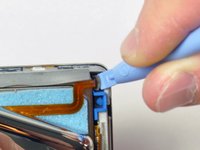
Gently glide the iPod opening tool on the top of the display, making sure to free the retaining clips.
-
The other sides of the iPod should now easily come loose. If they do not, use iPod opening tools on the right side of the iPod in the same way as on the left side of the iPod.
-
Separate the front of the iPod from the back about an inch (or a couple of centimeters).
-
-
crwdns2935267:0crwdne2935267:0Tweezers$3.99
-
Use angled tweezers or an iPod opening tool to slide up the brown connector latch, holding the orange battery ribbon cable in place. Make sure you pull from both sides of the latch. You only need to lift the brown connector latch up about 1-2mm to free the cable. Do not lift more or remove the latch, or you might pull the white connector with it!
-
Remove the cable from the connector.
-
-
-
-
You should now have one orange ribbon cable still attaching the front case to the back.
-
At this point you are able to remove and replace the blue rubber bumpers, or continue with separating the case.
-
-
-
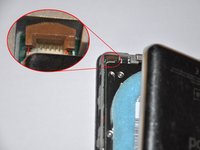
Lift up the hard drive to expose the headphone jack ribbon connector (indicated by the yellow box).
-
-
-
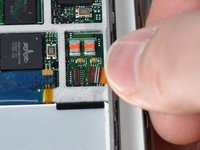
With the iPod opening tool, gently lift the brown tab of the headphone ribbon cable connector. The tab will rotate up 90 degrees, releasing the ribbon cable.
-
Using your fingers, pull out the headphone jack ribbon cable.
-
-
-
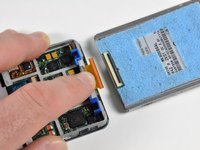
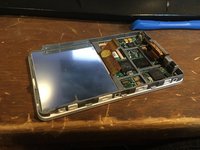
The front and back of the iPod should now be completely separated.
-
-
-
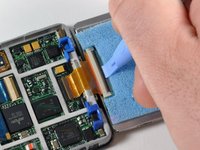
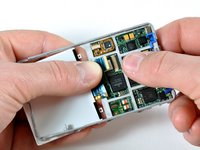
Use a small iPod opening tool to release the black hinge holding the hard drive ribbon cable. The tab will rotate up 90 degrees towards the logic board, releasing the ribbon cable.
-
Use your forefinger to hold the ribbon cable in place; disconnect the drive from the ribbon cable.
-
-
-
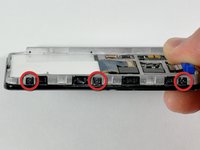
Remove the three black Phillips screws securing the front panel to the metal framework.
-
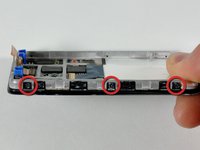
Rotate the iPod laterally 180 degrees and remove the three black Phillips screws securing the front panel to the metal framework on the other side.
-
-
-
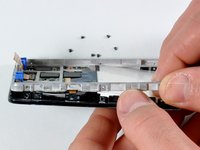
Carefully work around the edge of the iPod to separate the front panel from the metal framework.
-
Lift the framework (including the attached display, logic board, and click wheel) away from the front panel.
-
-
-
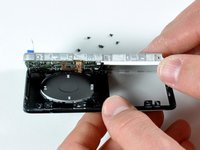
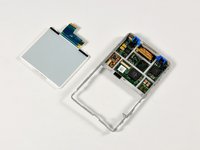
The front panel should now be free from the rest of the iPod.
-
-
-
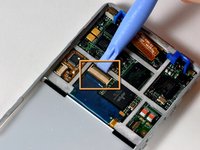
Rotate the iPod so the black plastic tab is more accessible to you.
-
Use a small iPod opening tool (or your fingernail) to flip up the black plastic tab holding the display ribbon in place. The tab will rotate up 90 degrees towards the display, releasing the ribbon cable.
-
Use your finger to prevent the cable from lifting upwards. Wiggle the display loose from the frame, and then pull it gently outwards to release the display's ribbon cable. You may need to lift the cable away from the two white pegs that poke through it near the edge of the frame.
-
-
-
The display should now be free from the rest of the iPod.
-


To reassemble your device, follow these instructions in reverse order.
crwdns2935221:0crwdne2935221:0
crwdns2935229:0325crwdne2935229:0

crwdns2947412:011crwdne2947412:0
Great guide! worked liked magic!
Monique - crwdns2934203:0crwdne2934203:0 crwdns2950251:0crwdne2950251:0
I can't believe it worked, but it did. I finally can see what songs I want to play instead of mystery music! When it comes to releasing the battery ribbon, as well as reconnecting it, a picture of how far in the ribbon goes would be very useful. Thank you!!!
asbell - crwdns2934203:0crwdne2934203:0 crwdns2950251:0crwdne2950251:0
I've had this ipod since i was about 12 when it came out in 2005. The other day I dropped it and the screen went half black. So, I ordered a new screen, and got it within 4 days (as promised). From sit down to finish time, it was about 15 min. But, I have also put my own hard-drive, and battery in the iPod as well so I am very familiar with the inside. The screen works great and I am very impressed. I will definitely continue to use this site.
tannerwagaman - crwdns2934203:0crwdne2934203:0 crwdns2950251:0crwdne2950251:0
Completed an install of a new LCD screen in about 20 minutes, with no hitches. Great instructions, thanks!
andrewmacrae - crwdns2934203:0crwdne2934203:0 crwdns2950251:0crwdne2950251:0
Excellent guide. Very happy with the guide, the part, and the successful repair result.
Jim Athay - crwdns2934203:0crwdne2934203:0 crwdns2950251:0crwdne2950251:0