crwdns2915892:0crwdne2915892:0
电池不耐用了吗?换个电池就好。
crwdns2942213:0crwdne2942213:0
-
-
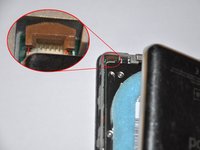
在前置面板和后盖的缝隙之间插入另外一根撬棒,两根撬棒之间最少相隔1.5英寸(大约4厘米)。
-
-
-
控制好角度,并在两根撬棒之间的缝隙中小心插入长约1/8英寸(约4cm)的油灰刀刀刃。
-
当油灰刀清干净后盖时,调整油灰刀尽可能的与桌面垂直,并且小心和稳当的在两根撬棒间来回滑动。
-
-
-
用握在后盖上的手指推进油灰刀降低弯曲度,就像图中展示那样,确保iPod这条边上的金属卡扣大部分能够分离开来。
-
-
-
从iPod机身中拔出油灰刀,然后再把油灰刀插入iPod的顶角处。使用和前面相同的拖动方法即可。
-
-
-
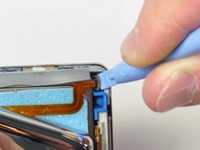
在靠近显示屏的中心处,小心的插入一根金属撬棒在由塑料撬棒制造的缝隙中。
-
使用金属撬棒,松开iPod顶部的单个卡扣。
-
-
-
-
拔出插在顶部的塑料撬棒然后插到iPod侧边的缝隙中 ,两根撬棒之间最少间隔1.5英寸(大约4厘米)。(另一侧进行同样的操作)
-
-
-
相同角度在两根撬棒之间的缝隙中小心插入油灰刀大约1/8英寸(大约0.5cm)。
-
当油灰刀清干净后盖时,调整油灰刀尽可能的与桌面垂直,并且小心和稳当的在两根撬棒间来回滑动。
-
用握在后盖上的手指推进油灰刀降低弯曲度,轻柔的操作确保iPod这条边上的金属卡扣大部分能够分离开来。
-
-
-
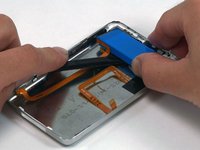
一只手握住前置面板另外一只手握住后盖。
-
轻柔地(注意了:轻柔地)拉动前置面板和后盖松开剩余的卡扣使二者完全分离开来(以iPod底部为参考点),留意不要损坏连在一起的2条带状排线。
-
-
crwdns2935267:0crwdne2935267:0Tweezers$3.99
-
使用带角度的镊子或工具,将棕色锁舌向上直提 1 毫米。请确保从锁舌的两侧拉动。
-
用手或者镊子抓住连接线并竖直拉出以断开连接。
-
-
-
一只手拉起硬盘这样你就可以看到在下方的耳机排线了。
-
用撬棒挑开固定耳机排线的塑料扣。这个塑料扣竖起90°就能松开带状排线。
-
取出橙色的耳机带状排线。
-
现在后盖完全从机身上分离出来了。
-
-
-
现在就可以对iPod Classic 的内部进行修复了!这是值得称赞的没有一个卡扣被拉伸损坏。在安装后面板时所有的卡扣都必须准确的扣进去。
-
-
-
用金属撬棒的宽口撬起卡扣,注意不要撕扯到后盖上的薄的金属片。另外一种方法是用平口的钳子,这样可以减少滑动降低损伤耳机接口的风险。
-
-
-
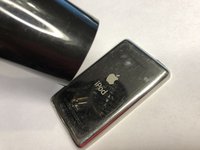
用撬棒撬起电池和机身上电池的排线。如果是160GB的iPod,电池将比图片上的还薄。
-
如果您在取出电池时遇到问题,可以使用iPod背面的吹风机或热风枪来软化将电池固定到位的胶水。小心不要让电池过热。
-


重组你的设备只需将上面的步骤倒过来。
重组你的设备只需将上面的步骤倒过来。
crwdns2935221:0crwdne2935221:0
crwdns2935229:0639crwdne2935229:0
crwdns2934873:0crwdne2934873:0
100%


crwdns2934885:0crwdne2934885:0 crwdns2934875:0crwdne2934875:0
crwdns2934877:0crwdne2934877:0 ›

crwdns2947412:086crwdne2947412:0
Bought an extra pair of the blue opening tools ... they both broke trying to open the case. Guess this one was a bit more stubborn. What saved me was the mini-screwdriver on a Leatherman Micro multitool & the iFixIt Metal Spudger.
Insert a plastic opening tool into the seam between the front and back of the iPod.
This is not possible for ipod 6th gen, I think ifitit may did for 5th gen?
It IS possible and it's really REALLY tough. The plastic tool included in this set is enough to keep seams open where they show in steps 2 and 3 just wide enough for you to put something else in there. But to start them, I used an exacto like blade. When I did this job, I had 3 regular spudgers, the 2 tools provided here, 4 different style green spudgers from somewhere else, 5 large 'guitar picks' sold here to cut the glue holding new iMac screens to the case, the metal spudger, and an exacto type blade.
It was still an incredibly laborious job and although the iPod is back together and works perfectly, one of the seams is bent out a little.
Well, *that* was interesting!
Firstly, as a few have mentioned here, the 6th-generation classics are more tightly-sealed than their immediate forebears, so the otherwise-useful plastic tools included in the battery-replacement kit won't cut it all by themselves; artful (and careful!) application of the metal spudger tool was also required. Thankfully, years of freelance IT work on recalcitrant Macs of all stripes helped prepare me for this bit of improvisation, even though this was the first time I've taken a crack at an iPod (my own 120GB classic - thin version). Happily, other than twisting that one metal clip near the headphone jack - apparently impossible to avoid - and some very minor cosmetic damage, the balance of work went without a hitch. I speculate why Apple makes us go though this, but that's for another thread. Thanks for the kit and tools!
LOL! The reason they make it hard to service is that Apple Authorized repair wants $360.00 US to replace the battery!