
iPhone 4S Home Button Replacement

crwdns2944107:0crwdnd2944107:0Walter Galancrwdnd2944107:0crwdnd2944107:0crwdnd2944107:06crwdnd2944107:0crwdne2944107:0
crwdns2944111:0Maw 21, 2025crwdne2944111:0
crwdns2915892:0crwdne2915892:0
crwdns2942287:0crwdne2942287:0Use this guide to replace a broken home button.
crwdns2942213:0crwdne2942213:0
crwdns2943213:0crwdne2943213:0
crwdns2943215:0crwdne2943215:0


crwdns2944105:0crwdne2944105:0

-
-
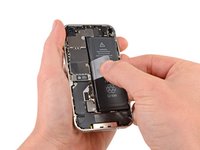
Power off your iPhone before beginning disassembly.
-
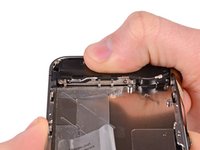
Remove the two 3.6 mm Pentalobe P2 screws next to the dock connector.
-
-
-
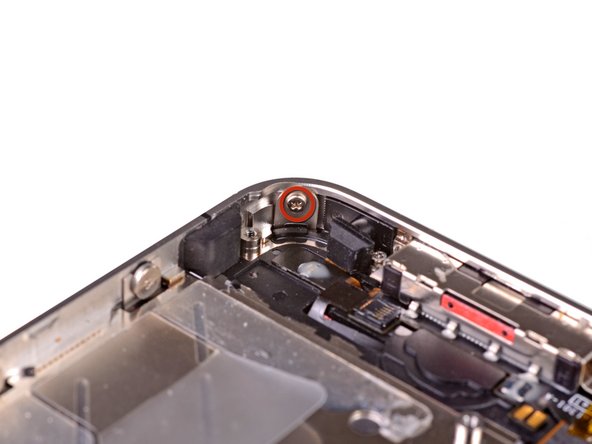
Push the rear panel toward the top edge of the iPhone.
-
-
-
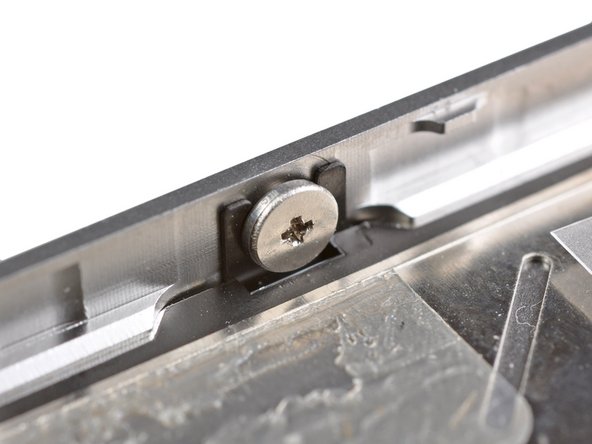
Pull the rear panel away from the back of the iPhone, being careful not to damage the plastic clips attached to the rear panel.
-
Remove the rear panel from the iPhone.
-
-
-
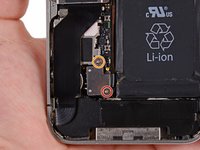
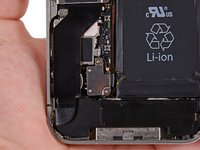
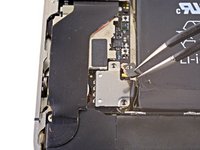
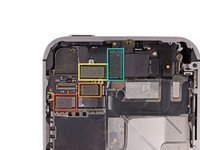
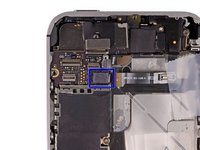
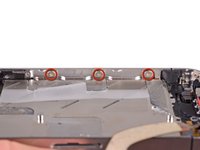
Remove the following screws securing the battery connector to the logic board:
-
One 1.7 mm Phillips screw (PH00)
-
One 1.5 mm Phillips screw (PH00)
This step needs a few more caveats.
The bottom screw on my phone was locked with some thread adhesive, and required more force to loosen it than I expected.
Even after removing the screws, the battery connector was rather firmly seated, and required a fair bit of persistent gentle prying with the opening tool before it came loose.
The ground clip came loose and nearly flew off while loosening the connector, so it would really help people if there were a warning on this step to watch out for the ground clip and make sure it doesn't bounce away.
I had the same problem with the ground clip! I’m glad that I didn't for it.
iScott -
The battery connector is attached to the battery. You're not going to completely lift it out and remove it. It pulls out from the socket you can see in step 5 picture 3. The pressure contact (little black and gold thing) will probably just slide out from under the connector. Not a problem.
I completed this successfully, but this step gave me the most trouble. The pressure contact is really difficult to reseat. So much so that it should probably be called out more clearly in it's own step.
If your pressure contact pops out you might find the video at http://www.hightechdad.com/2013/05/07/ho... helpful
I found this link to be incredibly helpful in identifying how/ where to put the pressure contact back in place
In french: attention avant de retirer le contacteur de la batterie. La vis du haut tient "en sandwich" une petite pièce métallique noire et dorée. Cette pièce a pour but de faire contact de masse avec le dos de l'iphone quand il est refermé. Donc il ne faut pas la tordre. Quand les deux vis du contacteur sont retirée, attention au moment de débrancher le contacteur: cela va faire bouger cette pièce qui ne doit pas être abîmée ni tordue. Au remontage, il faut bien la remettre en place sous le contacteur de batterie: il est tout à fait possible de mettre d'abord le contacteur, puis de glisser la petite pièce au dessous pour qu'elle soit bien à sa place, le trou en face du trou de vis et du trou du contacteur. En remettant la vis, la pièce tient bien en place. Elle doit bien continuer à dépasser de manière a faire contact avec le dos de l'iphone.
Top screw didn’t move with iFixit Philips #000 driver. The metal is too soft and in the result the screw was damaged while still in place. Having nothing to lose I also tried #00 and #0. Any way to remove the stuck screw? I would gladly saw it off if I could.
Ok, I had to drill the screw to break it. It was very delicate and time consuming operation. But in the end the screw cap finally broke off and I was able to remove the battery!
The Liberation Kit Philips head screwdriver strips the battery connector screws! It stripped the ne 1.7 mm Phillips screw circled in red in the photo above. I was able to remove the other screw, then I lifted the battery connector off while the red screw was still in position and wound the connector around in circles while lifting upwards and managed to unscrew the stripped screw. Advice, find a decent philips heard screwdriver for the internal screws like the two found on the battery connector.
Bottom screw was totally stuck, nothing could budge it. I removed top screw, heated up battery with hair dryer to release the glue, pulled it out using the spudger. Lifted up the metal plate thing (after taking out the ground piece and putting it aside). Cut off the flexible bit between the plate and the battery and twisted the plate around the screw as you did.
Well, the screw eventually came out—but only the top half! Yes, it split in two. Then the bottom half came out, still attached to the thing it was screwed in to (a sort of barrel).
I put the new battery in, put the bottom half (with the barrel) of lower screw back in its original position, replaced the ground piece and positioned the new plate over it, and screwed the top screw back in. Then put the top half of the lower screw in and tightened it.
Et voila!
Extra: It was helpful to discover that the 1.5 and 1.7 mm measurements refer to length of screw, not size of Phillips head.
When reassembling, use EST tweezers to get align the pressure contact over the top screw hole. using the pointy end of a spudger to assist: put the point through top screw-hole on the battery connector, then through the pressure contact and into the screw-hole. this will help to keep the small piece in place while re-seating the battery connector. Leave the top hole spiked as such until the screw in the bottom hole is gently fastened. Remove the spudger and replace the top screw.
Pressure contact needs to be remain EXACTLY in the same position if you remove/replace battery. I had to re-open my iPhone 4S after a battery replacement (the mobile connectivity was lost) and tweak the position of the Pressure to restore functionality.
I used my 16x magnifier loupe to be certain I had the pressure sensor aligned with the screw hole - no problem, no stripping. I consider it indispensable for tricky steps like this, and IFixit sells a similar tool for just $14.
The pressure connector is the battery connector under the silver plate. BE CAREFUL. It seems like it'd be really easy to tear that pressure connector out without meaning to. The bronze and black thing is the ground, *not* the pressure connector. If you remove it just keep track of it and re-install it.
The phillips head screwdriver provided in the ifixit repair kit does not work well this these two screws after my first attempt at unscrewing the screws became stripped. The 1.7 mm phillips screw gave me the most trouble. It took an hour to unscrew after the screwdriver from the kit stripped the screw. I used a piece of masking tape over the screw for grip to loosen it, then used finger nail clippers as pliers to unscrew. I would recommend investing in a better screwdriver for this one step. Assembly is otherwise simple and easy.
Here's a tip if you're having trouble removing the 1.7 mm screw. I had real problems removing it – the 1.5 mm screw came out easily using a Phillips #000 screwdriver but I almost stripped the 1.7 mm screw using the same screwdriver. What I did instead was use a flathead screwdriver from the iFixit pro tech toolkit I got, the one with a "–" sign and 1.0 size. That worked perfectly!
When disconnecting the battery make sure to use a plastic tool not a metal tool that could short out the battery
I would agree that a decent magnifier would help as the screws and components are small.
Also take necessary precautions to ensure the screws are not lost or mixed up.
Other than being a bit fiddly (particularly the earth connector), the only challenge I had not covered was that the battery was fixed with glue close to where the connector is and despite releasing the battery along the side, I couldn't get the battery to lift out using the tab. In the end I had to use the plastic tools to gently lever the battery away, working from the outside edge and ensuring I wasn't levering against the volume control buttons.
The new battery is in and following the advise given, I hard reset the phone and all my usual functions are now running... and if this £18:00 fix gives the phone another year or two of use, it will be well worth the effort.
Vous dites "Le connecteur de batterie s'enlève verticalement de la carte mère. Ne forcez pas latéralement"
Ou placez vous la verticalité ? pour moi c'est connecteur d'alimentation en bas, bouton d'alimentation en haut ?
Parce ce que sur la photo suivante, vous enlevez le connecteur de la gauche vers la droite ... c'est à dire latéralement ...
Soit nous n'avons pas le même sens vertical / horizontal, soit il y a un GROS problème dans l'explication, ou dans la traduction.
En tout cas, à la lecture de votre explication, j'ai essayé d'enlever le connecteur vers le haut !!
Donc il m'est maintenant impossible de remettre la batterie neuve, le connecteur est cassé !!!
Bravo pour l'expertise ifixit :(
I've gone through this process twice now. I found this video also very helpful: https://www.youtube.com/watch?v=nYYdbk3U...
The little contact thing that sits under top screw is always the biggest hassle to fit back into place (I do it after attaching the battery cable) with tweezers from ifixit.
My personal tips:
- plan that the incredibly tiny screws or the top-screw contact thing, might get away from you. so work in a space where you can find them easily. Not over carpet, etc.
- I use strips of tape on a piece of paper to secure the screws while they are out, and position them so I know which one goes on top of battery connector, and the one on bottom.
- If you have access to a spouse's/mate's iphone, in Accessibility settings there's a Magnifier option (triple-click home button) which does an amazing job at magnifying stuff at a circa 4-6" distance. Lacking any good magnifying glasses, this feature helped a lot. https://www.imore.com/how-use-magnifier-...
Why the guide don't mention PH000 or PH00 instead of Phillip 1.7 mm / 1.5 mm? I didn't know it is PH000 until some comments here save my time. Thanks guys
I wonder if the two screws shown on the picture are not inverted. It would seem logical to me that the longest (1.7mm) screw be placed on the upper hole, (where there is the yellow circle) ie on the hole where there is extra thickness (of the gold plated grounding contact sheet metal) in the sandwich. I have not checked, however, I just put the screws in the same location as found.
I was able to remove the screws without problem, but almost stripped one of the screws when reinstalling the battery connector. Be careful how much force you use!
It does not work
When removing the 1.7 mm Philips screw, on rare occasion, the socket it is threaded into, might come out with it. (It depends on how little of that blue glue was used underneath on the assembly line.) Grab the socket under the removed plate between your fingers and use your Phillips screwdriver to back out the 1.7 mm screw from the old shield. Then once separated, thread back in the socket, into the case where it came from. You will want to do that before installing the new battery. You will need a small flat blade to span the socket hole in order to thread it back in snug. When the 1.7 mm screw is threaded back in with the new shield (with the Phillips screwdriver), it should tighten the rest of the way. Don’t over tighten. Great little kit!
-
-
-
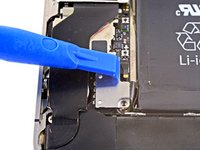
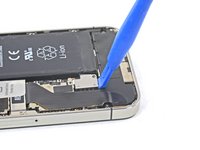
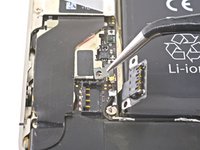
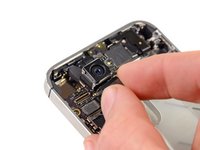
Carefully push the pressure contact away from the battery connector until it slides free from its position.
-
Remove the pressure contact.
-
-
-
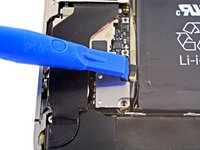
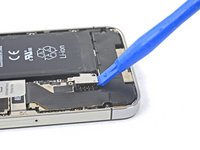
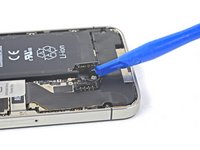
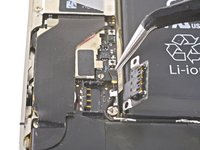
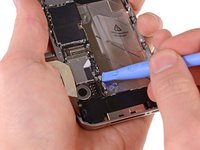
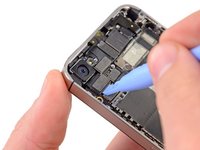
Use a plastic opening tool to gently pry up the battery connector from its socket on the logic board.
-
Place the tip of the tool between the loudspeaker enclosure and the metal cover of the connector, and lift the bottom edge of the connector first.
-
-
-
Insert the edge of a plastic opening tool between the battery and the outer case near the bottom of the iPhone.
-
Run the plastic opening tool along the right edge of the battery and pry up at several points to completely separate it from the adhesive securing it to the outer case.
-
Wait about one minute for the alcohol solution to weaken the adhesive.
-
Use the flat end of a plastic opening tool to gently lift the battery.
-
-
-
Use the exposed clear plastic pull tab to peel the battery off the adhesive securing it to the iPhone.
-
Remove the battery.
-
-
-
Remove the following screws securing the dock connector cable cover to the logic board:
-
One 1.5 mm Phillips screw
-
One 1.2 mm Phillips screw
-
Remove the metal dock connector cable cover.
-
-
-
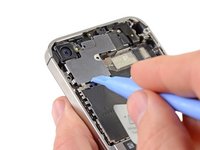
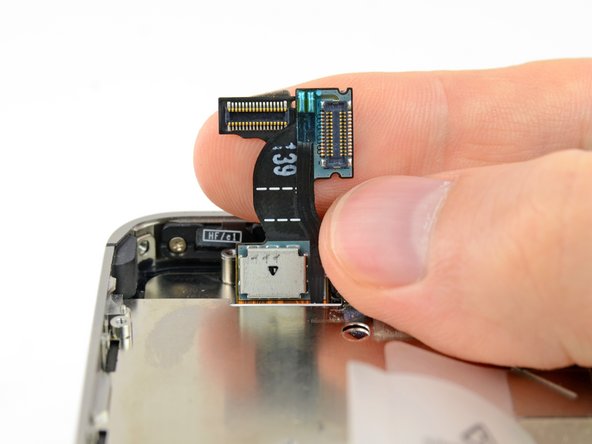
Use the edge of a plastic opening tool to pry the dock cable up from its socket on the logic board.
-
-
-
Peel the dock connector cable off the adhesive securing it to the logic board and the side of the speaker enclosure.
-
-
-
Use the edge of a plastic opening tool to pry the cellular antenna cable up from its socket on the logic board.
-
De-route the cellular antenna cable out from under the metal fingers attached to the logic board.
-
-
crwdns2935267:0crwdne2935267:0Tweezers$4.99
-
-
Remove the following four screws securing the cable cover to the logic board:
-
One 2.7 mm Phillips screw
-
One 2.6 mm Phillips screw
-
One 1.3 mm Phillips screw
-
One 1.2 mm Phillips screw
-
-
-
Use the edge of a plastic opening tool to pry the cable cover tabs out of their slots cut into the EMI shield on the logic board.
-
Lift the cable cover from its edge nearest the top and remove it from the iPhone.
-
-
-
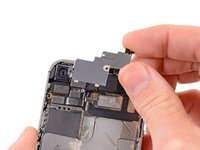
Use the edge of a plastic opening tool to pry the rear camera connector up from its socket on the logic board.
-
Remove the rear camera from the iPhone.
-
-
-
Use a SIM eject tool or a paperclip to eject the SIM and its tray.
-
Remove the SIM and its tray.
-
-
-
Remove the five cables near the top of the logic board in the following order:
-
Headphone jack/volume button cable
-
Front facing camera cable
-
Digitizer cable
-
Display data cable
-
Power button cable (located underneath the headphone jack/volume button cable as shown in the second picture.)
-
-
-
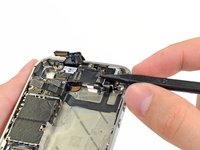
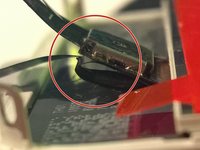
Remove the 1.5 mm Phillips screw securing the grounding clip to the logic board near the headphone jack.
-
-
-
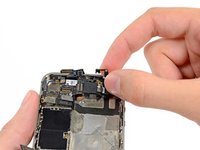
Use the tip of a spudger to pry the small grounding clip up off the logic board.
-
Carefully grasp the grounding clip and remove it from the iPhone.
-
-
crwdns2935267:0crwdne2935267:0Standoff Screwdriver for iPhones$5.49
-
Remove the 4.8 mm standoff screw near the headphone jack.
-
-
-
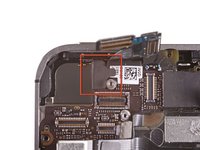
Use the edge of a plastic opening tool to disconnect the Wi-Fi antenna from the logic board.
-
-
-
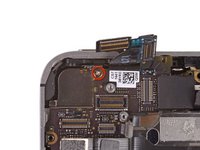
If present, peel the piece of black tape covering the hidden screw near the power button.
-
Remove the 2.6 mm Phillips screw securing the logic board near the power button.
-
-
-
Remove the following screws securing the logic board to the case:
-
One 2.5 mm Phillips screw near the vibrator motor
-
One 2.4 mm Phillips screw
-
One 3.6 mm standoff along the side of the logic board nearest the battery opening.
-
-
-
Carefully lift the logic board from the end closest to the speaker enclosure and slide it away from the top edge of the iPhone.
-
Remove the logic board.
-
-
-
Wedge the plastic opening tool between the vibrator and the side of the iPhone.
-
Pry the vibrator up to release it from the adhesive securing it to the iPhone.
-
Remove the vibrator.
-
-
-
Remove the two 2.4 mm Phillips screws from the sides of the speaker enclosure assembly.
-
-
-
Remove the small plastic bracket that was installed under the screw closest to the dock connector cable.
-
-
-
Remove the speaker enclosure assembly from the iPhone.
-
-
-
Remove the small pieces of black tape covering the display mounting tabs.
-
-
-
Remove the 1.5 mm Phillips screw securing the display assembly near the power button.
-
-
-
Remove the 1.5 mm Phillips screw near the headphone jack.
-
-
-
Remove the 1.5 mm Phillips screw near the lower microphone.
-
-
-
Remove the 1.5 mm Phillips screw near the dock connector cable.
-
-
-
Loosen the three large-headed Phillips screws along the volume button side of the iPhone about one half turn.
-
-
-
Loosen the three large-headed Phillips screws along the other side of the iPhone about one half turn.
-
-
-
Use the edge of a plastic opening tool to gently pry up the display assembly around its perimeter.
-
-
-
Remove the display assembly from the iPhone.
-
-
-
Remember to switch the home button from your old display to the new display (in most cases, this is not provided). The home button gasket is thin rubber, so care must be taken not to tear it. Also, check that the mesh for the speaker hole is present in the replacement; if not, move it over from the old display.
-
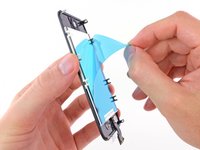
Be sure to peel off the protective backing (usually blue or pink) from the new panel before installing it.
-
If your replacement display does not come with a 7 mm clear plastic ring surrounding the front-facing camera, be sure to transfer it between the old and new display.
-
-
-
Carefully straighten the digitizer and LCD data cables, and feed them through the slot cut in the outer case.
-
This photo shows the display assembly being installed incorrectly, with too much slack in the digitizer cable, which then forms a bend/loop that gets caught in the slot. The third photo also shows this loop.
-
-
-
During reassembly, do not touch the metallic area at the base of the LCD data cable, as this can cause problems with the LCD. If you do touch it accidentally, clean it gently with an alcohol wipe before continuing.
-
After reassembly, protect your new display from any scratches by installing a new screen protector.
-
-
-
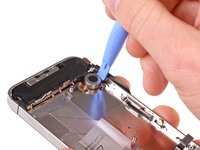
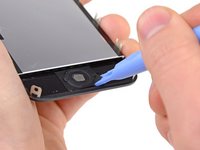
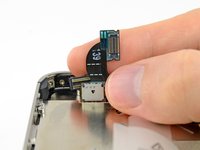
Use the edge of a plastic opening tool to gently peel the bottom right corner of the home button assembly from the display assembly.
-
-
crwdns2935267:0crwdne2935267:0Tweezers$4.99
-
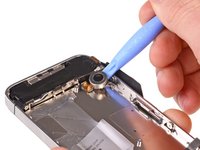
Use a pair of tweezers to peel the home button assembly off the adhesive securing it to the display assembly.
-
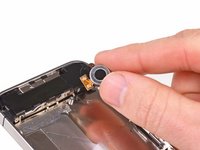
Remove the home button assembly from the display assembly.
-
-
-
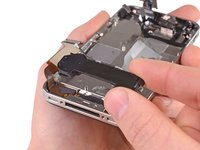
Remove the home button from the home button gasket.
-


To reassemble your device, follow these instructions in reverse order.
To reassemble your device, follow these instructions in reverse order.
crwdns2935221:0crwdne2935221:0
crwdns2935229:0216crwdne2935229:0
crwdns2947821:0crwdne2947821:0
crwdns2947823:0crwdne2947823:0


crwdns2947412:03crwdne2947412:0
I found the tear down somewhat easier than it's predecessor (IPhone 4) though for those attempting this kind of thing for the first time, extreme care should be taken to ensure the right tool is used for each job (ie. Phillips driver for Phillips screw etc.). I inherited this job from a friend that didn't know the difference between Phillips and pentalobe screws and hence destroyed the head of the first screw (and the pentalobe driver) once inside the unit.
Take care and you will enjoy a new found love for the device that YOU repaired.
I completed the teardown, but the metal fingers on the new display don't match the old one, hence the 6 screws that you loosen before removing the display no longer line up. VERY annoying... my phone is in pieces now until I can get a replacement display. Anyone else had this problem? BEWARE.. attempt to check yours before getting too far, line up the new display with the side screws and make sure it fits, it wasn't off by much so check they line up exactly. Did I get a iphone 4 display instead of a 4s? I dunno.. i've emailed ifixit to find out.
Did you put the screen + digitizer in upside down or backwards?