crwdns2933423:0crwdne2933423:0

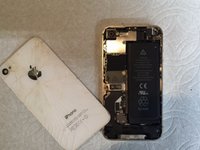
iPhone 4S Battery Replacement

crwdns2942213:0crwdne2942213:0

  1. iPhone 4S Battery Replacement, Pentalobe Screws: crwdns2935265:01crwdnd2935265:01crwdnd2935265:01crwdne2935265:0
    • Remove the two bottom Pentalobe screws next to the 30-Pin connector.

    • It is recommended that you use a small 5-Point screwdriver for this process.

    • Remember to make sure your iPhone is fully turned off before commencing this process, to prevent serious injury to the phone.

  2. iPhone 4S Battery Replacement, Back Panel Removal: crwdns2935265:02crwdnd2935265:01crwdnd2935265:02crwdne2935265:0 iPhone 4S Battery Replacement, Back Panel Removal: crwdns2935265:02crwdnd2935265:02crwdnd2935265:02crwdne2935265:0
    • Push the back panel towards the top of the iPhone. Doing this should allow the back panel to slide off safely.

    • Do not apply too much pressure to the back. Especially if your phone has a cracked back panel.

    • Do not rush it! Time is key.

  3. iPhone 4S Battery Replacement, Battery Screws: crwdns2935265:03crwdnd2935265:01crwdnd2935265:01crwdne2935265:0
    • Remove these two screws that are securing the battery connector to the Logic Board.

    • Beware of unscrewing the battery connector, as your screwdriver does have the possibility to slip and pierce the battery.

    • For the bottom screws, it is recommended that you use a 1.5 mm screw bit, and a 1.7 mm for the top screw.

  4. iPhone 4S Battery Replacement, Battery Strip: crwdns2935265:04crwdnd2935265:01crwdnd2935265:01crwdne2935265:0
    • Locate and pull the plastic tab to pull out the battery. Make sure to pry up on the outside of the battery on all sides.

    • Do not pull on the plastic tab too hard, as it can easily rip, making the battery removal process harder.

  5. iPhone 4S Battery Replacement, Battery Removal: crwdns2935265:05crwdnd2935265:01crwdnd2935265:01crwdne2935265:0
    • Carefully remove the battery.

    • Remember, if you are replacing your battery, remember to preform a hard reset on your iPhone by holding on both the home and power button for a few seconds once the repair is all finished.

crwdns2915888:0crwdne2915888:0

To reassemble your device, follow these instructions in reverse order.

crwdns2935229:062crwdne2935229:0

Cole Anello

crwdns2935283:011/01/16crwdne2935283:0

2,028 crwdns2915208:0crwdne2915208:0

crwdns2935295:0crwdne2935295:0

crwdns2947410:01crwdne2947410:0

la olum bunu benim 1 yaşında kızım da biliyo

ahmetceylanbm - crwdns2934203:0crwdne2934203:0

crwdns2917038:0crwdne2917038:0

crwdns2936625:0crwdne2936625:0:

crwdns2936751:024crwdne2936751:0 7

crwdns2936753:07crwdne2936753:0 42

crwdns2936753:030crwdne2936753:0 391

crwdns2942667:0crwdne2942667:0 22,723