crwdns2915892:0crwdne2915892:0
This guide is for replacing the metal power and lock button cover, not the electronic switch itself.
crwdns2942213:0crwdne2942213:0
crwdns2936621:0crwdne2936621:0
-
-
Power off your iPhone before beginning disassembly.
-
Your iPhone 4 rear cover may have either two #000 Phillips screws or Apple's 5-Point "Pentalobe" screws (second image). Check which screws you have, and ensure you also have the correct screwdriver in order to remove them.
-
Remove the two 3.6 mm Pentalobe or Phillips #000 screws next to the dock connector.
 crwdns2952109:0crwdne2952109:0
-
-
-
Push the rear panel toward the top edge of the iPhone.
-
-
-
Pinch the rear panel with your fingers and lift it away from the iPhone. Alternatively, use a Small Suction Cup .
-
-
-
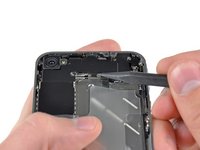
Remove the single 2.5 mm Phillips screw securing the battery connector to the logic board.
-
-
-
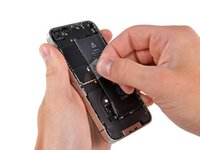
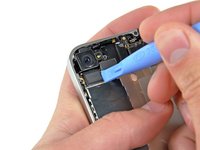
Use a plastic opening tool to gently pry the battery connector up from its socket on the logic board.
-
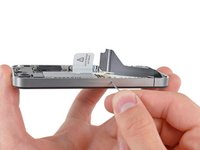
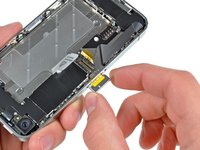
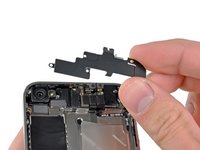
Remove the metal clip covering the antenna connector.
-
-
-
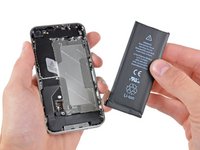
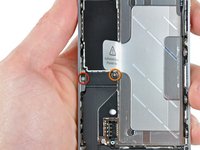
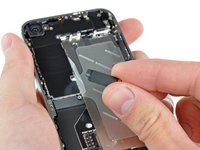
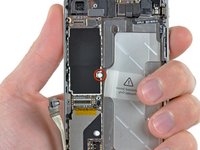
Use the clear plastic pull tab to gently lift the battery out of the iPhone.
-
If there's any alcohol solution remaining in the phone, carefully wipe it off or allow it to air dry before installing your new battery.
-
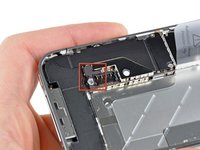
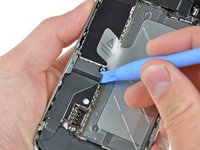
Before reconnecting the battery connector, be sure the contact clip (shown in red) is properly positioned next to the battery connector.
-
-
-
Use a SIM card eject tool or a paperclip to eject the SIM card and its holder.
-
Remove the SIM card and its holder.
-
-
-
Remove the following two screws:
-
One 1.2 mm Phillips
-
One 1.6 mm Phillips
-
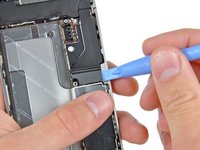
Remove the thin steel dock connector cable cover from the iPhone.
-
-
-
-
Use an iPod opening tool to gently pry the dock cable connector up off the logic board from both short ends of the connector.
-
-
-
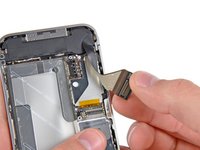
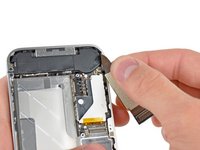
Carefully peel the dock ribbon cable off the logic board and the lower speaker enclosure.
-
-
-
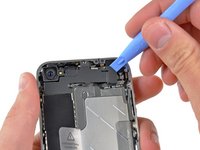
Use a plastic opening tool to pry the lower antenna connector up off its socket on the logic board.
-
-
-
Remove the 1.9 mm Phillips screw securing the bottom of the logic board to the inner case.
-
-
-
Remove the following five screws securing the Wi-Fi antenna to the logic board:
-
One 2.3 mm Phillips
-
Two 1.6 mm Phillips
-
One 1.4 mm Phillips
-
One 4.8 mm Phillips
-
-
-
Use an iPod opening tool to slightly lift the top edge of the Wi-Fi antenna away from the logic board.
-
Use the tip of a spudger to pull the Wi-Fi retaining clips away from the inner frame.
-
Remove the Wi-Fi antenna from the iPhone. Make sure you don't lose the metal clips on the top of the cover where the 4.8mm screw attaches or the 4.8mm screw. That's the primary reason for abnormal Wi-Fi performance after the reassembly.
-
-
-
Use an iPod opening tool to carefully lift the rear camera connector up off its socket on the logic board.
-
Remove the rear camera.
-
-
-
Remove the small circular white sticker (warranty sticker and water indicator) covering the screw near the battery pull tab.
-
Remove the 2.4 mm Phillips screw that was hidden underneath the sticker.
-
-
-
Use the edge of a plastic opening tool to gently pry the following connectors up and out of their sockets on the logic board:
-
Digitizer cable (pry from bottom)
-
LCD cable (pry from bottom)
-
Headphone jack/volume button cable (pry from top)
-
Top Microphone/sleep button cable (pry from top)
-
Front camera cable (pry from top)
-
-
crwdns2935267:0crwdne2935267:0Standoff Screwdriver for iPhones$5.49
-
Remove the 4.8 mm standoff screw near the headphone jack.
-
Without this part, the motherboard could damage the ribbon cables around it.
-
-
-
Carefully remove the logic board from the iPhone, minding any cables that may get caught.
-
-
-
Use the edge of a plastic opening tool to lift the thin steel front camera retainer off the front camera.
-
Remove the front camera retainer.
-
-
crwdns2935267:0crwdne2935267:0Tweezers$4.99
-
Carefully lift the front facing camera out of the iPhone.
-
-
-
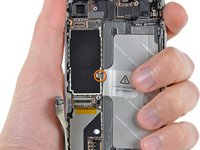
Remove the two 1.5 mm Phillips screws securing the power button bracket to the outer case.
-
-
-
Carefully lift the power button bracket out of the outer case, minding its thin and delicate ribbon cable.
-
-
crwdns2935267:0crwdne2935267:0Tweezers$4.99
-
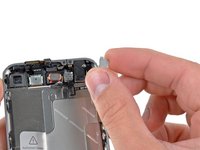
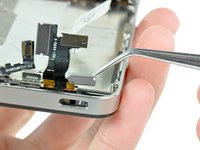
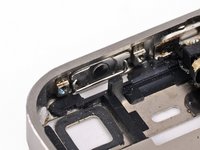
Use a pair of tweezers to remove the power & lock button from the iPhone.
-


To reassemble your device, follow these instructions in reverse order.
crwdns2935221:0crwdne2935221:0
crwdns2935229:0461crwdne2935229:0
crwdns2935103:0crwdne2935103:0

crwdns2947412:039crwdne2947412:0
Instructions are not detailed enough. No idea how to get the buton to "click". No notes about this nor any picture - fail.
Jonas - crwdns2934203:0crwdne2934203:0 crwdns2950251:0crwdne2950251:0
cant get the button to work it doesnt click when you press it the screws are tight and it just bends the middle of the plastic bit when you press it HELP PLEASE !!!
declan - crwdns2934203:0crwdne2934203:0 crwdns2950251:0crwdne2950251:0
for that you need to take a look at the power and sensor cable (guide is on here as well). Either replace it or if you know what you are doing modify it.
Sebastian - crwdns2934203:0crwdne2934203:0 crwdns2950251:0crwdne2950251:0
The guide was okay, until now!
Why isn't there shown how to install a new button?
alexander - crwdns2934203:0crwdne2934203:0 crwdns2950251:0crwdne2950251:0
Same problem - can't get the button to "click".
Manda - crwdns2934203:0crwdne2934203:0 crwdns2950251:0crwdne2950251:0