crwdns2933423:0crwdne2933423:0
crwdns2947577:0crwdnd2947577:0crwdne2947577:0

iPhone 3GS Front Panel Assembly Replacement

crwdns2942213:0crwdne2942213:0

crwdns2936621:0crwdne2936621:0

    1. iPhone 3GS Front Panel Assembly Replacement, Broken Glass: crwdns2935265:01crwdnd2935265:01crwdnd2935265:03crwdne2935265:0 iPhone 3GS Front Panel Assembly Replacement, Broken Glass: crwdns2935265:01crwdnd2935265:02crwdnd2935265:03crwdne2935265:0 iPhone 3GS Front Panel Assembly Replacement, Broken Glass: crwdns2935265:01crwdnd2935265:03crwdnd2935265:03crwdne2935265:0
      • If your display glass is cracked, keep further breakage contained and prevent bodily harm during your repair by taping the glass.

      • Lay overlapping strips of clear packing tape over the iPhone's display until the whole face is covered.

      • This will keep glass shards contained and provide structural integrity when prying and lifting the display.

      • Wear safety glasses to protect your eyes from any glass shaken free during the repair.

      crwdns2952109:0crwdne2952109:0

      crwdns2917038:0crwdne2917038:0

    1. iPhone 3GS Front Panel Assembly Replacement, Display: crwdns2935265:02crwdnd2935265:01crwdnd2935265:01crwdne2935265:0
      • Remove the two Phillips #00 screws from the dock-connector end of the iPhone.

      • Make sure to keep all the screws organized as you are taking the phone apart. They are different sizes.

      crwdns2952109:0crwdne2952109:0

      crwdns2917038:0crwdne2917038:0

    2. iPhone 3GS Front Panel Assembly Replacement: crwdns2935265:03crwdnd2935265:01crwdnd2935265:01crwdne2935265:0
      • Remove the metal handle from the suction cup. It's easier and safer to grip the suction cup's base instead of the metal handle.

      • Be very careful when opening the iPhone so that the cables under the display are not severed.

      • There is a rubber gasket between the silver front bezel and black display assembly. A bit of force is required in this step to separate the iPhone's display assembly.

      • Use a small suction cup near the Home button to gently pull up the lower portion of the iPhone's display assembly.

      • If the display assembly is too damaged to allow the suction cup to adhere, tape with a strong adhesive such as duct tape may be used.

      crwdns2952109:0crwdne2952109:0

      crwdns2917038:0crwdne2917038:0

    3. iPhone 3GS Front Panel Assembly Replacement: crwdns2935265:04crwdnd2935265:01crwdnd2935265:01crwdne2935265:0
      • The display assembly is still connected to the iPhone by several cables, so don't try to remove it entirely just yet.

      • Rotate the display assembly up until it is at an angle of approximately 45 degrees.

      crwdns2952109:0crwdne2952109:0

      crwdns2917038:0crwdne2917038:0

    4. iPhone 3GS Front Panel Assembly Replacement: crwdns2935265:05crwdnd2935265:01crwdnd2935265:01crwdne2935265:0
      • Continue to hold the display assembly with one hand, and use your other hand and a spudger to disconnect the black ribbon cable labeled "1."

      • Ribbon cable "1" is connected with a plug style connector. The block at the end of the cable is the plug which is simply pushed into a socket on the circuit board. No other locking mechanism is used.

      crwdns2952109:0crwdne2952109:0

      crwdns2917038:0crwdne2917038:0

    5. iPhone 3GS Front Panel Assembly Replacement: crwdns2935265:06crwdnd2935265:01crwdnd2935265:01crwdne2935265:0
      • Rotate the display assembly up until it is roughly vertical. This will allow easier access for disconnecting the remaining cables.

      • Use a spudger to disconnect the black ribbon cable labeled "2."

      crwdns2952109:0crwdne2952109:0

      crwdns2917038:0crwdne2917038:0

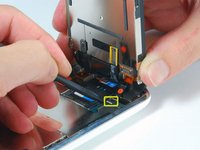
    6. iPhone 3GS Front Panel Assembly Replacement: crwdns2935265:07crwdnd2935265:01crwdnd2935265:02crwdne2935265:0 iPhone 3GS Front Panel Assembly Replacement: crwdns2935265:07crwdnd2935265:02crwdnd2935265:02crwdne2935265:0
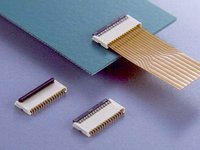
      • Ribbon cable "3" is held in place by a FPC style connector. You must unlock this connector before sliding the ribbon cable out. The locking mechanism is on the opposite side of where the cable is inserted - it swivels upwards 90 degrees. Use a plastic spudger to lift the locking mechanism.

      • The FPC locking latch is very delicate and is typically a different color than the body of the connector. (see the detail image of FPC connector open and closed)

      • Slide the ribbon cable out of the connector, and remove the display assembly from the iPhone.

      • It's impossible to properly reinsert a ribbon into an FPC connector unless the lock is disengaged. Make sure the locking latch is open when attaching/detaching the cable.

      crwdns2952109:0crwdne2952109:0

      crwdns2917038:0crwdne2917038:0

    7. iPhone 3GS Front Panel Assembly Replacement: crwdns2935265:08crwdnd2935265:01crwdnd2935265:01crwdne2935265:0
      • Remove the single Phillips #00 screw from the corner of the display assembly.

      crwdns2952109:0crwdne2952109:0

      crwdns2917038:0crwdne2917038:0

    8. iPhone 3GS Front Panel Assembly Replacement: crwdns2935265:09crwdnd2935265:01crwdnd2935265:01crwdne2935265:0
      • Remove the two Phillips #00 screws from the right side of the display assembly.

      crwdns2952109:0crwdne2952109:0

      crwdns2917038:0crwdne2917038:0

    9. iPhone 3GS Front Panel Assembly Replacement: crwdns2935265:010crwdnd2935265:01crwdnd2935265:01crwdne2935265:0
      • Turn the display around, and if there is a thin strip of black tape on the edge of the display assembly, carefully peel it up.

      • Keeping the tape from sticking to itself can be tricky. We recommend placing the tape on a wax-coated piece of paper (any sticker backing will do).

      crwdns2952109:0crwdne2952109:0

      crwdns2917038:0crwdne2917038:0

    10. iPhone 3GS Front Panel Assembly Replacement: crwdns2935265:011crwdnd2935265:01crwdnd2935265:01crwdne2935265:0
      • Remove the three Phillips #00 screws from the left side of the display assembly.

      crwdns2952109:0crwdne2952109:0

      crwdns2917038:0crwdne2917038:0

    11. iPhone 3GS Front Panel Assembly Replacement: crwdns2935265:012crwdnd2935265:01crwdnd2935265:01crwdne2935265:0
      • Turn the display assembly over and again carefully insert a metal spudger between the two metal rails along the edge of the display assembly. Gently rotate the spudger to lift the LCD up from the glass.

      crwdns2952109:0crwdne2952109:0

      crwdns2917038:0crwdne2917038:0

    12. iPhone 3GS Front Panel Assembly Replacement: crwdns2935265:013crwdnd2935265:01crwdnd2935265:01crwdne2935265:0
      • Separate the LCD and glass by sliding the LCD panel away from the ribbon cables on the glass.

      crwdns2952109:0crwdne2952109:0

      crwdns2917038:0crwdne2917038:0

    1. iPhone 3GS Front Panel Assembly Replacement, Front Panel Assembly: crwdns2935265:014crwdnd2935265:01crwdnd2935265:01crwdne2935265:0
      • Front Panel Assembly remains.

      crwdns2952109:0crwdne2952109:0

      crwdns2917038:0crwdne2917038:0

crwdns2935217:0crwdne2935217:0

crwdns2935221:0crwdne2935221:0

crwdns2935229:0333crwdne2935229:0

crwdns2947412:09crwdne2947412:0

do not forget to remove the smart cart!!

if less than an hour to remove and replace the new front panel.

sylval1 - crwdns2934203:0crwdne2934203:0 crwdns2950251:0crwdne2950251:0

The hardest parts are separating the glass from the plastics and then re-attaching it. It would do you well to buy the 'custom' double sided sticky tape they sell here at ifixit. I used regular double sided tape and it took a long time to cut and fit properly so all sensors would remain working and the screen would be held in place.

damuta - crwdns2934203:0crwdne2934203:0 crwdns2950251:0crwdne2950251:0

If your screen is severely damaged, there is no way to separate the digitizer from the outside glass without destroying the digitizer, is there? I couldn't do it. Also, nail polish remover is good for getting rid of the adhesive!

Michael - crwdns2934203:0crwdne2934203:0 crwdns2950251:0crwdne2950251:0

Be careful putting the new screen back in. I got almost all the way to done and everything was working perfectly - then I had trouble getting the bottom portion of the assembly (near the home button) back in.

I forced it a bit thinking I had squeeze it in and cracked the new screen. Doh.

Mxfive4 - crwdns2934203:0crwdne2934203:0 crwdns2950251:0crwdne2950251:0

crwdns2917038:0crwdne2917038:0

crwdns2936625:0crwdne2936625:0:

crwdns2936751:024crwdne2936751:0 1

crwdns2936753:07crwdne2936753:0 27

crwdns2936753:030crwdne2936753:0 79

crwdns2942667:0crwdne2942667:0 252,816