crwdns2915892:0crwdne2915892:0
Connects the iPhone to a computer or charger via iPhone cable.
crwdns2942213:0crwdne2942213:0
crwdns2936621:0crwdne2936621:0
-
-
If your display glass is cracked, keep further breakage contained and prevent bodily harm during your repair by taping the glass.
-
Lay overlapping strips of clear packing tape over the iPhone's display until the whole face is covered.
-
-
-
Remove the two Phillips #00 screws from the dock-connector end of the iPhone.
-
-
-
Remove the metal handle from the suction cup. It's easier and safer to grip the suction cup's base instead of the metal handle.
-
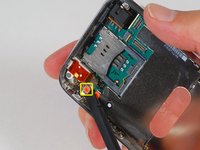
Use a small suction cup near the Home button to gently pull up the bottom portion of the iPhone's display assembly.
Be careful here. In my 3G device I found cables attached to the main board on both ends. In the pics above you do not see the cables.
Rams is right on here.
The cable labeled 4 in step 3 may have adhered to the back of your LCD. Mine ripped when I opened the phone. Now the dock connector needs to be replaced as well.
crwdns2936937:0postnospamcrwdne2936937:0
Rams is right on here.
The cable labeled 4 in step 3 may have adhered to the back of your LCD. Mine ripped when I opened the phone. Now the dock connector needs to be replaced as well.
This is exactly what happened to me!!.. found the dock connector online for $20 (ebay)
I didn't have a suction cup so I used the windscreen sucker attachment from my sat nav which gave me a lot of control using the fitting part as a handle, and made it quite easy. Given the force required to get the screen off mine I think I'd have struggled with a small suction cup.
-
-
-
Rotate the display assembly up until it is at an angle of approximately 45 degrees.
For me, the ribbon cable 1 became disconnected when lifting the screen to ~45 degrees. Nothing tore at least, it just popped up/out.
-
-
-
Continue to hold the display assembly with one hand, and use your other hand and a spudger to disconnect the black ribbon cable labeled "1."
-
Start from the ribbon and work your way towards the outside edge of the case.
-
-
-
Rotate the display assembly up until it is roughly vertical. This will allow easier access for disconnecting the remaining cables.
-
Use a spudger to disconnect the black ribbon cable labeled "2."
-
-
-
-
Use a spudger to flip up the white plastic tab holding the remaining ribbon cable in place. The white tab will rotate up 90 degrees, releasing the ribbon cable.
-
Slide the black ribbon cable out of its connector, and remove the display assembly from the iPhone.
I found that the tab I needed to flip up was black not white. There is a white piece of plastic that the ribbon slides under but it's the black piece of plastic it slid into that I needed to lift up. I found it quite tricky re-assembly this part, I thought I needed to slide the ribbon in further when in actual fact it was already in far enough.
crwdns2936937:0Joe Flemingcrwdne2936937:0
I found that the tab I needed to flip up was black not white. There is a white piece of plastic that the ribbon slides under but it's the black piece of plastic it slid into that I needed to lift up. I found it quite tricky re-assembly this part, I thought I needed to slide the ribbon in further when in actual fact it was already in far enough.
Wow wow wow... wait a minute: DO NOT TRY to flip up the black part (the thingy on the north side of the phone) but the WHITE PART (on the south side)!!! I almost wrecked that connector trying to pry up the black part! It's definitely the white, tiny tab that flips up!
crwdns2936937:0Sawatzkicrwdne2936937:0
Wow wow wow... wait a minute: DO NOT TRY to flip up the black part (the thingy on the north side of the phone) but the WHITE PART (on the south side)!!! I almost wrecked that connector trying to pry up the black part! It's definitely the white, tiny tab that flips up!
Ok, just to clear this up: It seems that at Joe's iPhone, the colors of the parts were different than on mine and the one in the picture.
To get this crystal-clear: the part that flips up is the one facing AWAY FROM THE CABLE. Imagine the cable being on the NORTH SIDE of the connector, the tab to flip up is ON THE SOUTH SIDE.
Be very careful when removing and reinstalling Ribbon #3. Do not bend it with your fingers or use mechanical means or installation or you will damage it (I had to replace mine). Ideally, hands off. This ribbon controls the light sesnor and earpiece. When you reinstall, gently slide it in by holding the screen assembly only. It will go in about 65% of the way, which is as far as it is intended to go.
ARRRGH. OK, wish I had read the notes before trying this. I tried to move the black part as described & broke the connector. Now I'm SOL. I actually fixed the antenna connector which is the reason I opened it in the first place but now it's useless as a phone because I can't hear audio from calls through the speaker anymore. Can't someone please add a note like this to the original guide instead of hoping people will look at the notes??!!! If it had been there, I'd be happily using a repaired phone right now instead of looking at a broken one.
-
-
-
Insert your SIM eject tool or a paper clip into the hole next to the headphone jack.
-
Press down on the tool until the SIM card tray pops out.
-
Grasp the SIM card tray and slide it out of the iPhone.
-
-
-
Use a spudger to disconnect the ribbon cable labeled "4."
-
-
-
Use a spudger to disconnect the ribbon cable labeled "5."
-
-
-
Use a spudger to disconnect the ribbon cable labeled "6."
-
-
-
Carefully peel up the small sticker labeled "Do not remove."
the little sticker "do not remove" is very fast, very broken ....ups ;)
That sticker sticks like !@#$. Could only scratch it gently away from the screw it covers.
-
-
-
Remove the following 8 screws:
-
Five 2.3 mm Phillips #00 screws with partial threads securing the logic board to the rear panel.
-
Two 2.3 mm Phillips #00 screws with full threads securing the logic board and camera.
-
One 2.9 mm Phillips #00 screw from beneath the "Do not remove" sticker.
-
-
-
Use a spudger to gently remove the camera retaining clip, (formerly secured by the removed screw) and gently pry the camera up and out of its housing in the rear panel. The camera cannot be removed entirely yet because it's connected to the bottom of the logic board.
-
-
-
Use a spudger to gently pry up the end of the logic board closest to the dock connector.
-
-
-
Slide the logic board towards the dock connector and out of the iPhone.
-
-
-
Remove the following 3 screws:
-
Two 1.5 mm Phillips #00 screws, one on either side of the dock connector.
-
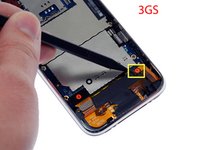
One 2.4 mm Phillips #00 screw near the ribbon cable labeled "4."
Take a look at the small spacer just below the "4" connector. Some dock connectors out there do not have the small spacer. I experienced a couple of times that the (4) cable had popped out of the connector after using the phone for some days. The cable is a little stiff. The small spacer helps press down the cable onto the connector so it doesn't jump out.
-
-
-
Lift the dock connector assembly up and out of the iPhone.
I broke my speaker and the mic. Don't you have further steps how to disassemble the dock connector from the speaker and mic? Thank you
crwdns2936937:0Szabo Davidcrwdne2936937:0
I broke my speaker and the mic. Don't you have further steps how to disassemble the dock connector from the speaker and mic? Thank you
Hi David, you can buy the part as one, I bought the following... http://cgi.ebay.co.uk/ws/eBayISAPI.dll?V...
crwdns2936937:0Joe Flemingcrwdne2936937:0
Hi David, you can buy the part as one, I bought the following... http://cgi.ebay.co.uk/ws/eBayISAPI.dll?V...
Oh great, thank you! Don't you know whether it fits the iphone 3GS? Are these parts same for iphone 3G and 3GS, I cannot find on ebay one for iphone 3gs.
David
crwdns2936937:0Szabo Davidcrwdne2936937:0
Oh great, thank you! Don't you know whether it fits the iphone 3GS? Are these parts same for iphone 3G and 3GS, I cannot find on ebay one for iphone 3gs.
David
iPhone 3GS Complete Dock Charge Port Connector Assembly...
I did need to do a reset of my iPhone once installed since my Photos app wasn't launching. Might be unrelated to new hardware, but it's most likely recommended to do an iPhone reset after installing.
The whole walkthrough was pure money. I tore the ribbon cable off the dock connector while seperating the whole assembly but the replacement went in without an issue and this walkthrough was pure MONEY!!!!
THANKS AGAIN!
If the replacement dock connector assembly doesn't have the foam pad over the connector (labeled "4" on the original part), carefully transfer it to the new assembly, lifting as much of the adhesive off with the foam pad as possible.
If the replacement dock connector assembly doesn't have the wire mesh pad on the flex circuit (close to the connector labeled "4"), carefully lift it off with a knife or other thin tool, taking care to keep as much adhesive as possible with the mesh pad. Then transfer it to the same spot on the new part.
all done.
Be very careful with the screws. Please be sure not to misplace them
-


To reassemble your device, follow these instructions in reverse order.
To reassemble your device, follow these instructions in reverse order.
crwdns2935221:0crwdne2935221:0
crwdns2935229:0298crwdne2935229:0

crwdns2947412:011crwdne2947412:0
When closing the phone (Step 3 - but when going backwards) it is important to be aware of the the contact for the HOME button. They are two little gold contacts that have to hit against two solder points on the dock assembly. I managed to bend them a bit out of alignment, so when I closed up the iPhone the home button was no longer working. Easily fixed, but worth noting.
When replacing the connector you will have to desolder 4 small solder points, 2 per ribbon cable. They are easily desoldered by gently pressing the soldering iron tip to the top of the cable and gently peeling it away.
They can they be resoldered onto the new connector.
The solder points can be seen in step 16 just above the two 1.5mm screws.
Hi, I followed the instructions and all went well, except for now I have very bad reception problems. I keep getting 'No Service' and cant really make calls. :-(
Could I have damaged the antenna somehow? I have found the antenna stickers online for sale but havent found any instructions as to how to install it...
Any help would be much appreciated.
Thanks
the sample phone looks like a 3G nto a 3Gs. I have an extra wire connection on top of the dock connector in my 3Gs.
If you're purchasing a Phillips screwdriver for this I'd highly recommend getting one that has a magnetic tip. I bought the cheaper screwdriver from iFixit but wish I would've sprung for the "professional" version (which I assume does have a magnetic tip). It can be done without it (I did it) but it took much longer than it would have otherwise.
For months when I used 3G, it would only work for about 30 minutes until it went to No Service or just said 5 bars and no internet access or phone calls, I had to use Edge instead. I found a crack on the bottom of the case so I think that's what damaged the Dock Connector. Since Edge worked and 3G lasted for a short bit, I think the antenna was damaged but not destroyed. Bought a cheap one on eBay, followed the guide, and I can actually listen to Pandora again. I was about to scrap the phone. Thank the gods.
Per others above, I transferred the antenna sticker from the old dock connector and I'm not seeing any degradation of signal quality. Its the silver sticker below connector labelled "4". I also figured I'd transfer the piece of electrical tape just above the dock connector itself, though I inadvertently covered the contacts for the home button, which game me a nice scare when I put everything back together.
So far so good, my phone seems to be working great again and no longer getting the dreaded "this accessory does not support charging" message every time I go to plug in.
I had a white screen after the replacement, reset the phone and all appears well now.
This is not the Iphone 3GS the 3GS has another connector on the dock.
I have replaced the dock connector port and reassembled the phone but all I getting is a white screen
I have replaced the docking port and re assembled the phone but all I'm getting is a white screen , have I missed any thing?