crwdns2933423:0crwdne2933423:0

iPhone 16 Pro Max Taptic Engine Installation

crwdns2862623:0crwdne2862623:0
crwdns2942641:0crwdne2942641:0

crwdns2942213:0crwdne2942213:0

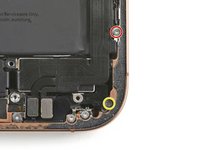
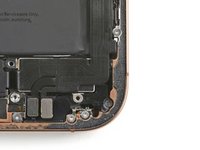
  1. iPhone 16 Pro Max Taptic Engine Installation, Install the Taptic Engine: crwdns2935265:01crwdnd2935265:01crwdnd2935265:01crwdne2935265:0
    • Lay the Taptic Engine in its recess.

  2. iPhone 16 Pro Max Taptic Engine Installation: crwdns2935265:02crwdnd2935265:01crwdnd2935265:01crwdne2935265:0
    • Use your finger to pivot the corner bracket down into place.

  3. iPhone 16 Pro Max Taptic Engine Installation: crwdns2935265:03crwdnd2935265:01crwdnd2935265:01crwdne2935265:0
    • Use a Phillips screwdriver to install the 2.1 mm‑long screw securing the Taptic Engine.

  4. iPhone 16 Pro Max Taptic Engine Installation: crwdns2935265:04crwdnd2935265:01crwdnd2935265:01crwdne2935265:0
    • Use your finger to gently press the lower assembly cable onto the top of the Taptic Engine.

  5. iPhone 16 Pro Max Taptic Engine Installation: crwdns2935265:05crwdnd2935265:01crwdnd2935265:02crwdne2935265:0 iPhone 16 Pro Max Taptic Engine Installation: crwdns2935265:05crwdnd2935265:02crwdnd2935265:02crwdne2935265:0
    • Install the two screws securing the lower assembly cable:

    • One 1.0 mm‑long tri-point Y000 screw

    • One 1.3 mm‑long Phillips screw

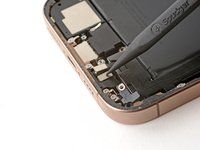
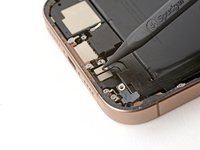
  6. iPhone 16 Pro Max Taptic Engine Installation: crwdns2935265:06crwdnd2935265:01crwdnd2935265:02crwdne2935265:0 iPhone 16 Pro Max Taptic Engine Installation: crwdns2935265:06crwdnd2935265:02crwdnd2935265:02crwdne2935265:0
    • Use your finger or a spudger to press and connect the two lower assembly cable connectors.

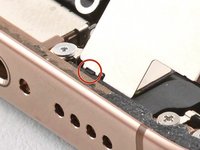
  7. iPhone 16 Pro Max Taptic Engine Installation: crwdns2935265:07crwdnd2935265:01crwdnd2935265:02crwdne2935265:0 iPhone 16 Pro Max Taptic Engine Installation: crwdns2935265:07crwdnd2935265:02crwdnd2935265:02crwdne2935265:0
    • Lay the Taptic Engine cover in place and align it by its screw holes.

    • Make sure the bottom edge of the cover latches properly to the frame.

  8. iPhone 16 Pro Max Taptic Engine Installation: crwdns2935265:08crwdnd2935265:01crwdnd2935265:02crwdne2935265:0 iPhone 16 Pro Max Taptic Engine Installation: crwdns2935265:08crwdnd2935265:02crwdnd2935265:02crwdne2935265:0
    • Use a Phillips screwdriver to install the three screws securing the Taptic Engine cover:

    • One 2.9 mm‑long screw

    • One 1.3 mm‑long screw

    • One 2.4 mm‑long screw

  9. iPhone 16 Pro Max Taptic Engine Installation: crwdns2935265:09crwdnd2935265:01crwdnd2935265:01crwdne2935265:0
    • Use your finger or a spudger to press the assembly cable connector onto the logic board.

crwdns2935217:0crwdne2935217:0

Arthur Shi

crwdns2935283:001/03/18crwdne2935283:0

284,302 crwdns2915208:0crwdne2915208:0

crwdns2935297:0588crwdne2935297:0

crwdns2915084:0crwdne2915084:0

iFixit crwdns2935289:0iFixitcrwdne2935289:0

Staff

crwdns2931471:0121crwdne2931471:0

crwdns2935297:019,776crwdne2935297:0

crwdns2947412:00crwdne2947412:0

crwdns2917038:0crwdne2917038:0

crwdns2936625:0crwdne2936625:0:

crwdns2936751:024crwdne2936751:0 0

crwdns2936753:07crwdne2936753:0 0

crwdns2936753:030crwdne2936753:0 0

crwdns2942667:0crwdne2942667:0 33