crwdns2933423:0crwdne2933423:0
crwdns2947577:0crwdnd2947577:0crwdne2947577:0
iPad 2 Touch Screen Replacement Video tutorial

iPad 2 Touch Screen Replacement Video tutorial

ZFix

crwdns2944107:0crwdnd2944107:0ZFixcrwdnd2944107:0crwdnd2944107:0crwdnd2944107:02crwdnd2944107:0crwdne2944107:0

crwdns2944111:0Maw 22, 2019crwdne2944111:0

crwdns2931273:0crwdne2931273:0
crwdns2937801:0crwdne2937801:0
crwdns2944444:0crwdne2944444:0
crwdns2862587:0crwdne2862587:0
crwdns2862588:0crwdne2862588:0

crwdns2915892:0crwdne2915892:0

crwdns2942287:0crwdne2942287:0

Don't try this if you haven't experience !!!

How to replace / change broken glass / touch screen - Apple iPad2.

See also iPad 2 Wi-Fi EMC 2415 Front Panel Replacement


Please SUBSCRIBE to my channel ツ

crwdns2942213:0crwdne2942213:0

crwdns2943215:0crwdne2943215:0

crwdns2944105:0crwdne2944105:0

crwdns2936621:0crwdne2936621:0

  1. iPad 2 Touch Screen Replacement Video tutorial, Front Panel Assembly: crwdns2935265:01crwdnd2935265:01crwdnd2935265:02crwdne2935265:0 iPad 2 Touch Screen Replacement Video tutorial, Front Panel Assembly: crwdns2935265:01crwdnd2935265:02crwdnd2935265:02crwdne2935265:0
    • Use the edge of a plastic opening tool to carefully flip up the retaining flaps on the two digitizer ribbon cable ZIF sockets.

    • Be sure you are prying up on the hinged retaining flaps, not the sockets themselves.

    • The retaining flaps are highlighted in red in the second picture.

  2. iPad 2 Touch Screen Replacement Video tutorial: crwdns2935265:02crwdnd2935265:01crwdnd2935265:02crwdne2935265:0 iPad 2 Touch Screen Replacement Video tutorial: crwdns2935265:02crwdnd2935265:02crwdnd2935265:02crwdne2935265:0
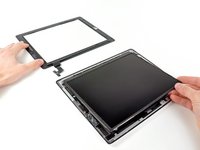
    • Use the edge of a plastic opening tool to peel the digitizer cable off the shields on the logic board.

    • Carefully pull the digitizer cable off the adhesive securing it to the side of the rear case.

  3. iPad 2 Touch Screen Replacement Video tutorial: crwdns2935265:03crwdnd2935265:01crwdnd2935265:01crwdne2935265:0
    • Pull the digitizer ribbon cable straight out of its two sockets on the logic board.

  4. iPad 2 Touch Screen Replacement Video tutorial: crwdns2935265:04crwdnd2935265:01crwdnd2935265:02crwdne2935265:0 iPad 2 Touch Screen Replacement Video tutorial: crwdns2935265:04crwdnd2935265:02crwdnd2935265:02crwdne2935265:0
    • In order to remove the front panel assembly, the ribbon cable needs to slide out between the case and the LCD. You'll need to move the LCD to make some room.

    • Be very careful when moving the LCD, and do not attempt to remove it from the iPad—its cable will remain connected while it is rotated over.

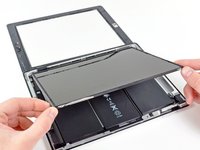
    • Lift the LCD from its long edge farthest from the digitizer cable and gently flip it toward the rear case—like closing a book.

    • While holding the LCD up, gently slide the front panel away from the iPad. Be careful not to snag the digitizer cable on the rear case or LCD.

    • Set the LCD back into the body for safekeeping.

crwdns2915888:0crwdne2915888:0

To reassemble your device, follow these instructions in reverse order.

crwdns2935229:04crwdne2935229:0

crwdns2947821:0crwdne2947821:0

crwdns2947823:0crwdne2947823:0

ZFix

crwdns2935283:012/09/13crwdne2935283:0

194,733 crwdns2915208:0crwdne2915208:0

crwdns2935297:0330crwdne2935297:0

crwdns2915084:0crwdne2915084:0

Master Techs crwdns2935289:0Master Techscrwdne2935289:0

Community

crwdns2931471:0326crwdne2931471:0

crwdns2935297:01,382crwdne2935297:0

crwdns2947410:01crwdne2947410:0

We replaced the screen successfully and it turns on all looks beautiful except the touch screen isn’t working at all—any thoughts? We are beginners

shelley fiedler - crwdns2934203:0crwdne2934203:0

crwdns2917038:0crwdne2917038:0

crwdns2936625:0crwdne2936625:0:

crwdns2936751:024crwdne2936751:0 0

crwdns2936753:07crwdne2936753:0 0

crwdns2936753:030crwdne2936753:0 7

crwdns2942667:0crwdne2942667:0 4,492