crwdns2915892:0crwdne2915892:0
This guide will help you replace the power supply.
crwdns2942213:0crwdne2942213:0
-
crwdns2935267:0crwdne2935267:0Heavy-Duty Suction Cups (Pair)$14.95
-
Stick a heavy-duty suction cup near each of the two top corners of the glass panel.
-
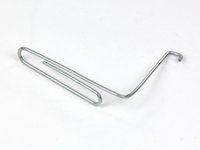
While lightly holding the suction cup against the glass, raise the movable handle until it is parallel with the other handle (as indicated by the third picture).
-
-
-
Gently lift the glass panel perpendicular to the face of the LCD, enough to clear the steel mounting pins attached along the underside of the top edge of the glass panel.
-
Pull the glass panel away from the lower edge of the iMac and carefully set it aside.
-
-
-
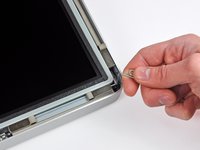
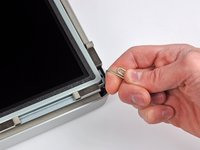
Remove the eight T10 Torx screws securing the LCD to the outer case.
-
-
crwdns2935267:0crwdne2935267:0Tweezers$3.99
-
Carefully lay the iMac stand-side down on a flat surface.
-
Use a thin hooked tool to lift one side of the top edge of the display by its steel outer frame.
-
Raise and hold the display high enough to access the cables.
-
-
-
Disconnect the vertical sync cable in the upper left corner of the screen. Use the tip of a spudger to push on the connector's side tabs and gently walk it out of its socket.
-
-
-
-
Disconnect the LED backlight driver cable with your hand by pressing the tab down and sliding it towards the bottom of the display.
-
-
-
Pull the black tab straight up to disconnect the latch on the display data cable ZIF connector.
-
Continue to pull the black tab up toward the top of the device, to detach the display data cable.
-
-
-
Use the tip of a spudger to disconnect the display power cable next to the display data cable.
-
-
-
Carefully pull the display toward the top edge of your iMac and lift it out of the iMac case.
-
-
-
Lay the display face down on a flat, soft surface.
-
If there is a wire or cable underneath adhesive tape, always pull the tape off first. Do not pull on the cable directly.
-
If the cable is glued to the chassis, use a heated iOpener or a hair dryer to soften the adhesive first. You can then slide an opening pick underneath the cable to loosen it. Never pull on the delicate connectors.
-
Slide an opening pick underneath the foam cushion pieces to separate them from the display, and gently pull them off. You may need some double sided tape to re-attach them to the new display.
-
-
-
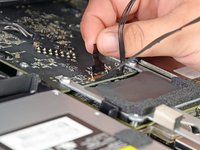
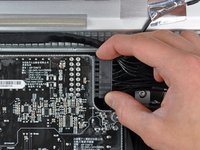
Disconnect the DC power cable by using your index finger to depress the locking mechanism on the back of the connector while you pull the connector away from its socket on the power supply.
-
Once the locking mechanism has cleared the socket, pull the DC power connector away from the power supply.
-
-
-
Disconnect the AC power inlet cable by depressing the locking mechanism while pulling the connector away from its socket.
-
-
-
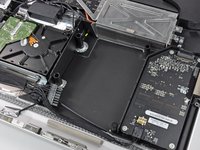
Remove the following screws securing the power supply to the outer case:
-
Two fine-thread shouldered T10 Torx
-
One coarse-thread shouldered T10 Torx
-
One short coarse-thread T10 Torx
-
-
-
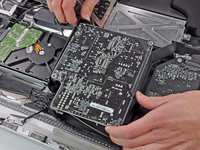
Lift the power supply out of the outer case while gently de-routing it from any wires that may get caught.
-


To reassemble your device, follow these instructions in reverse order.
crwdns2935221:0crwdne2935221:0
crwdns2935229:0125crwdne2935229:0

crwdns2947412:027crwdne2947412:0
It was a bit nerve wracking when it came to the ZIF connector because it is so small and delicate and my eyesight is not great. However I did disconnect and reconnect without damaging. The paperclip tool is a very good recommendation and luckily I had a couple of oversized ones which I have not added to my tool kit. I would suggest making two to allow you to pull on both sides at the same time. So I put everything back together again and now we have a beautifully silent (working!!) iMac. We had got so used to the constant buzzing noise so it is now fantastic to have silence. I am looking forward to repairing more!! One idea that I have is to buy a broken mac air on ebay and repair that for my son.
Restez très précis, n'y allez pas en force cela ne sert à rien. La seule chose qui n'est pas indiquée mais qui va vous sauver la vie, munissez-vous d'une bombe d'air sec pour pouvoir dépoussiérer les surfaces des écrans (protection écran) une fois mises à jour. Car même dans une pièce très propre, une fine poussière se dépose et une fois fermé, c'est terminé ! @++
Great guide, I made my repairs and it was easier than it seemed--The paper clip and the pen caps were innovative work arounds to having a third hand. Unfortunately, this did not fix my iMac from intermittently turning off. The computer worked for about 25 minutes before it shutdown again. Now I cannot turn it back on, next weekend I will go back into the machine to try again. Regardless, the guide and the tools gave me the confidence to try this repair. Thanks!
Excellent guide, easily replaced the power supply and my iMac is back to normal.
Thank you ifixit!
how do i exactly know its my power supply that needs replacement ??? when i plug in the computer and press the power button nothing happens at all ???