crwdns2915892:0crwdne2915892:0
Backlight not working? Use this guide to replace a broken LED driver board.
crwdns2942213:0crwdne2942213:0
-
crwdns2935267:0crwdne2935267:0Heavy-Duty Suction Cups (Pair)$14.95
-
Stick a heavy-duty suction cup near each of the two top corners of the glass panel.
-
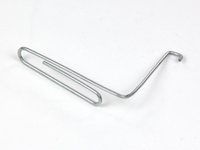
While lightly holding the suction cup against the glass, raise the movable handle until it is parallel with the other handle (as indicated by the third picture).
-
-
-
Gently lift the glass panel perpendicular to the face of the LCD, enough to clear the steel mounting pins attached along the underside of the top edge of the glass panel.
-
Pull the glass panel away from the lower edge of the iMac and carefully set it aside.
-
-
-
Remove the eight T10 Torx screws securing the LCD to the outer case.
-
-
-
Carefully lay the iMac stand-side down on a flat surface.
-
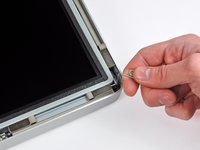
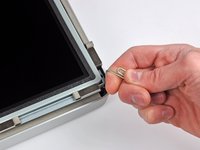
Use a thin hooked tool to lift one side of the top edge of the display by its steel outer frame.
-
-
-
crwdns2935267:0crwdne2935267:0Tweezers$4.99
-
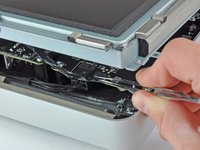
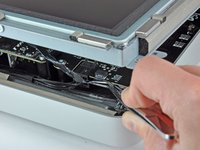
Use a pair of tweezers to pull the vertical sync ribbon cable out of its socket on the LED driver board near the top left corner of your iMac.
-
-
-
Rotate the display out of the outer case enough to disconnect the LED backlight power cable from the LED driver board.
-
-
-
Squeeze the two display data cable connector arms together to unlock it from its socket on the logic board.
-
Pull the display data cable connector away from its socket on the logic board.
-
-
-
Lift the display for enough clearance to disconnect the LCD thermal sensor cable connector from its socket on the logic board.
-
-
-
Carefully pull the display toward the top edge of your iMac and lift it out of the outer case.
-
-
-
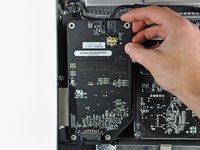
Remove the four T10 Torx screws securing the LED driver board to the outer case.
-
-
-
Lift the LED driver board out of its recess in the outer case, minding the DC-In cable still attaching it to the power supply.
-
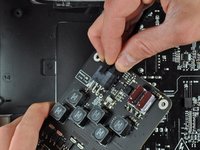
Disconnect the DC-In cable by depressing the locking mechanism while pulling the connector away from its socket on the LED driver board.
-


To reassemble your device, follow these instructions in reverse order.
To reassemble your device, follow these instructions in reverse order.
crwdns2935221:0crwdne2935221:0
crwdns2935229:011crwdne2935229:0

