crwdns2933423:0crwdne2933423:0

iMac Intel 21.5" EMC 2805 Hard Drive Replacement

crwdns2942213:0crwdne2942213:0

  1. iMac Intel 21.5" EMC 2805 Hard Drive Replacement, Display Assembly: crwdns2935265:01crwdnd2935265:01crwdnd2935265:01crwdne2935265:0
    crwdns2935267:0crwdne2935267:0
    iMac Intel 21.5" Cardboard Service Wedge
    $4.99
    crwdns2942207:0crwdne2942207:0
    • With the hinge free to move, the iMac will be unbalanced and hard to work on. Repairs are fast and easy with an iMac service wedge, but can be completed without one.

    • If you are using the iFixit cardboard service wedge, follow these assembly directions to put it together.

    • Before beginning any work on your iMac: Unplug the computer and press and hold the power button for ten seconds to discharge the power supply's capacitors.

    • Be very careful not to touch the capacitor leads or any exposed solder joints on the back of the power supply. Only handle the board by the edges.

  2. iMac Intel 21.5" EMC 2805 Hard Drive Replacement: crwdns2935265:02crwdnd2935265:01crwdnd2935265:02crwdne2935265:0 iMac Intel 21.5" EMC 2805 Hard Drive Replacement: crwdns2935265:02crwdnd2935265:02crwdnd2935265:02crwdne2935265:0
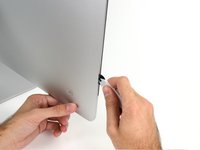
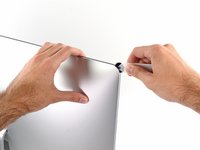
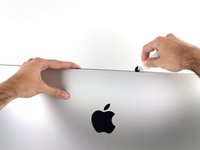
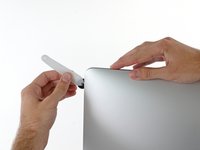
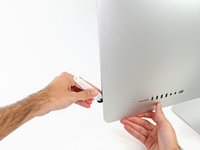
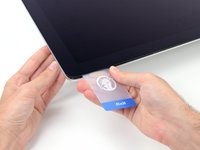
    • Starting on the left of the display, near the power button, insert the iMac Opening Tool into the gap between the glass panel and the rear enclosure.

    • The hub on the iMac Opening Tool will keep you from pushing the wheel in too far. If using a different tool, insert no more than 3/8" into the display. Otherwise, you risk severing antenna cables and causing serious damage.

  3. iMac Intel 21.5" EMC 2805 Hard Drive Replacement: crwdns2935265:03crwdnd2935265:01crwdnd2935265:03crwdne2935265:0 iMac Intel 21.5" EMC 2805 Hard Drive Replacement: crwdns2935265:03crwdnd2935265:02crwdnd2935265:03crwdne2935265:0 iMac Intel 21.5" EMC 2805 Hard Drive Replacement: crwdns2935265:03crwdnd2935265:03crwdnd2935265:03crwdne2935265:0
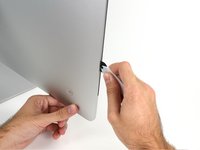
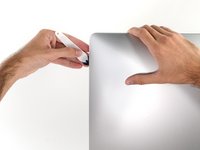
    • Use the tool like a pizza cutter—roll it along through the gap, and it will cut the foam adhesive through the center.

    • Be sure to always push with the handle behind the cutting wheel. If you pull, the wheel might get pulled out of the handle.

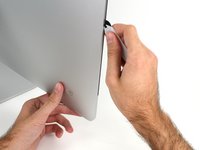
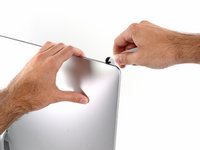
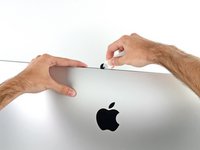
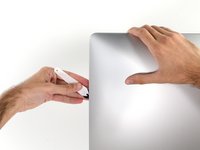
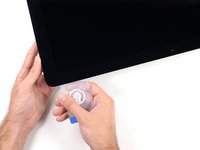
    • Run the tool up along the left side of the display.

  4. iMac Intel 21.5" EMC 2805 Hard Drive Replacement: crwdns2935265:04crwdnd2935265:01crwdnd2935265:03crwdne2935265:0 iMac Intel 21.5" EMC 2805 Hard Drive Replacement: crwdns2935265:04crwdnd2935265:02crwdnd2935265:03crwdne2935265:0 iMac Intel 21.5" EMC 2805 Hard Drive Replacement: crwdns2935265:04crwdnd2935265:03crwdnd2935265:03crwdne2935265:0
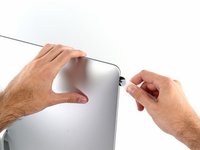
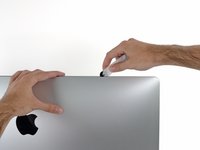
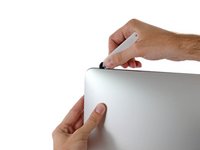
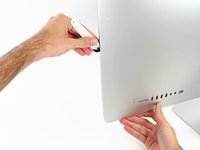
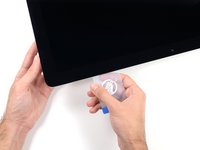
    • Continue running the tool up around the top left corner.

  5. iMac Intel 21.5" EMC 2805 Hard Drive Replacement: crwdns2935265:05crwdnd2935265:01crwdnd2935265:02crwdne2935265:0 iMac Intel 21.5" EMC 2805 Hard Drive Replacement: crwdns2935265:05crwdnd2935265:02crwdnd2935265:02crwdne2935265:0
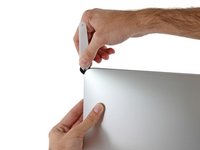
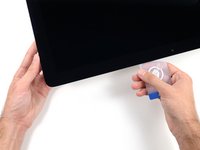
    • Cut the adhesive along the top left of the display.

  6. iMac Intel 21.5" EMC 2805 Hard Drive Replacement: crwdns2935265:06crwdnd2935265:01crwdnd2935265:02crwdne2935265:0 iMac Intel 21.5" EMC 2805 Hard Drive Replacement: crwdns2935265:06crwdnd2935265:02crwdnd2935265:02crwdne2935265:0
    • Continue along the top of the display.

    • You may want to run the tool back and forth through what you've already cut a few times, to ensure you get as much of the adhesive separated as possible.

  7. iMac Intel 21.5" EMC 2805 Hard Drive Replacement: crwdns2935265:07crwdnd2935265:01crwdnd2935265:03crwdne2935265:0 iMac Intel 21.5" EMC 2805 Hard Drive Replacement: crwdns2935265:07crwdnd2935265:02crwdnd2935265:03crwdne2935265:0 iMac Intel 21.5" EMC 2805 Hard Drive Replacement: crwdns2935265:07crwdnd2935265:03crwdnd2935265:03crwdne2935265:0
    • Push the tool around the top right corner of the display.

  8. iMac Intel 21.5" EMC 2805 Hard Drive Replacement: crwdns2935265:08crwdnd2935265:01crwdnd2935265:02crwdne2935265:0 iMac Intel 21.5" EMC 2805 Hard Drive Replacement: crwdns2935265:08crwdnd2935265:02crwdnd2935265:02crwdne2935265:0
    • Wheel the tool down along the right side of the display.

  9. iMac Intel 21.5" EMC 2805 Hard Drive Replacement: crwdns2935265:09crwdnd2935265:01crwdnd2935265:02crwdne2935265:0 iMac Intel 21.5" EMC 2805 Hard Drive Replacement: crwdns2935265:09crwdnd2935265:02crwdnd2935265:02crwdne2935265:0
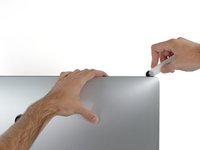
    • Finish pushing the opening tool to the bottom of the right side of the display.

    • At this point, you'll want to run the tool back around the entire display, to ensure you cut as much adhesive as possible.

  10. iMac Intel 21.5" EMC 2805 Hard Drive Replacement: crwdns2935265:010crwdnd2935265:01crwdnd2935265:03crwdne2935265:0 iMac Intel 21.5" EMC 2805 Hard Drive Replacement: crwdns2935265:010crwdnd2935265:02crwdnd2935265:03crwdne2935265:0 iMac Intel 21.5" EMC 2805 Hard Drive Replacement: crwdns2935265:010crwdnd2935265:03crwdnd2935265:03crwdne2935265:0
    crwdns2935267:0crwdne2935267:0
    Plastic Cards
    $2.99
    crwdns2942207:0crwdne2942207:0
    • While the opening tool cut most of the adhesive, the display will still be slightly adhered to the case. A plastic card will be necessary to free up the last of this adhesive.

    • Set the iMac face-up on a table.

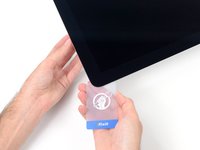
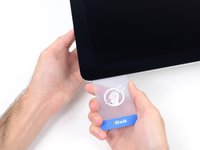
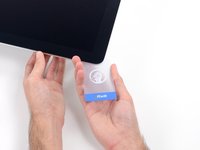
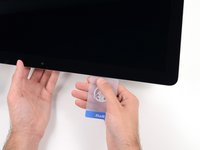
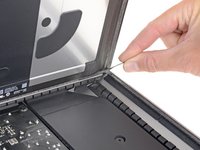
    • Starting from the top right corner of the iMac, wedge a plastic card between the display and frame.

    • Be careful not to insert the plastic card more than 3/8", or you may damage internal components.

  11. iMac Intel 21.5" EMC 2805 Hard Drive Replacement: crwdns2935265:011crwdnd2935265:01crwdnd2935265:02crwdne2935265:0 iMac Intel 21.5" EMC 2805 Hard Drive Replacement: crwdns2935265:011crwdnd2935265:02crwdnd2935265:02crwdne2935265:0
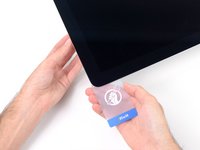
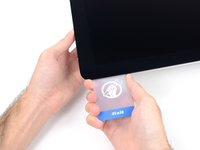
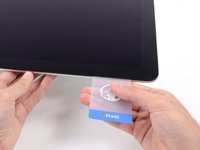
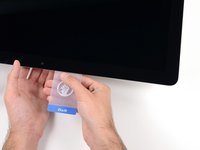
    • Gently twist the plastic card sideways to create a gap between the display and frame.

    • Move slowly and be careful not to stress the display glass too much—you only need to make a gap of about 1/4".

  12. iMac Intel 21.5" EMC 2805 Hard Drive Replacement: crwdns2935265:012crwdnd2935265:01crwdnd2935265:03crwdne2935265:0 iMac Intel 21.5" EMC 2805 Hard Drive Replacement: crwdns2935265:012crwdnd2935265:02crwdnd2935265:03crwdne2935265:0 iMac Intel 21.5" EMC 2805 Hard Drive Replacement: crwdns2935265:012crwdnd2935265:03crwdnd2935265:03crwdne2935265:0
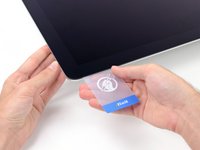
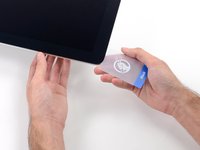
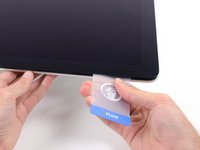
    • Slide the card toward the center of the display to cut any of the remaining adhesive along the top right corner of the iMac.

    • Be sure to stop before the iSight camera, or you may damage it.

  13. iMac Intel 21.5" EMC 2805 Hard Drive Replacement: crwdns2935265:013crwdnd2935265:01crwdnd2935265:02crwdne2935265:0 iMac Intel 21.5" EMC 2805 Hard Drive Replacement: crwdns2935265:013crwdnd2935265:02crwdnd2935265:02crwdne2935265:0
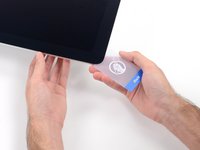
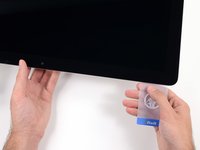
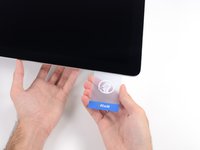
    • Wedge the plastic card into the top right corner once again, and leave it there to prevent the adhesive from resticking.

  14. iMac Intel 21.5" EMC 2805 Hard Drive Replacement: crwdns2935265:014crwdnd2935265:01crwdnd2935265:03crwdne2935265:0 iMac Intel 21.5" EMC 2805 Hard Drive Replacement: crwdns2935265:014crwdnd2935265:02crwdnd2935265:03crwdne2935265:0 iMac Intel 21.5" EMC 2805 Hard Drive Replacement: crwdns2935265:014crwdnd2935265:03crwdnd2935265:03crwdne2935265:0
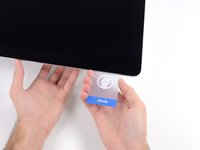
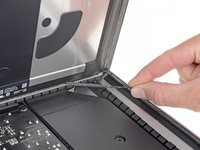
    • Insert a second plastic card into the gap between the display and frame near the top left corner of the iMac.

  15. iMac Intel 21.5" EMC 2805 Hard Drive Replacement: crwdns2935265:015crwdnd2935265:01crwdnd2935265:02crwdne2935265:0 iMac Intel 21.5" EMC 2805 Hard Drive Replacement: crwdns2935265:015crwdnd2935265:02crwdnd2935265:02crwdne2935265:0
    • Gently twist the card upward, slightly increasing the space between the display and frame.

    • As with the other side, twist slowly to allow the adhesive time to separate, and be careful not to over-stress the display glass.

  16. iMac Intel 21.5" EMC 2805 Hard Drive Replacement: crwdns2935265:016crwdnd2935265:01crwdnd2935265:03crwdne2935265:0 iMac Intel 21.5" EMC 2805 Hard Drive Replacement: crwdns2935265:016crwdnd2935265:02crwdnd2935265:03crwdne2935265:0 iMac Intel 21.5" EMC 2805 Hard Drive Replacement: crwdns2935265:016crwdnd2935265:03crwdnd2935265:03crwdne2935265:0
    • Slide the plastic card toward the center, again stopping just before the iSight camera.

  17. iMac Intel 21.5" EMC 2805 Hard Drive Replacement: crwdns2935265:017crwdnd2935265:01crwdnd2935265:02crwdne2935265:0 iMac Intel 21.5" EMC 2805 Hard Drive Replacement: crwdns2935265:017crwdnd2935265:02crwdnd2935265:02crwdne2935265:0
    • Wedge the plastic card back into the top left corner.

  18. iMac Intel 21.5" EMC 2805 Hard Drive Replacement: crwdns2935265:018crwdnd2935265:01crwdnd2935265:03crwdne2935265:0 iMac Intel 21.5" EMC 2805 Hard Drive Replacement: crwdns2935265:018crwdnd2935265:02crwdnd2935265:03crwdne2935265:0 iMac Intel 21.5" EMC 2805 Hard Drive Replacement: crwdns2935265:018crwdnd2935265:03crwdnd2935265:03crwdne2935265:0
    • With both plastic cards inserted as shown near the corners, gently twist the cards sideways to increase the gap between display and case.

    • If there are any sections that seem to stick and won't separate, stop twisting and use one of the cards to cut the remaining adhesive.

    • Begin to lift the top of the display up from the frame.

    • Only lift the display a few inches—the display data and power cables are still connected to the logic board.

  19. iMac Intel 21.5" EMC 2805 Hard Drive Replacement, Display Assembly Cables: crwdns2935265:019crwdnd2935265:01crwdnd2935265:03crwdne2935265:0 iMac Intel 21.5" EMC 2805 Hard Drive Replacement, Display Assembly Cables: crwdns2935265:019crwdnd2935265:02crwdnd2935265:03crwdne2935265:0 iMac Intel 21.5" EMC 2805 Hard Drive Replacement, Display Assembly Cables: crwdns2935265:019crwdnd2935265:03crwdnd2935265:03crwdne2935265:0
    • Use a pair of tweezers to flip up the metal retaining bracket on the display data cable.

    • Carefully pull the display data cable from its socket on the logic board.

    • Be sure to pull the display data cable connector straight out of its socket.

  20. iMac Intel 21.5" EMC 2805 Hard Drive Replacement: crwdns2935265:020crwdnd2935265:01crwdnd2935265:02crwdne2935265:0 iMac Intel 21.5" EMC 2805 Hard Drive Replacement: crwdns2935265:020crwdnd2935265:02crwdnd2935265:02crwdne2935265:0
    • While holding the display up with one hand, use the other hand to unplug the display power cable.

    • Lift the display up enough to have easy access to the connector, but not so much that you stretch the cables and stress their connections (about 8").

  21. iMac Intel 21.5" EMC 2805 Hard Drive Replacement, Display: crwdns2935265:021crwdnd2935265:01crwdnd2935265:02crwdne2935265:0 iMac Intel 21.5" EMC 2805 Hard Drive Replacement, Display: crwdns2935265:021crwdnd2935265:02crwdnd2935265:02crwdne2935265:0
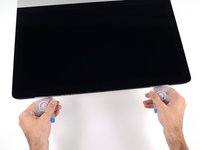
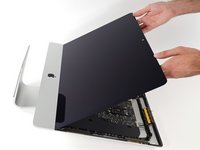
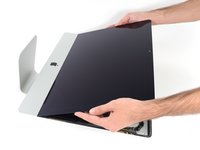
    • Lift the display up to a near-vertical position.

    • At this point there is still a strip of adhesive along the bottom of the display, that will hold the display to the frame like a hinge. You can loosen this adhesive by working the display up and down a few times.

  22. iMac Intel 21.5" EMC 2805 Hard Drive Replacement: crwdns2935265:022crwdnd2935265:01crwdnd2935265:03crwdne2935265:0 iMac Intel 21.5" EMC 2805 Hard Drive Replacement: crwdns2935265:022crwdnd2935265:02crwdnd2935265:03crwdne2935265:0 iMac Intel 21.5" EMC 2805 Hard Drive Replacement: crwdns2935265:022crwdnd2935265:03crwdnd2935265:03crwdne2935265:0
    crwdns2935267:0crwdne2935267:0
    Plastic Cards
    $2.99
    crwdns2942207:0crwdne2942207:0
    • Be very careful not to touch the capacitor leads or any exposed solder joints on the back of the power supply (boxed in red).

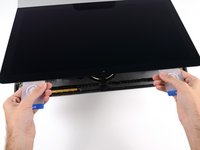
    • Grasp the small tab at the end of one of the bottom edge display adhesive strips and pull the adhesive toward the top of the iMac to remove it.

    • Repeat this step with the other adhesive strip and remove it.

    • If either adhesive strip breaks before it's removed, use a plastic card to slice through the remaining adhesive.

  23. iMac Intel 21.5" EMC 2805 Hard Drive Replacement: crwdns2935265:023crwdnd2935265:01crwdnd2935265:03crwdne2935265:0 iMac Intel 21.5" EMC 2805 Hard Drive Replacement: crwdns2935265:023crwdnd2935265:02crwdnd2935265:03crwdne2935265:0 iMac Intel 21.5" EMC 2805 Hard Drive Replacement: crwdns2935265:023crwdnd2935265:03crwdnd2935265:03crwdne2935265:0
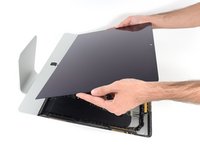
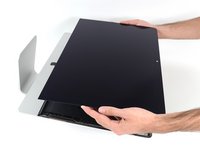
    • Lift the display up from the frame and remove it from the iMac.

    • It may be necessary to slowly lift from one side, to peel against the remaining adhesive.

    • Be very careful handling the display—it's big, heavy, and made of glass.

    • If you're replacing the display with a new one, you may need to transfer some components from the old display to the new display.

    • During reassembly, head over to our display adhesive guide to install the new adhesive.

  24. iMac Intel 21.5" EMC 2805 Hard Drive Replacement, Hard Drive Brackets: crwdns2935265:024crwdnd2935265:01crwdnd2935265:01crwdne2935265:0
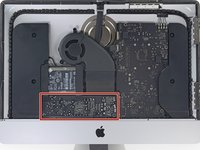
    • Remove the following screws securing the hard drive bracket to the rear enclosure:

    • Two 21 mm T10 Torx screws from the left-hand hard drive bracket.

    • One 9 mm T10 Torx screw.

    • One 27 mm T10 Torx screw.

  25. iMac Intel 21.5" EMC 2805 Hard Drive Replacement: crwdns2935265:025crwdnd2935265:01crwdnd2935265:02crwdne2935265:0 iMac Intel 21.5" EMC 2805 Hard Drive Replacement: crwdns2935265:025crwdnd2935265:02crwdnd2935265:02crwdne2935265:0
    • Remove the left and right hard drive brackets from the iMac.

  26. iMac Intel 21.5" EMC 2805 Hard Drive Replacement, Hard Drive Assembly: crwdns2935265:026crwdnd2935265:01crwdnd2935265:03crwdne2935265:0 iMac Intel 21.5" EMC 2805 Hard Drive Replacement, Hard Drive Assembly: crwdns2935265:026crwdnd2935265:02crwdnd2935265:03crwdne2935265:0 iMac Intel 21.5" EMC 2805 Hard Drive Replacement, Hard Drive Assembly: crwdns2935265:026crwdnd2935265:03crwdnd2935265:03crwdne2935265:0
    • Lift the hard drive from the edge nearest the logic board and pull it slightly out of its recess.

    • The hard drive is attached by a single SATA power/data cable, do not attempt to fully remove it from the iMac.

  27. iMac Intel 21.5" EMC 2805 Hard Drive Replacement: crwdns2935265:027crwdnd2935265:01crwdnd2935265:03crwdne2935265:0 iMac Intel 21.5" EMC 2805 Hard Drive Replacement: crwdns2935265:027crwdnd2935265:02crwdnd2935265:03crwdne2935265:0 iMac Intel 21.5" EMC 2805 Hard Drive Replacement: crwdns2935265:027crwdnd2935265:03crwdnd2935265:03crwdne2935265:0
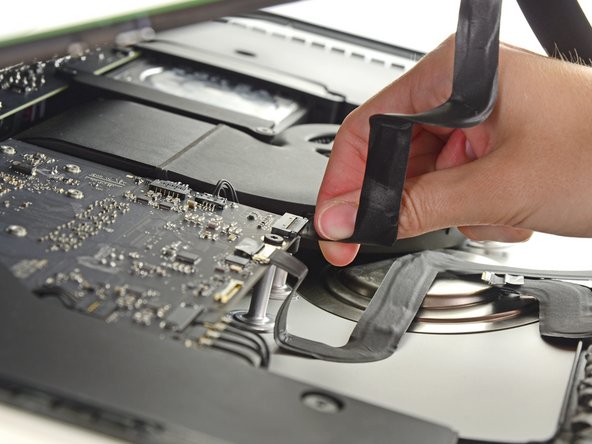
    • Use a spudger to disconnect the single SATA power and data combo cable.

  28. iMac Intel 21.5" EMC 2805 Hard Drive Replacement: crwdns2935265:028crwdnd2935265:01crwdnd2935265:01crwdne2935265:0
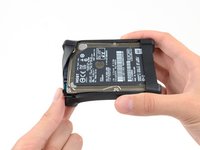
    • Remove the hard drive from the iMac.

  29. iMac Intel 21.5" EMC 2805 Hard Drive Replacement, Hard Drive: crwdns2935265:029crwdnd2935265:01crwdnd2935265:02crwdne2935265:0 iMac Intel 21.5" EMC 2805 Hard Drive Replacement, Hard Drive: crwdns2935265:029crwdnd2935265:02crwdnd2935265:02crwdne2935265:0
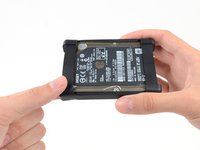
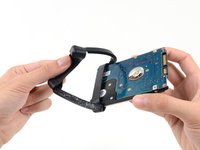
    • Peel the flexible hard drive sleeve off the top left corner of the hard drive.

  30. iMac Intel 21.5" EMC 2805 Hard Drive Replacement: crwdns2935265:030crwdnd2935265:01crwdnd2935265:02crwdne2935265:0 iMac Intel 21.5" EMC 2805 Hard Drive Replacement: crwdns2935265:030crwdnd2935265:02crwdnd2935265:02crwdne2935265:0
    • Continue peeling the hard drive sleeve off the adhesive securing it to the hard drive.

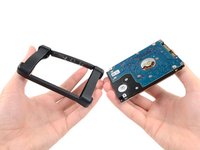
    • Remove the sleeve from the hard drive.

    • Hard Drive remains.

crwdns2915888:0crwdne2915888:0

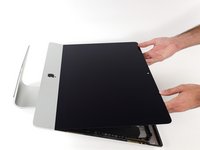
To reassemble your device, follow these instructions in reverse and use our Adhesive Strips Guide to reattach the display glass.

crwdns2935229:070crwdne2935229:0

Walter Galan

693 936 crwdns2915208:0crwdne2915208:0

crwdns2935297:01 203crwdne2935297:0

crwdns2944067:019crwdne2944067:0

Is there a problem with the fan if I install SSD?

asrugo770 - crwdns2934203:0crwdne2934203:0

Yes. There is a thermal sensor, which is going crazy after replacement.

And also have a problem with kernel_task after upgrade...

markeev -

is there a solution about the termal sensor and the kernel_task issue?

Roberto Bonilla - crwdns2934203:0crwdne2934203:0

is there a solution about the termal sensor and the kernel_task issue?

i have the same problem, CPU 700 %…

roro974 - crwdns2934203:0crwdne2934203:0

I’ve run into the same thing: fans are running constantly with a new 1 TB 2.5” drive that I pulled from a 2012 iMac. I can use MacsFanControl as a 3rd party fix, but if anyone has a better (command line?) solution, I would be grateful!

Aaron Schine - crwdns2934203:0crwdne2934203:0

crwdns2917038:0crwdne2917038:0

crwdns2936625:0crwdne2936625:0:

crwdns2936751:024crwdne2936751:0 11

crwdns2936753:07crwdne2936753:0 60

crwdns2936753:030crwdne2936753:0 251

crwdns2942667:0crwdne2942667:0 55,126