crwdns2933423:0crwdne2933423:0

iMac Intel 21.5" EMC 2544 Heat Sink Assembly Replacement

crwdns2862623:0crwdne2862623:0
crwdns2942641:0crwdne2942641:0

crwdns2942213:0crwdne2942213:0

  1. iMac Intel 21.5" EMC 2544 Heat Sink Assembly Replacement, Heat Sink Assembly: crwdns2935265:01crwdnd2935265:01crwdnd2935265:03crwdne2935265:0 iMac Intel 21.5" EMC 2544 Heat Sink Assembly Replacement, Heat Sink Assembly: crwdns2935265:01crwdnd2935265:02crwdnd2935265:03crwdne2935265:0 iMac Intel 21.5" EMC 2544 Heat Sink Assembly Replacement, Heat Sink Assembly: crwdns2935265:01crwdnd2935265:03crwdnd2935265:03crwdne2935265:0
    • Disconnect and remove the SATA data and power cables from the logic board.

  2. iMac Intel 21.5" EMC 2544 Heat Sink Assembly Replacement: crwdns2935265:02crwdnd2935265:01crwdnd2935265:01crwdne2935265:0
    • Remove the four 12 mm T10 shoulder screws from the spring plate behind the CPU.

  3. iMac Intel 21.5" EMC 2544 Heat Sink Assembly Replacement: crwdns2935265:03crwdnd2935265:01crwdnd2935265:01crwdne2935265:0
    • Remove the spring plate from behind the CPU heat sink.

  4. iMac Intel 21.5" EMC 2544 Heat Sink Assembly Replacement: crwdns2935265:04crwdnd2935265:01crwdnd2935265:01crwdne2935265:0
    • Lift and remove the backing plate from behind the CPU heat sink.

    • The backing plate has two posts that fit into alignment holes in the logic board and heat sink.

  5. iMac Intel 21.5" EMC 2544 Heat Sink Assembly Replacement: crwdns2935265:05crwdnd2935265:01crwdnd2935265:02crwdne2935265:0 iMac Intel 21.5" EMC 2544 Heat Sink Assembly Replacement: crwdns2935265:05crwdnd2935265:02crwdnd2935265:02crwdne2935265:0
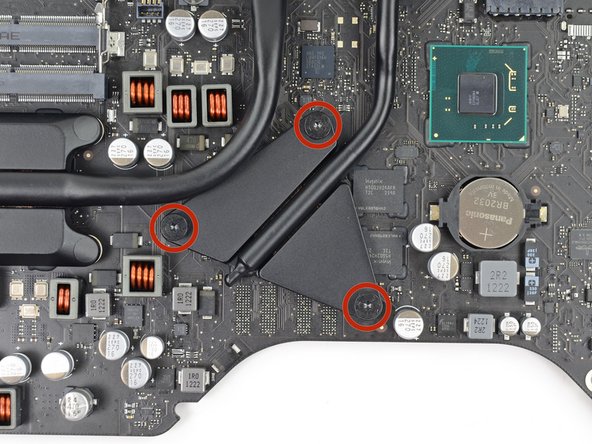
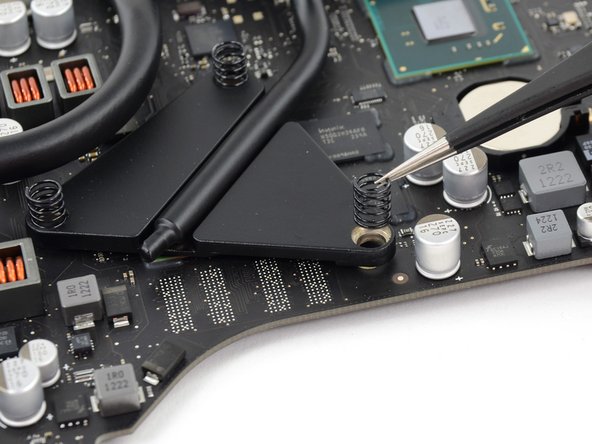
    • Remove the three 12 mm T8 Torx screws securing the GPU heat sink to the logic board.

    • Remove the three springs left behind.

    • These springs might come up with the screws; be careful not to lose track of them.

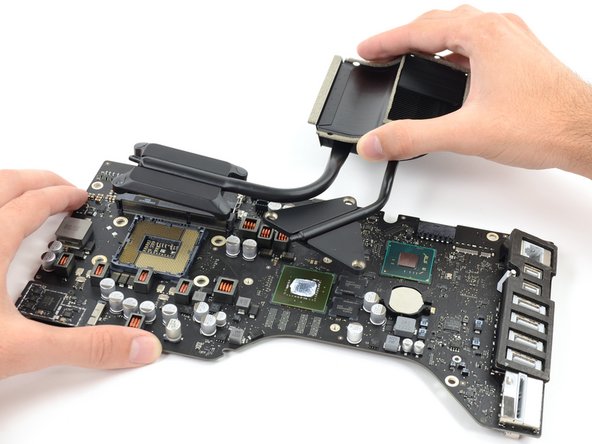
  6. iMac Intel 21.5" EMC 2544 Heat Sink Assembly Replacement: crwdns2935265:06crwdnd2935265:01crwdnd2935265:02crwdne2935265:0 iMac Intel 21.5" EMC 2544 Heat Sink Assembly Replacement: crwdns2935265:06crwdnd2935265:02crwdnd2935265:02crwdne2935265:0
    • Lift and remove the heat sink up off the logic board.

    • The CPU will most likely detach with the heat sink, so be careful about where you lay it down.

crwdns2915888:0crwdne2915888:0

To reassemble your device, follow these instructions in reverse order.

Sam Goldheart

crwdns2935283:010/18/12crwdne2935283:0

472,222 crwdns2915208:0crwdne2915208:0

crwdns2935297:0538crwdne2935297:0

crwdns2915084:0crwdne2915084:0

iFixit crwdns2935289:0iFixitcrwdne2935289:0

Staff

crwdns2931471:0121crwdne2931471:0

crwdns2935297:019,996crwdne2935297:0

crwdns2947412:00crwdne2947412:0

crwdns2917038:0crwdne2917038:0

crwdns2936625:0crwdne2936625:0:

crwdns2936751:024crwdne2936751:0 2

crwdns2936753:07crwdne2936753:0 3

crwdns2936753:030crwdne2936753:0 5

crwdns2942667:0crwdne2942667:0 57