crwdns2915892:0crwdne2915892:0
Use this guide to upgrade your CPU.
crwdns2942213:0crwdne2942213:0
-
-
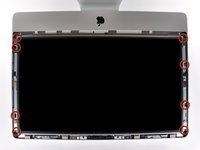
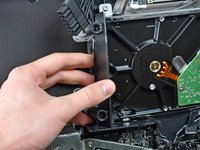
Loosen the three Phillips screws securing the access door to the bottom edge of your iMac.
-
Remove the access door from your iMac.
-
-
crwdns2935267:0crwdne2935267:0Heavy-Duty Suction Cups (Pair)$14.95
-
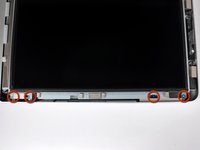
Stick a suction cup near each of the two top corners of the glass panel.
-
If your suction cups refuse to stick, try cleaning both the glass panel and the suction cup with a mild solvent.
-
-
-
Gently lift the glass panel perpendicular to the face of the LCD enough to clear the steel mounting pins attached along the underside of the top edge of the glass panel.
-
Pull the glass panel away from the lower edge of the iMac and carefully set it aside.
-
-
-
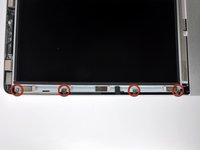
Remove the eight 8 mm T10 Torx screws securing the display to the outer case.
-
-
-
Slightly lift the top edge of the display out of the outer case.
-
-
-
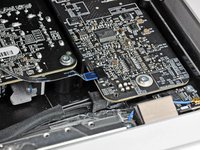
Pull the vertical sync ribbon cable out of its socket on the LED driver board near the top left corner of your iMac.
-
-
-
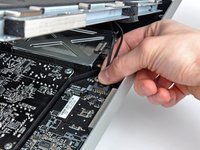
Rotate the display out of the outer case enough to disconnect the LED backlight power cable from the LED driver board.
-
-
-
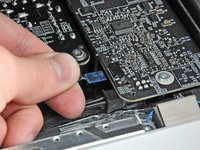
Squeeze the two display data cable connector arms together to unlock it from its socket on the logic board.
-
Pull the display data cable connector away from its socket on the logic board.
-
-
-
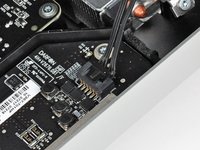
Disconnect the LCD thermal sensor cable connector from its socket on the logic board.
-
-
-
Carefully pull the display toward the top edge of your iMac and lift it out of the outer case, minding any cables that may get caught.
-
-
-
Remove the following four screws securing the power supply to the outer case:
-
Two 22.2 mm fine-thread T10 Torx
-
One 25 mm coarse-thread T10 Torx
-
One 9 mm coarse-thread T10 Torx
-
-
-
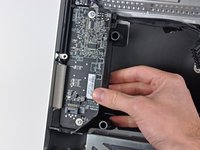
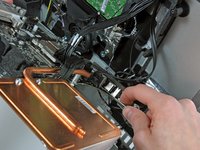
Carefully lift the power supply out of the outer case and rotate it to expose the cable lock as shown, minding the DC-Out cable still attaching it to the iMac.
-
Disconnect the DC-In cable by depressing the locking mechanism on the connector while you pull the connector away from its socket on the power supply.
-
Once the locking mechanism has cleared the socket, pull the DC-In connector away from the power supply.
-
-
-
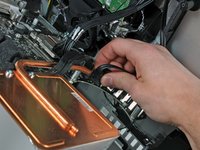
Disconnect the AC-In cable by depressing the locking mechanism while pulling the connector away from its socket.
-
Remove the power supply from the outer case.
-
-
-
Pull the optical drive thermal sensor connector straight away from its socket on the logic board.
-
-
-
-
Remove the four 9 mm T10 Torx screws securing the optical drive to the outer case.
-
-
-
Lift the inner edge of the optical drive and maneuver its connector past the frame attached to the logic board.
-
Carefully pull the optical drive off its mounting pins on the edge of the outer case to gain clearance for disconnecting the optical drive cable.
-
-
-
Use the flat end of a spudger to help disconnect the optical drive cable.
-
-
-
Remove the single 13 mm T10 Torx screw securing the optical drive fan to the outer case.
-
-
-
Pull the optical drive off the pins attached to the outer case.
-
-
-
Pull the optical drive fan connector away from its socket on the logic board.
-
Remove the optical drive fan from the iMac.
-
-
-
Pull the left and right speaker connectors toward the right side of the iMac to disconnect them from the logic board.
-
-
-
Disconnect the audio port cable by pulling its connector toward the right side of the iMac.
-
-
-
Disconnect the AirPort cable by lifting its connector off the socket on the logic board.
-
-
-
Disconnect the following cables by pulling their connectors toward the top edge of the iMac:
-
Camera cable
-
Hard drive thermal sensor
-
Hard drive fan
-
Microphone
-
Disconnect the following cables by pulling their connectors toward the right edge of the iMac:
-
Ambient temperature sensor
-
Bluetooth cable
-
-
-
Disconnect the CPU fan and power button by pulling their connectors toward the left edge of the iMac.
-
-
-
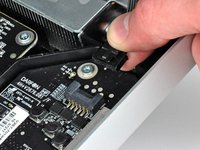
If present, remove the piece of tape covering the IR sensor connector.
-
Disconnect the IR sensor by pulling its connector toward the top edge of the iMac.
-
-
-
Use your fingers to lift IR sensor assembly straight up out of the outer case.
-
-
-
Remove the following six screws securing the logic board to the outer case:
-
Three 25 mm T10 Torx
-
Two 21.5 mm T10 Torx
-
One 7 mm T10 Torx
-
-
-
Remove the plastic ducts from the side of the LED driver board and the hard drive by pulling them away from the outer case.
-
-
-
Carefully remove the aluminum tape attaching the GPU heat sink to the outer case.
-
-
-
Carefully pull the logic board slightly away from the outer case.
-
While holding the board away from the outer case, rotate the board back and forth while lifting up to release it from the outer case.
-
-
-
Now that the lower edge of the board is free from the outer case, rotate the logic board toward yourself to expose its rear face.
-
Carefully pull the optical drive connector away from its socket on the logic board.
-
-
-
Disconnect the DC-In cable from the logic board by simultaneously depressing the locking lever on the connector while pulling it away from its socket.
-
Remove the logic board from the outer case.
-
-
crwdns2935267:0crwdne2935267:0Tweezers$4.99
-
Use a pair of tweezers to lift the heat sink thermal sensor connector straight up out of its socket on the logic board.
-
-
-
Remove the following six screws securing the heat sink to the logic board:
-
Five 6.5 mm T8 Torx
-
One 7 mm T10 Torx
-
-
-
Lift the heat sink bracket off the logic board.
-
-
-
Carefully lift the logic board off the heat sink.
-
-
-
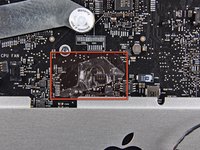
Carefully pull the CPU retaining bar away from the CPU socket.
-
Rotate the bar toward the center of the logic board.
-
-
-
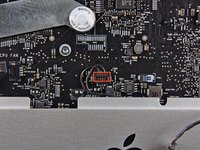
Rotate the CPU clamp away from the CPU.
-
-
-
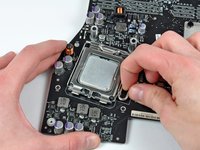
Carefully lift the CPU straight up off its socket.
-


To reassemble your device, follow these instructions in reverse order.
crwdns2935221:0crwdne2935221:0
crwdns2935229:032crwdne2935229:0

crwdns2947412:019crwdne2947412:0
Hello I fixit.!
Hello a lot of congrats! for your site! is very very helpfully for Mac Users
so. i have a question please if you want to help me.!
i have an i mac 21,5 late2009
3,06ghz intel core 2 duo
i have an idea to change the processor to. intel core i5 3,3 Ghz core
can be compatible . on main board .
thanks a lot for your time
These 21.5" (and 27") iMacs came with only either Core 2 Duo E7600 (3.06Ghz, 2 core, 65W TDP, LGA 775) or Core 2 Duo E8600 (3.33GHz, 2 core, 65W TDP, LGA 775), which are incompatible with any Core i5 as there are no Core i5's that were available on the LGA 775 socket these systems.
You might be able to upgrade to a Core 2 Quad Q9505S or Q9550S (2.83GHz, 4 core, 65W TDP LGA 775) which would provide 2 extra cores than the E7600/E8600 and work in the same socket but drop the max clocks to stay at the same 65W TDP power limit.
I installed a Q6700 Core 2 Quad into my late 2009 Core 2 Duo iMac.
Sadly it is not working, only recognize 2 Cores instead 4 under Windows 7.
Booting in the lates Mac OS, it gives up Kernel panic.
Any advise?
The Core 2 Quad Q6700 is a 105W TDP processor and the 21.5" & 27" iMacs running the Core 2 Duo E7600/E8600 only support 65W TDP LGA 775 Core 2 processors. If you wish to upgrade from the Core 2 Duo E7600/E8600 to a Core 2 Quad in these systems; I would recommend wither the Q9505S or Q9550S - specifically the "S" on there as those are the 65W TDP versions of the 105W TDP Q9505 and Q9550.
Windows is only allowing 2 of the 4 cores of that Q6700 to run to fit within the TDP of the system (particularly by regulating how much power the CPU can draw), and MacOS is panicking as it doesn't know how to handle the 105W the Q6700 is asking for on a 65W system.
Hello,
I'd like to upgrade the Core 2 Duo 3.06 CPU of my iMac 10,1 21.5". I already done the same operation in a white Core Duo iMac, being able to install the unsupported OS X 10.7. I'd like to do the same on the 10,1 but what CPU can I install? It seems that the i3, i5 or i7 are phisically different, am I right? And the user Tim report in being unable to make it work with a Core 2 Quad. So... what are the possibilities? Thanks!